
Let’s say you’ve been blogging for months, maybe years by now. You have dozens, perhaps hundreds, of blog posts live already. You did it—you’re doing it. You rock, you deserve to be proud of yourself (I mean that). Now that you’re in the game, it’s time to start republishing content and updating your older blog posts to stay fresh and help them generate more traffic — a strategy that matters more than ever in 2026, with AI search engines preferring fresh content and cited brands seeing a +35% CTR boost inside AI Overviews.
If you’re anything like me when I started blogging, you’re probably feelin that your past blog posts aren’t getting the kind of attention and traffic they deserve. Or if they are getting traffic, maybe those older posts no longer offer the best first impression for a new visitor if they’re outdated, poorly formatted, or reflect different views than you now hold.
Republishing content (updating old posts) keeps your content accurate, signals freshness to search engines, and improves your odds of being cited by AI engines like Google AI Overviews, ChatGPT, and Perplexity. It also saves you coming up with a new blog post idea each time you want to publish.
In this big ol’ guide to updating blog posts, I’ll show you exactly how to go about republishing content and updating old blog posts—but first, let’s take a quick look at the key reasons you’ll want to invest in this strategy moving forward.
Republishing Content: How to Update Old Blog Posts (Content Updates for More Traffic) in 2026
- 5 Reasons Why You Should Republish Content (Update Posts)
- Step 1. List Posts That Are a Year Old and Underperforming
- Step 2. Review the Keywords Your Post is Ranking For
- Step 3. Choose a Target Keyword
- Step 4. Rework Your Post to Match the Search Intent
- Step 5. Check Facts and Statistics Are Still Correct
- Step 6. Replace Any Broken or Outdated Links
- Step 7. Add Links to Related Content On Your Site
- Step 8. Revisit Your Call to Action
- Step 9. Add Value With “Extras” in Your Post
- Step 10. Run Your Post Through Grammarly (or Any Editing Tool)
- Step 11. Check Your On-Page SEO
- Step 12. Adjust Tags and Category if Needed
- Step 13. Don’t Change the URL
- Step 14. Consider Including an “Editor’s Note” at the Top
- How to Republish Your Updated Post in WordPress
Disclosure: Please note that some of the links below are affiliate links and at no additional cost to you, I’ll earn a commission. Know that I only recommend products and services I’ve personally used and stand behind. When you use one of my affiliate links, the company compensates me, which helps me run this blog and keep my in-depth content free of charge for readers (like you).
Want my Free SEO-Driven Blog Post Template?
Grab my free template to create your own traffic-driving content today.
"*" indicates required fields
5 Reasons Why You Should Republish Content (Update Blog Posts)
While republishing content won’t usually take as much time as coming up with high-quality new blog posts from scratch (you can use my free blog idea generator for that), it’s definitely still a meaningful time and energy investment, so don’t think this strategy is full e-z- mode. Now, why should you invest in updating & republishing content from across your blog?

Republishing content has a lot of advantages. Here are the top benefits I’ve experienced from updating my most important blog posts multiple times every year.
The 2026 shortcut: If you have dozens (or hundreds) of older posts to refresh, the 14-step process below is what you should know — but you don’t have to do it manually anymore. RightBlogger Agent is an AI agent that automates this entire workflow: it identifies your underperforming posts, audits each one for outdated facts and broken links, drafts content updates that match current search intent (including AI search citation patterns), and republishes through your WordPress site. Think of the rest of this guide as both a tutorial for doing it yourself and a checklist for understanding what Agent does on autopilot.
1. Makes Your Content More Likely to Rank Well
Search engines like content to be up to date—and simply the act of editing your post and hitting “update” could help your content to rank a little higher in organic Google search results.
Beyond that, when you update and republish your content, it’s going to be seen by more people. That could help you get links from other bloggers, which helps Google to see that your content is well-regarded. You’re likely to get more social shares, too.
2. You Can Apply Your Growing SEO Knowledge
Of course, you don’t want to leave good blog post rankings to chance! Updating old posts is the perfect way to apply everything you’ve learned about SEO (search engine optimization) to get more organic traffic.
For instance, you might not have understood much about keyword research back when you wrote one of your earliest blog posts. When you update that post, you could choose a primary keyword and make sure it’s included in the title, meta description, and a few times within the text of your post.
Use My Free Keyword Research Tool
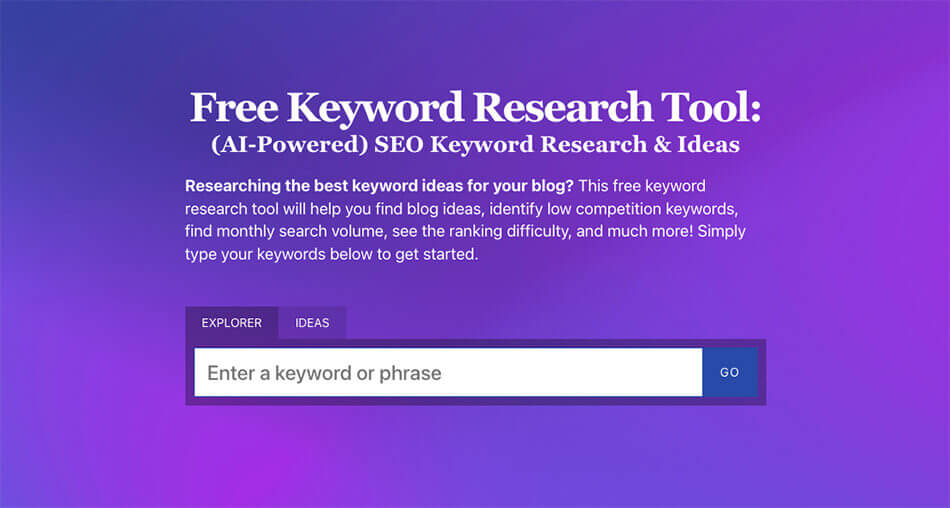
Try my free AI-Powered Keyword Tool to get dozens of research-backed ideas for keywords & topics to write about on your blog today.
3. Keeps Your Content Accurate and Up-to-Date
Updating your old content also helps you to keep everything accurate and fully up-to-date, providing a better user experience. This is particularly important in fast-moving blogging niches. For instance, if you wrote about social media demographics back in 2015, TikTok wasn’t even on the scene.
You may also find that, when you revisit old blog posts, you’ve made statements that you haven’t backed up—or even expressed opinions that you’ve changed your mind on over time. Updating your old content gives you a chance to edit these. Accurate, well-researched content is more likely to attract backlinks from other bloggers.
4. Lets You Link to More Recent Content, Services, and Products
If you wrote a post a year ago on say blogging statistics, chances are high that things have changed a bit since you last touched this post. You may have written another fifty or even a hundred posts since then, too—which means there are a lot of opportunities to link back to your statistics piece from your newer content (and vice-versa).
Perhaps you’ve launched new services or products throughout the past year. Some of those posts, services, and products might be related to the post that you’re updating—thus giving you an opportunity to surface your newer projects within your older content that already gets a bit more traffic.
Republishing old content lets you find opportunities to link to these things, helping you promote your blog’s products and services and boost conversions, or simply encouraging new readers to spend more time on your blog.
5. Saves Writing a Brand New Post Each Time
Most bloggers I know are very busy people—and even if you’re blogging full-time for a living, you’re probably spending lots of your time on activities like creating videos for YouTube, recording podcast episodes, posting on LinkedIn, creating products, sorting out technical issues, and so on.
Updating and republishing old posts can save you a lot of time, as you won’t need to come up with a whole new piece of content every time you want to publish something. This can also be really helpful during unusually busy periods—e.g. if you’re going on vacation for a couple of weeks or if you’ve just welcomed a new baby to your family.
Now that we’ve taken a look at why you’ll want to update old posts, let’s dig into how exactly to do that most effectively.
6. Republished Posts Get Cited More by AI Search Engines (New for 2026)
This reason didn’t exist when this guide was first written. Now that Google AI Overviews appear on 48% of SERPs and ChatGPT search/Perplexity/Gemini are eating into traditional clicks, getting cited by AI engines is increasingly valuable — and the data shows AI engines preferentially cite content that’s fresh, factually accurate, and well-structured.
The brands cited inside AI Overviews see a +35% click-through rate vs. those that aren’t (Seer Interactive data). Republishing your old content with refreshed facts, clear answer paragraphs near the top of sections, and current data points is one of the most direct ways to win AI citations — often without needing to rank in Google’s top 10 (only 38% of AI citations now come from top-10 pages, down from 76% earlier in 2025, per Ahrefs).
How to Update Your Old Blog Posts: 14 Steps to Take
You don’t necessarily have to go through every single step of this process for every blog post you update—but the more love you can give to each of the steps here, the stronger your republished blog post will be.

Step 1. List Posts That Are a Year Old and Underperforming
To maximize your efforts, it’s best to focus on past posts that are:
- At least a year old: If you only published a post a few months ago, it’s probably not worth updating it yet.
- Underperforming: That is, they’re not bringing in as much search engine traffic as you’d expect.
- Evergreen content: If you wrote a news article two years ago about the latest iPhone, there’s no point updating that post now.
Create a list of these posts—I recommend using a spreadsheet so you’re not relying on memory or a wall of sticky-notes. To find out which posts are bringing in low amounts of traffic, you can use Google Analytics or any similar analytics blogging tool.
In Google Analytics, go to Reports → Enagement → Pages and screens. Set the dates in the top right to the time period you want to look at (e.g. the previous month) and you can see your pages listed with their number of page views.
You can reverse-sort this list to bring up a list of the pages with the fewest page views:

Some of these pages might be search results pages from people searching your site, or things like your privacy policy or the landing page for an old product that you no longer sell. It doesn’t matter if hardly anyone is viewing those pages. Keep going down the list to look for blog posts that are underperforming instead.
Step 2. Review the Keywords Your Post is Ranking For
Next, figure out which keywords your post is ranking for. If it’s bringing in any search engine traffic at all, it’ll be ranking for something!
To find out what keywords your post is ranking for, you’ll need a Google Search Console account. In Google Search Console, you can go to Performance → Search results → Queries to check out the search queries (keywords) your content is ranking for.
In your list of posts, add the keyword(s) that each post is ranking for.
Step 3. Choose a Target Keyword
In many cases, the keyword you choose to target will be the one that your post is already ranking best for in SERPs (search engine results pages). But sometimes, there might be a different target keyword you want to use instead—perhaps one that gets a lot more search engine traffic.
There are lots of tools out there to help you choose keywords, like my very own free free keyword research tool. It gives you keyword volumes and indicates how hard that keyword will likely be to rank for (based on the amount of competition).
Use My Free Keyword Research Tool
Try my free AI-Powered Keyword Tool to get dozens of research-backed ideas for keywords & topics to write about on your blog today.
Step 4. Rework Your Post to Match the Search Intent
When someone searches for a particular keyword, they have a certain “search intent”—what they’re expecting to get as a result of that search.
For instance, if someone searches for “digital marketing ideas”, their search has what’s called “informational intent”. They’re looking for information: they’re probably not looking to buy something, so a blog post all about a new digital marketing product you’ve created probably won’t be a great fit.
You want your post to match up with the usual search intent for your keyword. That may mean reworking your post a little to make sure you’re delivering whatever someone searching for that keyword would expect.
2026 update: Also think about AI search intent separately. AI engines (Google AI Overviews, ChatGPT, Perplexity) summarize content for users who never click through — so make sure each section opens with a clear, scannable 2-3 sentence answer that AI can lift as a quotable snippet. The new discipline of optimizing for this is called GEO (Generative Engine Optimization).
Step 5. Check Facts and Statistics Are Still Correct
You wrote your old blog post a year or more ago—and things may well have changed since then. Perhaps you quoted a statistic, such as the percentage of internet users who are browsing on mobile devices, and that statistic has changed due to more recent research. Maybe you mentioned a celebrity who has now changed their name.
When you go through the text of your post, look out for any facts and statistics, and correct them if needed. Even something as simple as your business’s opening hours or where to find you on social media may have changed in the past year or more.
Step 6. Replace Any Broken or Outdated Links
Your next step is to check all the links in your post. Some links may be broken altogether: perhaps the webpage you’re linking to has a new URL, or the website has now gone. Other links may simply be outdated—there might be a more up-to-date source you could link to instead. There’s also probably new opportunities to add links for affiliate marketing purposes into your older content.
Go through, link by link, replacing any that are no longer working or relevant. This also goes for internal links (ones to other pages on your own site): make sure they’re still working, and consider whether you’ve created something more recent that you’d like to link to instead.
Doing this across hundreds of posts is exactly the kind of repetitive work AI is built for — RightBlogger Agent automatically scans your site for broken external links, identifies outdated references (acquired companies, shut-down platforms, rebrands), and proposes replacement links in bulk. If you only have 5-10 posts to refresh, doing it manually is fine. If you have 50+, automating this step alone saves dozens of hours.
Step 7. Add Links to Related Content On Your Site
As well as checking that all existing links to posts, pages, or resources on your website are accurate, you’ll also want to look for opportunities to add new internal links.
Some great places for adding a link are:
- Anywhere you mention a particular term or concept that you don’t have time to go into detail about in the post.
- At the end of your post, or even at the end of sections within your post, to offer extra resources on a topic.
- Whenever you talk about something related to a product or service that you have. Remember, plenty of users will come straight to this blog post—not to the homepage of your site first—so you want to be sure you don’t miss an opportunity to gain a new customer.
Step 8. Revisit Your Call to Action
Does your post have a clear call to action? Ideally, every blog post should have both a compelling blog conclusion and a meaningful, related call to action at the end—something that you’re encouraging the reader to do after reading your blog post.
Some calls to action are more useful to you than others. If your call to action invites the reader to leave a comment, that might be useful when you’re just getting your blog up and running, and trying to build an audience. But a year or more on, it might make sense to use your call to action to promote your email list or even a product.
Step 9. Add Value With “Extras” in Your Post
Is there anything you could add to your post to make it even more valuable and useful to your readers? In most cases, you’ll be able to find opportunities to do this. Take for example, this “extra” that encourages my readers to try all my free blogging tools:
Use My 50+ Powerful Free Blogging Tools Today
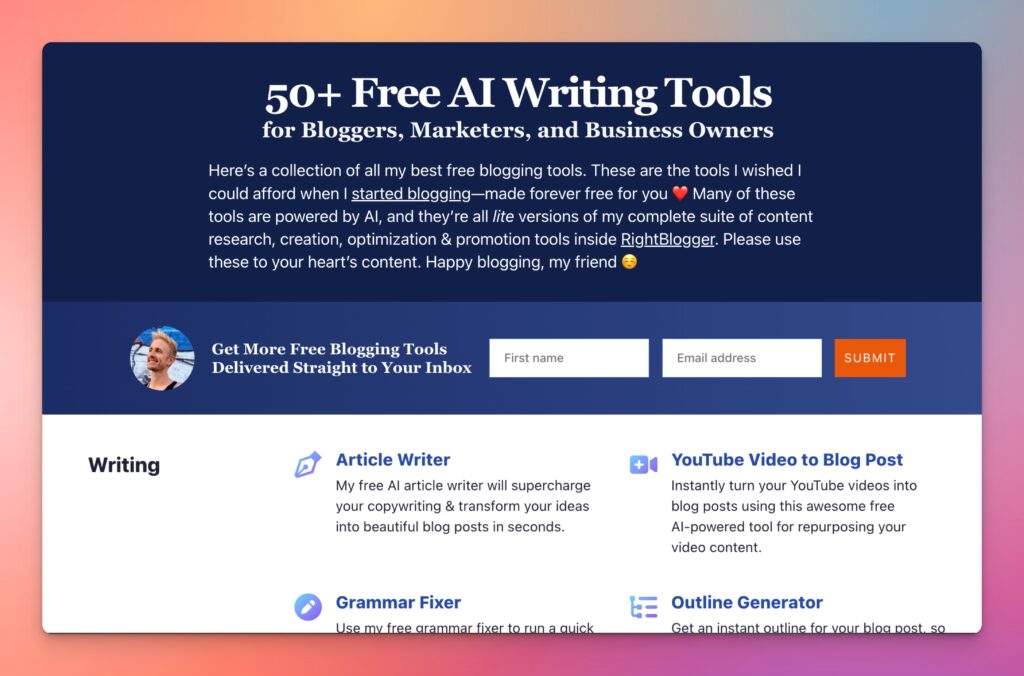
When I first started blogging, I couldn’t afford fancy tools. That sucked. And that’s why I’ve built a stable of powerful free blogging tools ranging from keyword research to an AI article writer, blog idea generator and more. Forever free for all to use—no strings attached.
For your blog, think about adding new sections like:
- Including practical tips that the reader can try right away.
- Adding links to further resources (yours or other people’s) on the topic.
- Putting more images into your post, to make it more visually appealing.
- Embedding a video that shows readers how to do something or adds a new angle.
- Including quotes from other people in your niche.
- Creating a table of contents that has links to jump the reader straight to the part of your post they’re most interested in.
The more useful you can make your post to your target audience, the more likely they are to read more posts on your blog, join your mailing list, and become a customer. Your original content may have been perfectly good, but by turning it into something closer to a complete guide, you may be able to get a lot of traffic.
Step 10. Run Your Post Through a Free Grammar Fixer or Editing Tool
It’s easy to miss your own typos and grammatical errors—even if you’re rewriting a post after a year or more. You might also end up introducing new errors: easy to do if you’re rewriting half a sentence or changing a statistic. That’s why I built a free grammar fixer tool.
While there’s no substitute for good self-editing and proofreading, a free tool like mine, or even Grammarly can help you catch mistakes that you might otherwise have missed. Before you finish your revisions to your post, make sure you run the text through an editing checker tool and fix any issues.
Step 11. Check Your On-Page SEO
On-page SEO is everything you do on your page (or blog post) itself to improve its search engine rankings. When you update an old blog post, that’s a great time to make sure you’ve got everything in place to rank well and get a great volume of search traffic.
Some of the basics you should check for are:
- Your SEO meta title uses your primary keyword (and perhaps even your secondary keyword(s) if possible).
- Your meta description uses your primary keyword (again, include your secondary keywords if you can do so easily and naturally).
- You’ve used subheadings to break up your post—and you’ve used your keywords in these where appropriate.
- You’ve used alt text to describe your images—this isn’t just important for search engines, it’s also a vital accessibility feature for visually impaired users, as screen readers can read out this text.
For more in-depth guidance on all of these (and more tips too), check out my guide to 10 On-Page SEO Strategies.
Step 12. Adjust Tags and Category if Needed
Your blog post should have a category: this helps with your search engine optimization, as categories create a structure for your site. It’s also useful for readers who may be interested in finding multiple posts within a category.
While you can assign more than one category to each post, I’d recommend just sticking with one category per post. That way, it’s really clear where your post belongs in the hierarchy of your site.
Tags are different: you can—and should!—have multiple tags per post. Tags can be much more granular than categories, and you may have some tags that are only used a few times across your site.
You can use your primary and secondary keywords as your tags, along with variations on these. If you’ve mentioned specific tools, resources, or people, you might also want to include those as tags.
Step 13. Don’t Change the URL
If you read my advice about on-page SEO, you’ll know that it’s important to have keywords in your URL.
What should you do, then, if your old URL doesn’t contain your primary keyword… or even anything close to it? Should you change the URL to something new that is more keyword-friendly?
No. It’s generally best to simply stick with the original URL (permalink) you set when you first published the post. While WordPress should redirect the old post URL to the new one, it’s better for Google if you just keep the URL you started out with. Trust me, I’ve seen some disastrous results from changing an existing blog post URL.
Step 14. Consider Including an “Editor’s Note” at the Top of the Post
While there’s no rule that says you have to let readers know your post has been updated and republished, it’s usually good practice to make it clear that you’ve changed the content.
Most bloggers do this with a short editor’s note at the top of the post. That could be something very simple, like this:
This post was originally published in (month, year) and was updated and republished in (month, year).
By including a note at the start of the post, you clear up any possible confusion—e.g. if there are comments from years ago already on the post, or if readers vaguely remember seeing that post before.
How to Republish Your Updated Post in WordPress
Let’s get tactical now. I’ll show you exactly how to go about republishing content from a more technical checklist point of view, after you’ve made content changes to your post.
There are two options here:
Option 1. Update old blog posts and leave them in their current position in your blog’s archives. This usually makes sense if you’re just making some small updates and tweaks, such as fixing broken links, improving the meta description, or adding more internal links.
Option 2. Update old blog posts and republish them as current posts, by changing the publish date. This is the best option if you’re making significant edits and you want to bring that post back to the “front” of your blog, so that new readers and subscribers see it instantly.
Option 1 is very straightforward. Simply edit your post and click the Update button. All your changes will be made live right away.

Option 2 is almost as easy, but involves the extra step of changing the date on your post.
Here’s how to update your blog post’s publish date:
Step 1. Login to your WordPress admin area and edit the post that you want to republish.
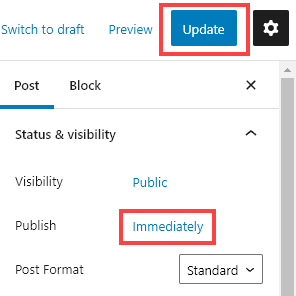
Step 2. Under the Post options on the top right, open the “Status & visibility” tab (if it’s not already open).
Step 3. Next to Publish, click on the date.

Step 4. Click the Reset link beneath the date picker (calendar).
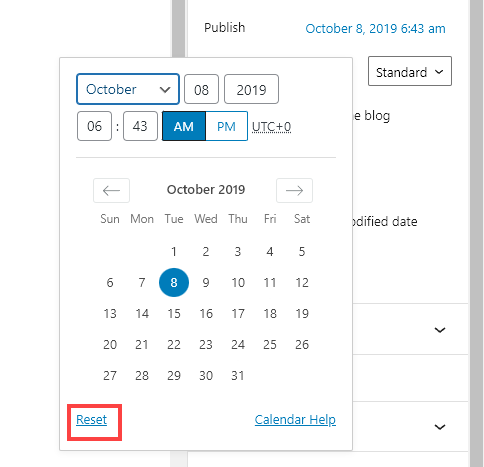
Step 5. You’ll now see that Publish is set to “Immediately”. Go ahead and click the Update button and your post will be republished at the current date and time.
If you want to schedule your post to go out later, or if you want to republish but backdate it, you can do that by instead setting the date manually here. You can then click Update or Schedule, as applicable.
Republishing Content: Frequently Asked Questions
Why is republishing old blog posts important in 2026?
Why is republishing old blog posts important in 2026?
Republishing matters more than ever in 2026 because of the AI search era. Google AI Overviews now appear on 48% of SERPs and have cut organic CTR by 61% on the queries where they appear — but cited brands see a +35% CTR boost inside AI Overviews. AI engines preferentially cite content that’s fresh, factually accurate, and structured for scannability. Republishing is one of the most direct ways to win AI citations on content you already own.
How often should I republish old blog posts?
How often should I republish old blog posts?
For most blogs, refreshing each major post once every 12-18 months is the right cadence. High-value money posts (your top 10% by traffic or revenue) deserve refreshing every 6-12 months. Time-sensitive content (statistics, pricing, year-stamped lists) may need refreshing every 6 months. Don’t obsess over republishing every post — concentrate effort on the posts that actually drive your traffic and revenue.
Can I use AI to automate content republishing?
Can I use AI to automate content republishing?
Yes — this is one of the highest-leverage AI use cases for bloggers in 2026. Tools like RightBlogger Agent automate the entire 14-step refresh workflow: identifying underperforming posts, auditing facts and links, drafting updates that match current search intent, and republishing through WordPress. AI-assisted refreshes work best when paired with human review — let AI handle the repetitive audit/draft/update work, then quickly review and approve before publishing.
Should I change the URL when I republish a post?
Should I change the URL when I republish a post?
No, almost never. Keeping the same URL preserves all your existing backlinks, internal links, and search engine ranking authority. Changing a URL — even with proper 301 redirects — loses some link equity. The only time to change a URL is if the original was genuinely badly named (keyword-stuffed, full of stop words, etc.) and the SEO upside outweighs the redirect cost. Even then, do this rarely and use proper 301 redirects.
Should I update the publish date when I republish?
Should I update the publish date when I republish?
Generally yes, if your post has been significantly updated (new sections, refreshed data, restructured advice). Updating the visible publish date signals freshness to both readers and search engines. For minor updates (typo fixes, single statistic refresh), keep the original date and let the “modified” date reflect the change. Many WordPress themes show both dates — “Originally published X, updated Y” — which is the cleanest approach for trust-building.
How do I know which posts to republish first?
How do I know which posts to republish first?
Prioritize posts that meet at least two of these criteria: (1) they’re a year+ old, (2) they’re ranking on Google page 2-3 (positions 11-30 — these can often jump to page 1 with a refresh), (3) they target keywords with steady or growing search volume, (4) they have factual or year-stamped content that’s now stale, (5) they have valuable backlinks pointing to them. Posts ranking #1 don’t need urgent refreshing; posts on page 3 with growing volume are the highest-leverage refresh candidates.
Does republishing affect SEO negatively?
Does republishing affect SEO negatively?
No — when done correctly, republishing is strictly positive for SEO. The only ways it can hurt: (1) if you change the URL without a proper 301 redirect (loses link equity), (2) if you remove a lot of content the post was previously ranked for (loses topical relevance), (3) if you stuff in keywords unnaturally (now flagged as spam by Helpful Content Updates). Following the 14-step process in this guide keeps all of those risks contained.
Ready to Start Updating Your Old Posts for More Traffic?
Republishing content has a huge number of benefits for your blog—and it can save you a lot of time and effort on coming up with new posts, too. Plus, going back to old pieces means you won’t end up publishing virtually duplicate content because you’ve forgotten you’ve covered that idea before!
Today, identify 5–10 old posts that you plan to update over the next few weeks or months. Make a list of them in a document or spreadsheet.
You might want to think about how these posts will fit into your blogging strategy—for instance, if you have a new product launch coming up, it makes sense to republish existing content related to the same topic as that product.
Then, decide how your republished content will fit in with your new blog content. If you don’t already have an editorial calendar, now’s a great time to start one — check out my free content calendar download to get started. That way, you can plan for a mix of new content and republished content over the upcoming weeks and months.
If the manual workflow feels overwhelming — especially if you’re sitting on a backlog of dozens or hundreds of older posts — consider letting AI handle the heavy lifting. RightBlogger Agent runs through this entire 14-step process automatically across your site, surfacing the highest-impact refresh opportunities first and drafting the updates so all you do is review and approve. It’s the closest thing to “press button, get fresh blog” that exists in 2026.
And because AI tools can help save significant amounts of time in blogging today, check out all of my top free blogging tools (many of which are AI blogging tools) & guides:
- Free AI Article Writer Tool (AI-Powered) SEO Blog Posts
- Free Blog Idea Generator Tool to Get Unlimited Blog Ideas
- Free AI-Powered Blog Title Generator for Creative Headline Ideas
- Free Keyword Research Tool for Bloggers, Writers & Content Marketers
- Free AI Paragraph Rewriter Tool (to Reword Your Paragraphs)
- Meta Description Generator to Write Smart SEO Descriptions
- AI Blogging Guide: How to Use AI for Your Blog (Thoughtfully)
- 16 Best AI Blogging Tools to Use This Year
- 14 Best AI SEO Tools for Bloggers to Get More Search Traffic
Want my Free SEO-Driven Blog Post Template?
Grab my free template to create your own traffic-driving content today.
"*" indicates required fields
Your articles come with next level information which helps people a lot.
When I Embedded YouTube video in blog post then it is not indexed by Google. is it still useful to embed related YouTube video while updating old blog post?
I appreciated your suggestion to optimize the headlines and meta tags. It’s amazing how much of a difference a catchy headline can make in driving traffic to our posts. And by tweaking the meta tags, we can improve our search engine rankings and attract even more readers.
Excellent insights into republishing content and maximizing blog traffic through updates! The guide provides a comprehensive roadmap for breathing new life into old blog posts. The tips on SEO optimization and audience engagement are particularly noteworthy. Are there specific tools or strategies you’ve found most effective in the republishing process? Looking forward to implementing these ideas!
Thanks for the kind words, my friend! Glad you found this guide so helpful 🙂