

WordPress is the most popular website in the world—by quite some way. At least 43% of all websites on the internet run on WordPress.
Whether you’re starting a blog to with aims to create a personal blog, lifestyle blog, a small business website, or a huge eCommerce store, WordPress is a great platform to use.
If you’re just getting started, though, WordPress can seem a bit daunting. There are more than a few things to learn and several steps to take in order to get your site online.
I’m going to take you through everything you need to know to get a website or blog up and running with WordPress. This is a big, comprehensive guide so you might want to bookmark it to keep handy as you create your site.
How to Use WordPress 101 (for Beginners): WordPress Tutorial
- What is WordPress?
- How to Install WordPress on Your Website
- How to Log In to WordPress for the First Time
- Understanding Your WordPress Dashboard and Admin Panel
- Choosing Your WordPress Theme
- Adding Plugins to WordPress
- Creating Your First WordPress Page
- Creating Your First WordPress Blog Post
- Customizing Your WordPress Theme
- Setting Up Your WordPress Site’s Home Page
- 16 Common WordPress Terms Explained (WordPress Glossary)
Disclosure: Please note that some of the links below are affiliate links and at no additional cost to you, I’ll earn a commission. Know that I only recommend products and services I’ve personally used and stand behind. When you use one of my affiliate links, the company compensates me, which helps me run this blog and keep my in-depth content free of charge for readers (like you).
Create Automated SEO Blog Posts in Minutes with RightBlogger
Join 45,417+ bloggers, marketers, writers & business owners in using RightBlogger, my very own Autoblogging solution with a built-in automated Content Schedule, and a kit of 80+ powerful tools for blogging, SEO, and marketing. You’ll create AI SEO-optimized content faster & get more traffic from Google and ChatGPT today. Plus, you’ll access online courses, a community, and more.
What is WordPress?
WordPress is the world’s most popular website builder or content management system. Originally designed for blogs, WordPress is used by many types of websites all across the world. The WordPress software is free and open-source plus it’s well-designed for good SEO (search engine optimization).
One thing that’s a little confusing about WordPress is that it comes in two “flavors.”
There’s WordPress.org, sometimes called self-hosted WordPress—which is what most people mean when we talk about “WordPress.”
Then there’s WordPress.com, sometimes called hosted WordPress—this is the commercial wing of WordPress and it can offer a slightly simpler user experience but has a lot of limitations.
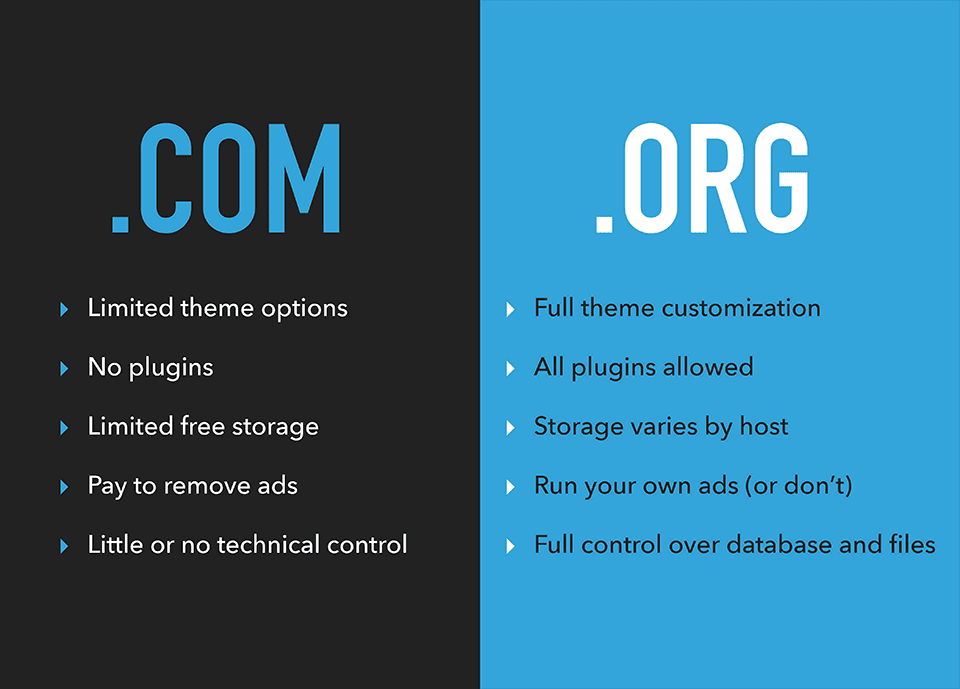
If you’d like to know more about the differences, check out my article on the difference between WordPress.org and WordPress.com.
When I talk about WordPress in this tutorial, I’ll be referring to WordPress.org (self-hosted WordPress), which is the best foundation to launch a blog or website with.
How to Install WordPress on Your Website
The idea of installing WordPress on your website might sound daunting, but web hosting companies make it really easy for you!
Your first step is to sign up with a web hosting provider that offers a seamless WordPress installation process.
My top WordPress hosting service recommendations are Bluehost and Dreamhost. They’re both great value and easy to sign up with.
I’ll quickly run through instructions for those web hosts here—but if you want a detailed tutorial that takes you step by step through the signup process as well as the WordPress installation process, check out my guide on how to install WordPress.
Tip: You might also want to look into managed WordPress hosting, which will cost you more but offers very useful extra support (like daily backups, carrying out updates for you, and more).
Installing WordPress on Your Bluehost Website
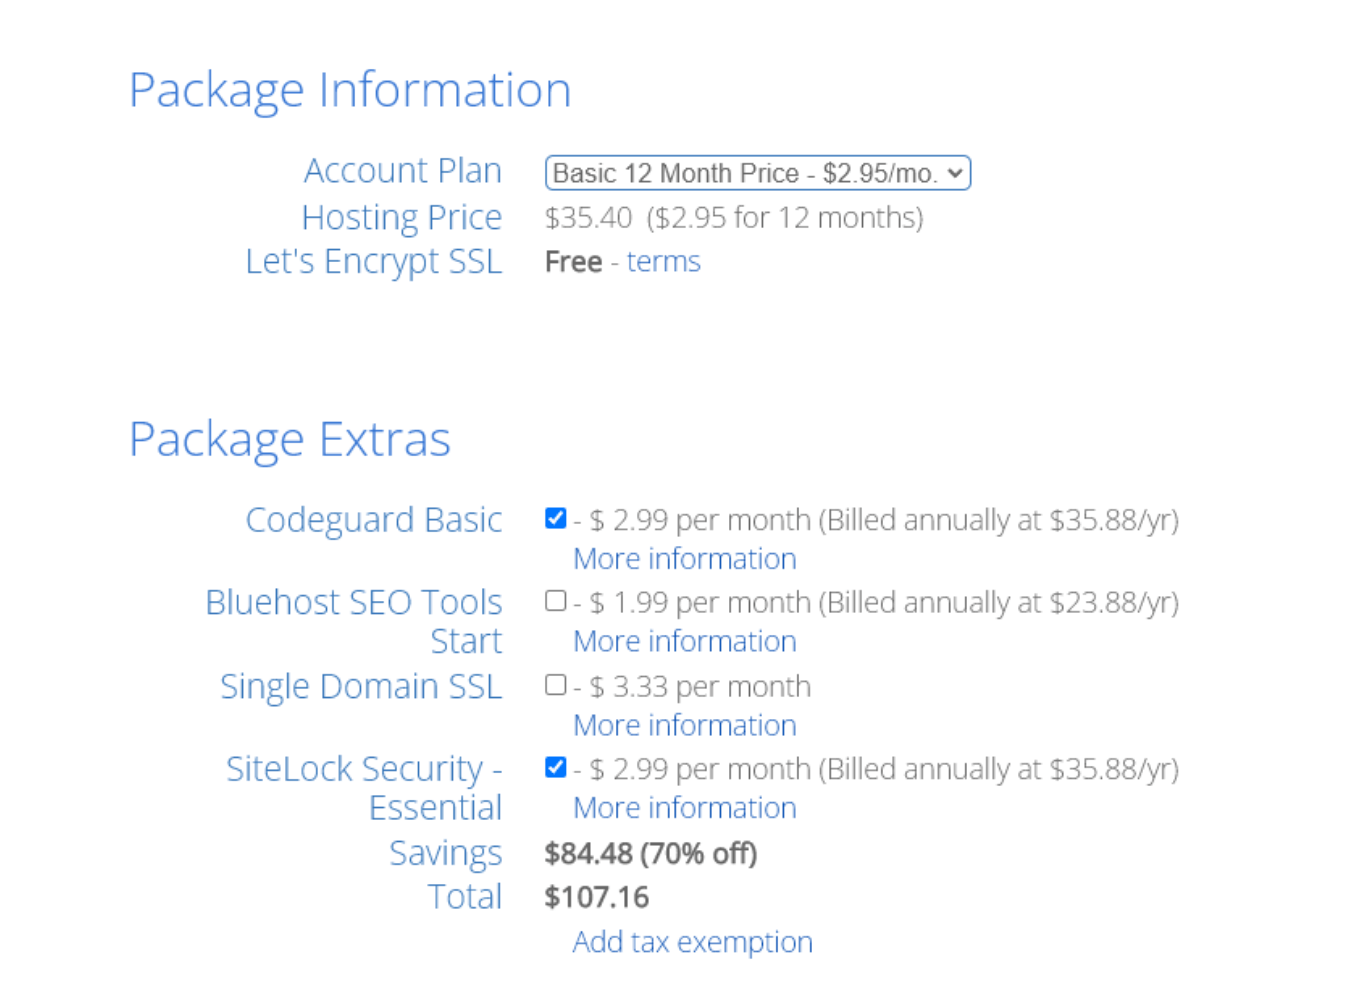
First, you’ll need to create a Bluehost account and choose your domain name. It’s really easy to create your account: just fill in all the information Bluehost requires, step by step.
I’d recommend selecting the 12-month plan, as that way, you only pay $35.40 upfront—making your hosting super-cheap for your first year:
Once you’ve paid, Bluehost will prompt you to pick a password for your account. Then, you can log in. You’ll immediately see a screen with a “Create your website” button.
Simply click that button, choose the type of site you’re going to create, and select the “Limitless customization” option when you’re prompted to choose how to build your WordPress site:
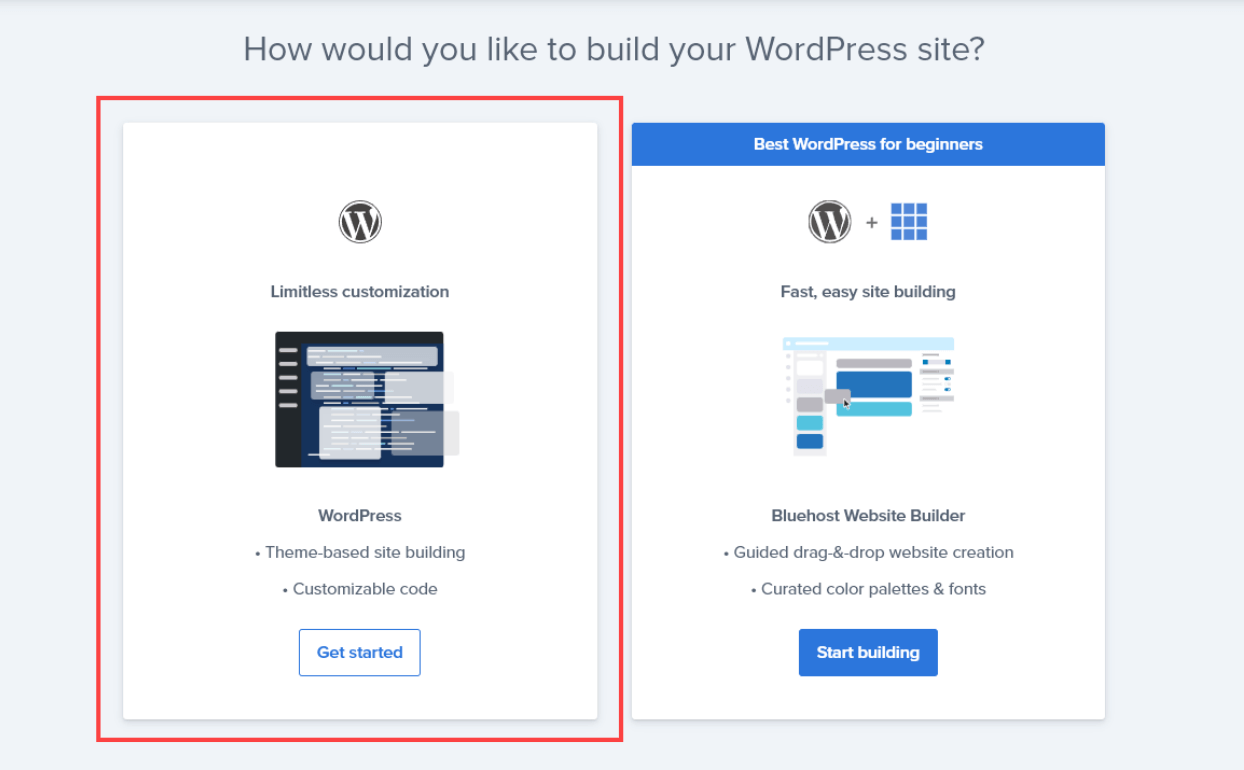
You’ll need to enter some details like the title and tagline for your new website. Don’t worry if you’re not sure what to put here, as you can easily change these later. You’ll also be prompted to pick a theme for your site—again, you can change this later.
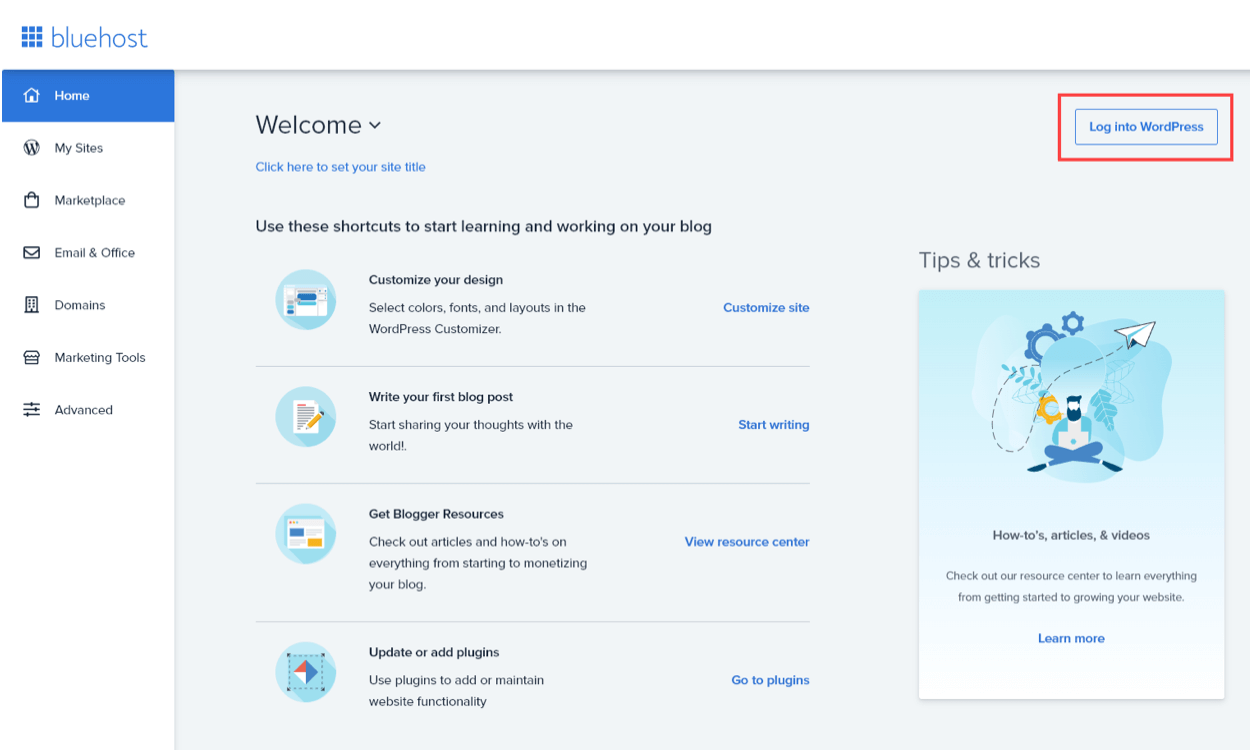
Then, Bluehost will install WordPress for you, and you’ll be taken to your main Bluehost dashboard, where you can easily login to your WordPress admin area.
Installing WordPress on Your Dreamhost Website
Installing WordPress on a Dreamhost website is really quick and easy. Simply select the hosting plan you want, choose your domain name, then you’ll see the checkout page.
On the checkout page, make sure you check the box to “Pre-Install WordPress:”
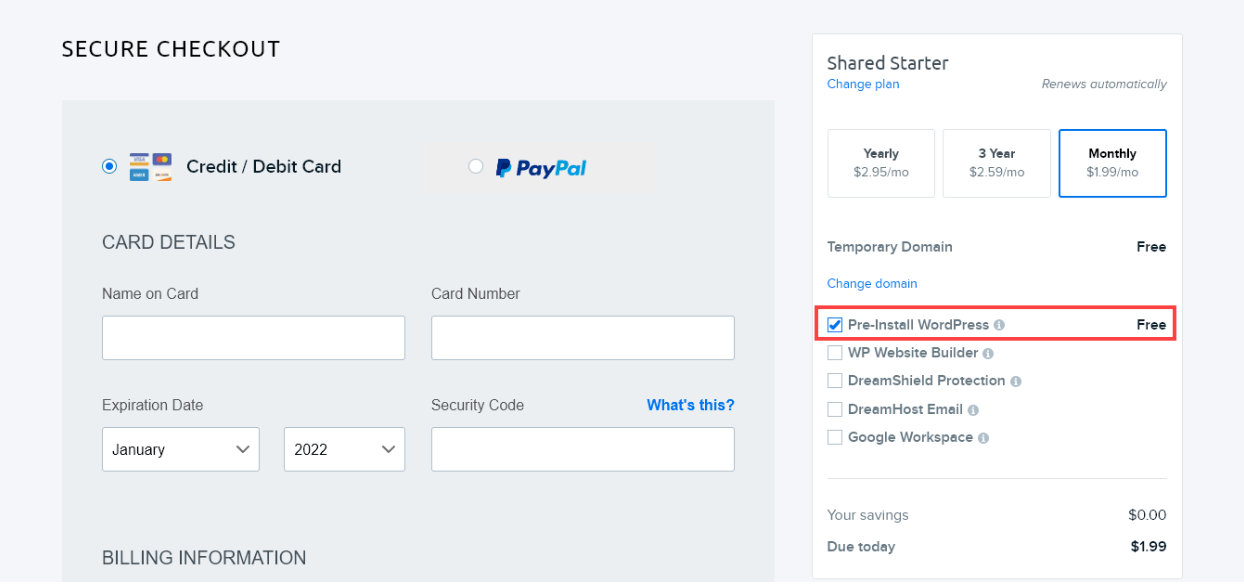
(If you miss the box, don’t worry: you can install WordPress on your site through your Dreamhost dashboard after creating your hosting account.)
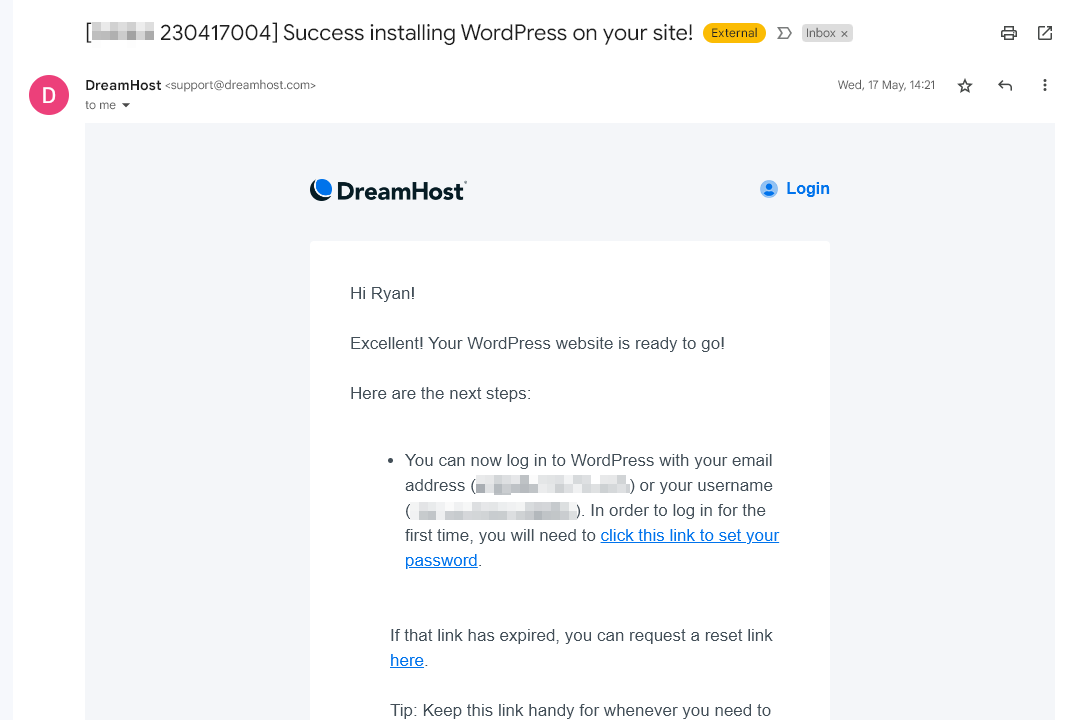
Once you’ve paid, Dreamhost will create your new site and install WordPress on it. Within a few minutes, you’ll receive an email with a link to login to the WordPress admin area on your own website:
How to Log In to WordPress for the First Time
If you’re using Bluehost, you can log in to WordPress by following the “Log into WordPress” link within your Bluehost account.
If you’re using Dreamhost, you’ll have an email with a special link to log in for the first time.
Using a different web hosting company? Look out for an email with your login instructions and details.
After logging in for the first time, you can log in on future occasions at yoursitename.com/wp-login.php
Understanding Your WordPress Dashboard and Admin Panel
When you login to WordPress, you’ll see your WordPress dashboard. It looks something like this:
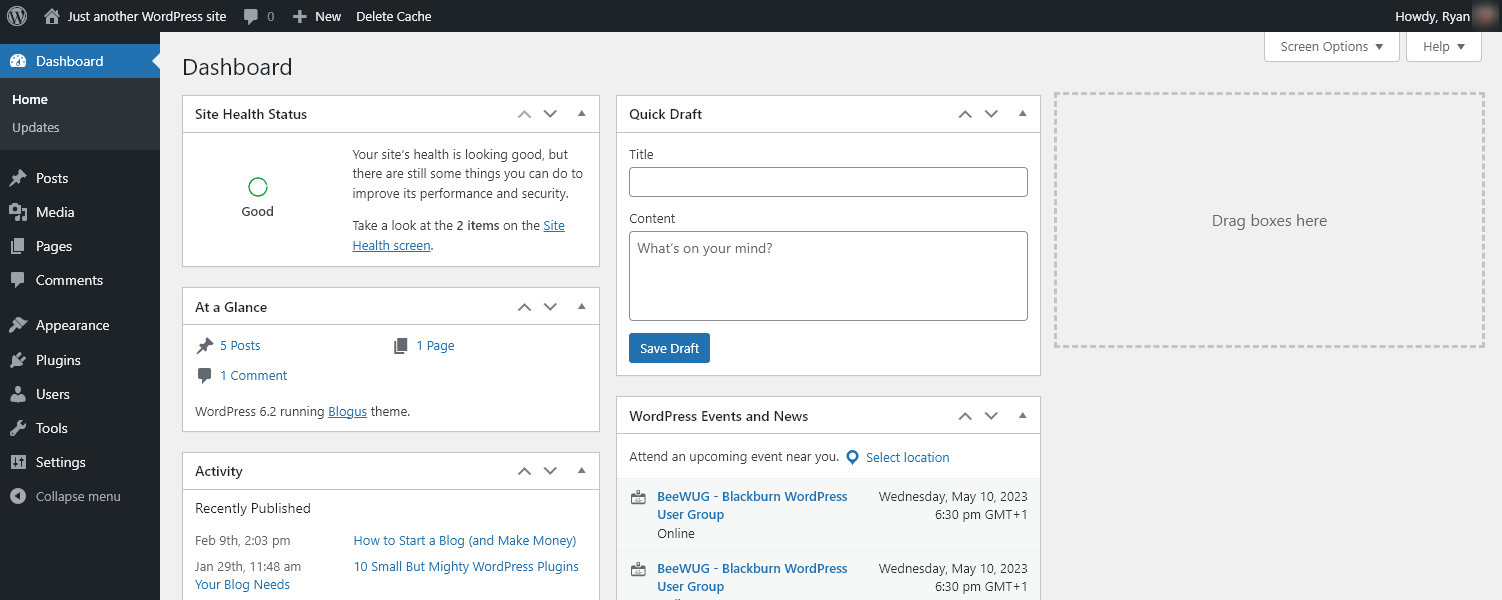
Your dashboard has useful information and links, like an “At a Glance” box telling you about your website.
Your admin panel is all the “backend” of your WordPress site. You can see the links down the left-hand side of the screen to things like “Posts,” “Pages,” “Comments,” “Appearance” and more.
This is where you control everything about your website. You use the admin panel to publish new posts and pages, moderate comments, change your site’s theme and appearance, add plugins, add users, change your settings, and more.
At first glance, the dashboard and admin panel as a whole can seem a bit overwhelming and you might not know how best to begin. Feel free to click around and take a look at different areas.
The key things to know about when you’re getting started are:
- Posts: This is where you can create new blog posts and edit (or even delete) existing ones.
- Pages: This lets you create pages for your website (such as an About page or Contact page).
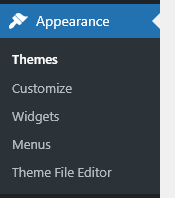
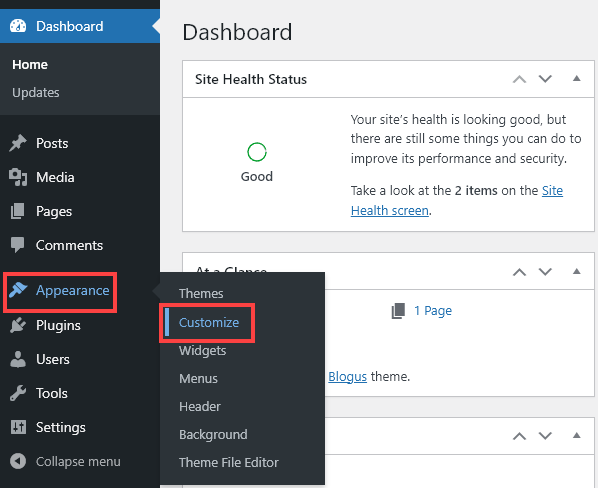
- Appearance: This has several useful options that you’ll want to try out: Themes lets you change your blog’s theme, Widgets lets you adjust your sidebar or footer, and Menus lets you change your navigation menu:
Tip: If you make a change to your WordPress site and decide against it, you can easily change it back again! Feel free to experiment and try out different things as you get used to WordPress.
Choosing Your WordPress Theme
One of the first things you’ll want to do when you set up your site is to change the WordPress theme.
A WordPress theme is like a template for your website. It controls how your site looks (and some themes also add extra functions to your website).
Your theme affects things like the font, colors, line spacing, layout, and more on your website.
You can change the theme as often as you like—though once your site is up and running, you’ll probably want to avoid making dramatic changes to how it looks.
All your content (posts, pages, comments, and so on) stays the same, however much you change your theme. The font or layout might change, but the words and images will be the same.
To pick a new theme, go to Appearance→Themes and then pick any theme that you like. Hover your mouse over the theme and click “Activate” to use that theme on your site.
You can also use the “Live Preview” option if you want to check out how the theme will look before actually using it for your site.
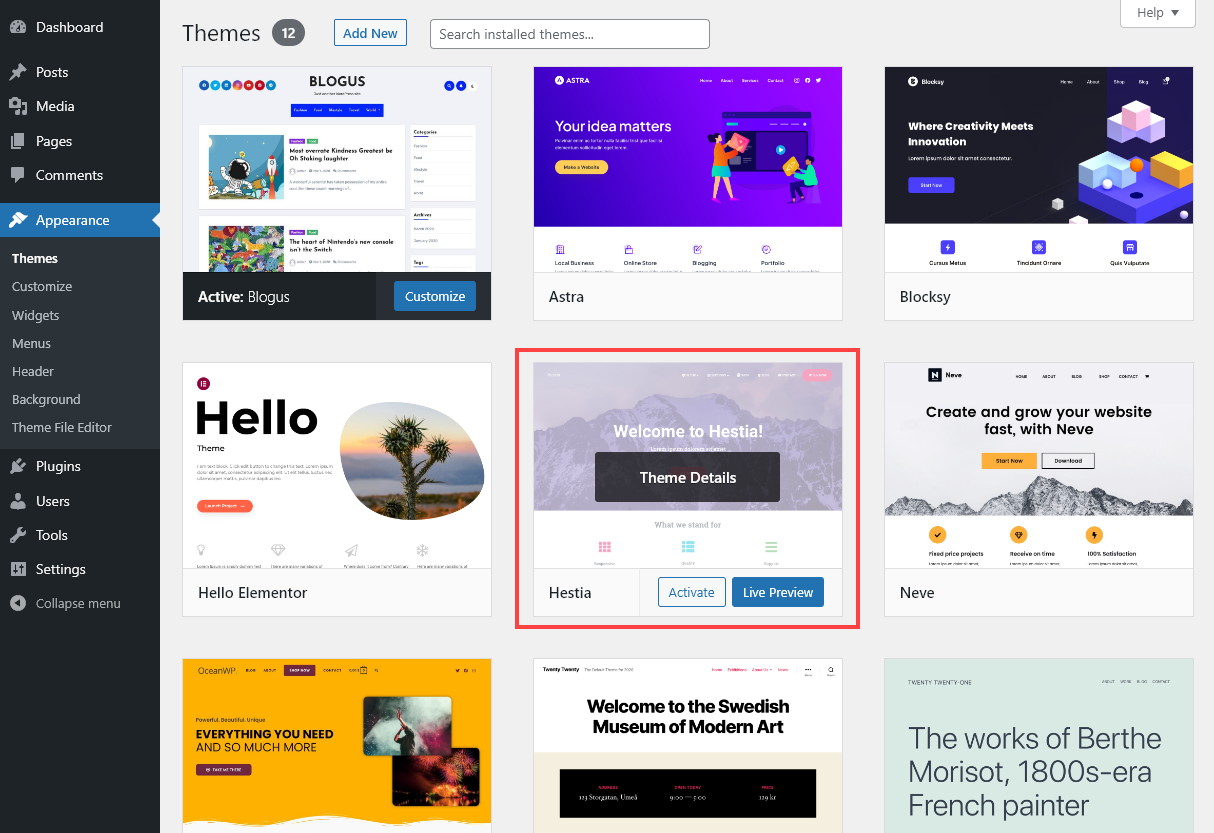
Tip: Some themes will have been pre-installed for you when WordPress was set up, but what if you want more themes to use from? Use the “Add New” button to search all the WordPress themes available. You’ll need to install themes before you can activate them.
Understanding Free vs Premium Themes
Many WordPress themes are completely free. They won’t have advanced features but they’ll usually look great and function well—especially if you choose popular free themes and install them through your WordPress admin area, as shown above.
Other WordPress themes are “premium” or “paid” themes. These will cost you anything from about $20–$200+, depending on the complexity of the theme.
Premium themes will often include lots of extra functionality—anything from the option to choose your color scheme to a full page builder—and many offer a free version to get you started.
If you want some theme recommendations, check out this guide to my favorite WordPress themes (free and paid).
Adding Plugins to WordPress
One of the best things about WordPress is that you can add new functionality to your website using “WordPress plugins”—which are like little apps for your website. These take just a couple of clicks to install and set up, and they make running a website so much easier.
There are thousands of WordPress plugins available, doing all sorts of things. As with themes, some plugins are free, and others are more complex pieces of software that you’ll need to pay for. Many premium plugins do have a limited free version to try, too.
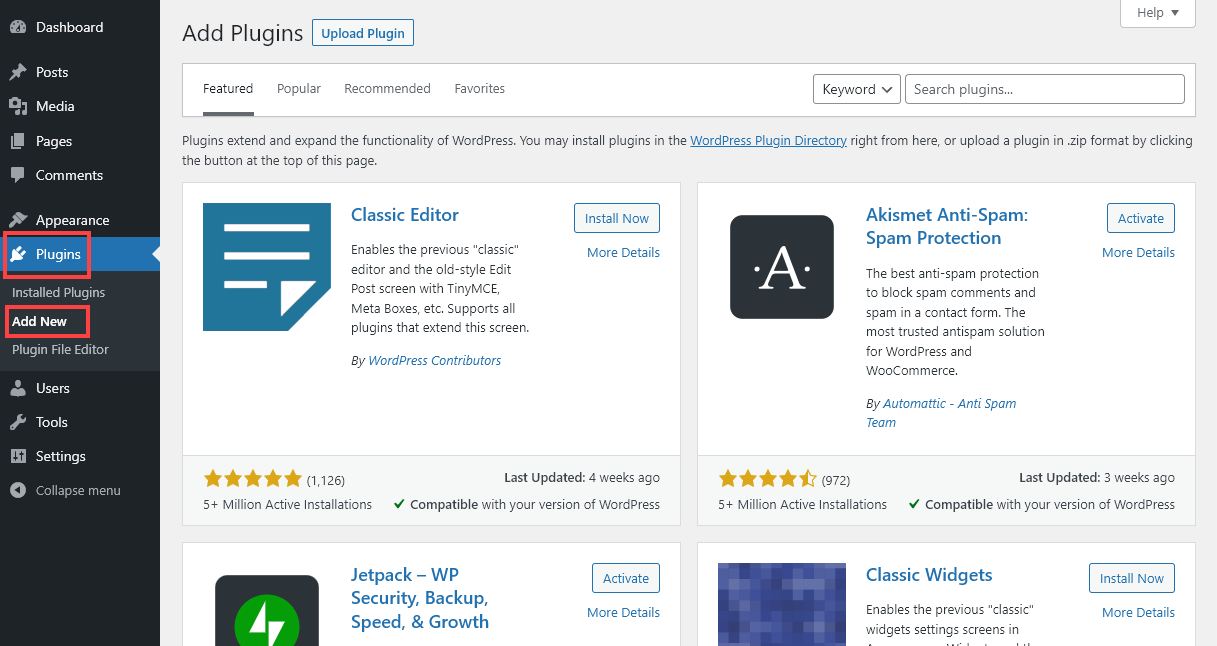
To install a plugin, go to Plugins→ Add New in your WordPress admin area. You’ll automatically see some popular plugins, but you can search for any type of plugin you want by typing in a keyword (such as “contact form”).
I’ve got a list of the best WordPress plugins here, but when you’re just starting out with WordPress, these are 4 of the most useful plugins to install.
1. Anti-Spam Plugin (Akismet)
If you have comments open on your website, you’ll inevitably receive spam comments. The good news is, you don’t need to manually remove these. A good anti-spam plugin can automatically catch spam before it ever appears on your site.
The best-known WordPress anti-spam plugin is Akismet. It’s priced at “pay what you can” for personal sites and blogs (and you can choose to pay nothing), though if you want more features and support, you’ll need to select a pricing plan.
2. Contact Form Plugin (WPForms)
While you don’t have to include a contact form on your website, it’s often to have this as well as (or instead of) your email address.
A contact form makes it really quick and easy for people to get in touch and it also gives you the option to collect useful information upfront, perhaps through a dropdown.
Their message comes to you by email, and you can reply to them as you would with any email.
WPForms is a great contact form plugin with a very user-friendly interface.
3. SSL Plugin (Really Simple SSL)
Websites without an SSL certificate (HTTPS) look less trustworthy to users, showing as “Not Secure” in browsers. They may also not rank so well in Google.
If you take online payments or need users to login, then it’s essential you have an SSL certificate. But even if you don’t, you should use SSL.
Some WordPress users run into issues getting their SSL certificate working correctly. (Most web hosts provide a free SSL certificate.) The plugin Really Simple SSL will automatically make sure all your content runs over HTTPS—and it can even provide a free SSL certificate for you if you don’t already have one.
4. Image Compression (TinyPNG)
One big factor in making your website load fast is compressing your images. You can use online services to compress images before uploading them—but what if you already have a lot of uncompressed images on your website?
TinyPNG is a great solution. It compresses JPEGs, PNGs, and WebP images automatically when you upload them, plus it can optimize images that are already on your site.
Other WordPress Plugins to Consider
Some other plugins you might want to add are:
- A caching plugin, such as W3 Total Cache, to speed up your website.
- A plugin that makes it easy to add Google Analytics code to your site, such as WPCode
- An ecommerce plugin if you want to run an online store—WooCommerce is the most popular
- A plugin to help with your SEO: I recommend Yoast SEO, RankMath, or All in One SEO
- A social media plugin such as Easy Social Sharing, to make it easier for readers to share your posts
Creating Your First WordPress Page
Once your site is looking good and you’ve installed some key plugins, it’s time to create your first page.
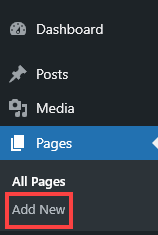
An About Me page is a great option to get started with. You can create one by going to Pages→Add New in your WordPress admin.
Type “About Me” or something similar for the title. (“About,” “About the Blog,” or “About Us” are all good options too.)
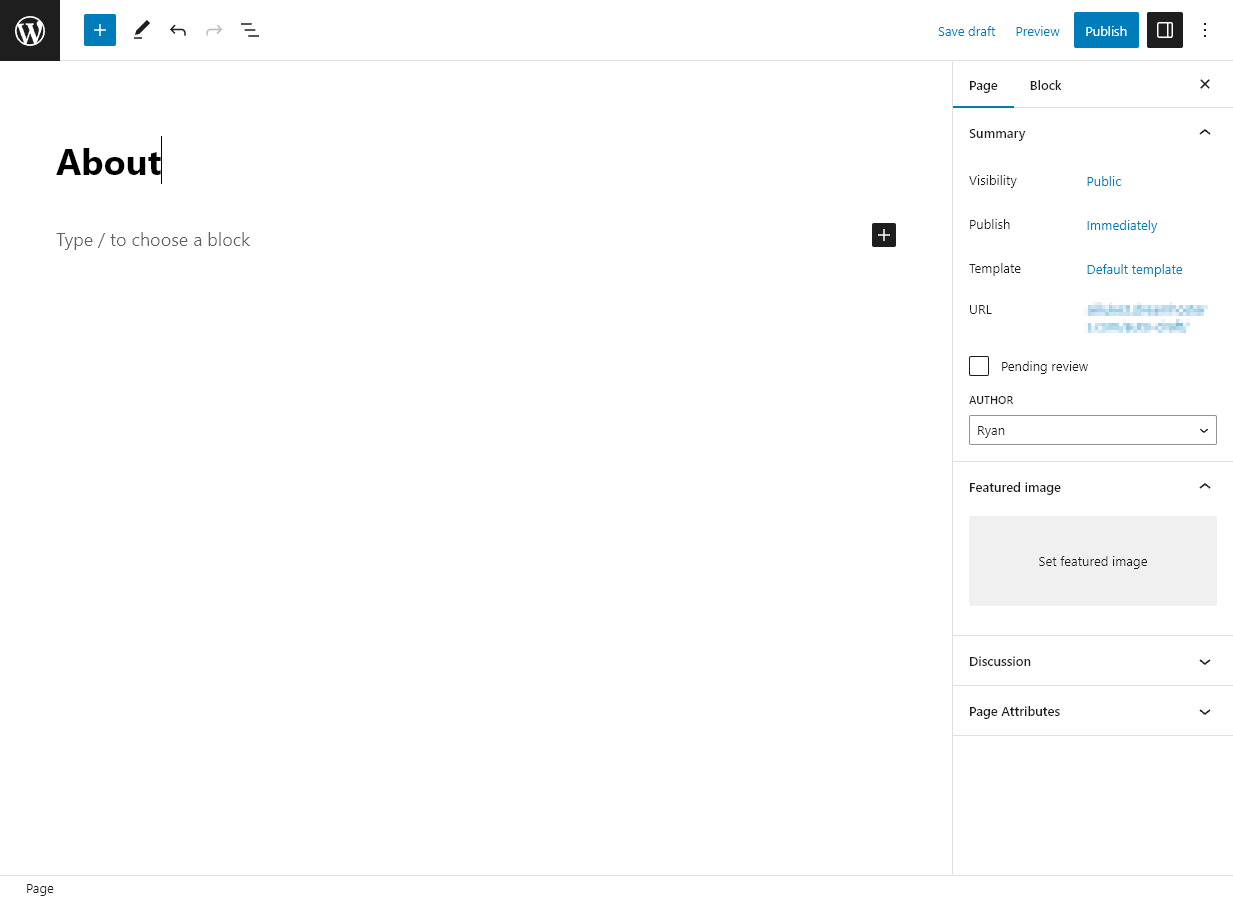
You can simply click where it says “Type / to choose a block” to start writing your page.
The buttons on the top right let you save, preview, and/or publish your page.
Using the Block Editor (Gutenberg Editor)
The block editor may seem a little confusing when you first try it, but once you get the hang of it, you’ll find it’s easy to work with and very versatile.
To create paragraph blocks, you can simply type as normal, hitting enter at the end of each paragraph.
To add other blocks, you can use the + icon to browse for and select a blog, or you can type a forward slash and whatever type of block you want—e.g. /image—to quickly create that type of block.
The most useful blocks to try out on your About page, apart from the paragraph block, are:
- Heading blocks. These let you create subheadings. For instance, you might have two sections for your page, “About Me” and “About My Blog.”
- Image blocks. These let you upload images (or pick images that you’ve already added to your media library) to use on your page.
- List blocks. You can use these to create a bullet point list or a numbered list.
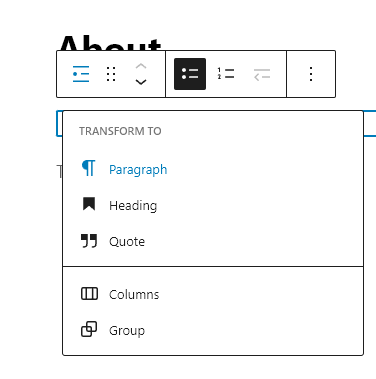
You can change a block into a different block by clicking on it and using the “Transform to” option. Here, I’m changing a list block to a paragraph block:
Tip: If you prefer, you can use drag-and-drop page builders to create your WordPress pages, such as Elementor or Beaver Builder. (You install these as plugins.)
Creating Your First WordPress Blog Post
Adding a blog post to your site is just as easy as adding a new page. Both posts and pages use the block editor.
When writing a blog post for the first time on your new site, you might write about one or more of these:
- Why you started your blog
- What readers can expect from your blog
- Some key “lessons learned” in your topic area
- A particular core idea in your topic area
- A step-by-step guide to getting started with a key aspect of your topic
… or anything else you want. For lots more inspiration, check out my guide to the best blog post ideas and use my free blog idea generator to come up with endless blog writing prompts & topics to explore.
To add a post, go to Posts→Add New. You can add content to your post just as you would for a page, typing (or copying-and-pasting) text.
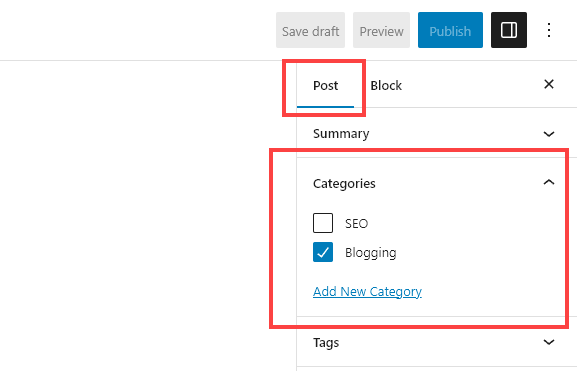
One key difference between posts and pages is that posts must have a category. You can set this in the post settings on the right-hand side of your screen:
Tip: Experienced with old-style website building and want to get hands-on with coding? You can use HTML in your blog post by adding a Custom HTML block or by editing a block as HTML. You can add CSS under Block→Advanced on the right-hand side.
With the proliferation of AI blogging, be sure to check out these guides & free tools of mine:
- Free AI Article Writer Tool (AI-Powered) SEO Blog Posts
- Free Blog Idea Generator Tool to Get Unlimited Blog Ideas
- Free AI-Powered Blog Title Generator for Creative Headline Ideas
- Free Keyword Research Tool for Bloggers, Writers & Content Marketers
- Free AI Paragraph Rewriter Tool (to Reword Your Paragraphs)
- Meta Description Generator to Write Smart SEO Descriptions
- AI Blogging Guide: How to Use AI for Your Blog (Thoughtfully)
- 16 Best AI Blogging Tools to Use This Year
- 14 Best AI SEO Tools for Bloggers to Get More Search Traffic
- 23 Top AI Tools and Apps for Content Creators
- 15 Best AI Writing Tools for Bloggers and Writers
Adding Images to Your Post
It’s a really good idea to add at least one image to your blog post. Images help to catch the reader’s eye and break up your post to make it more readable.
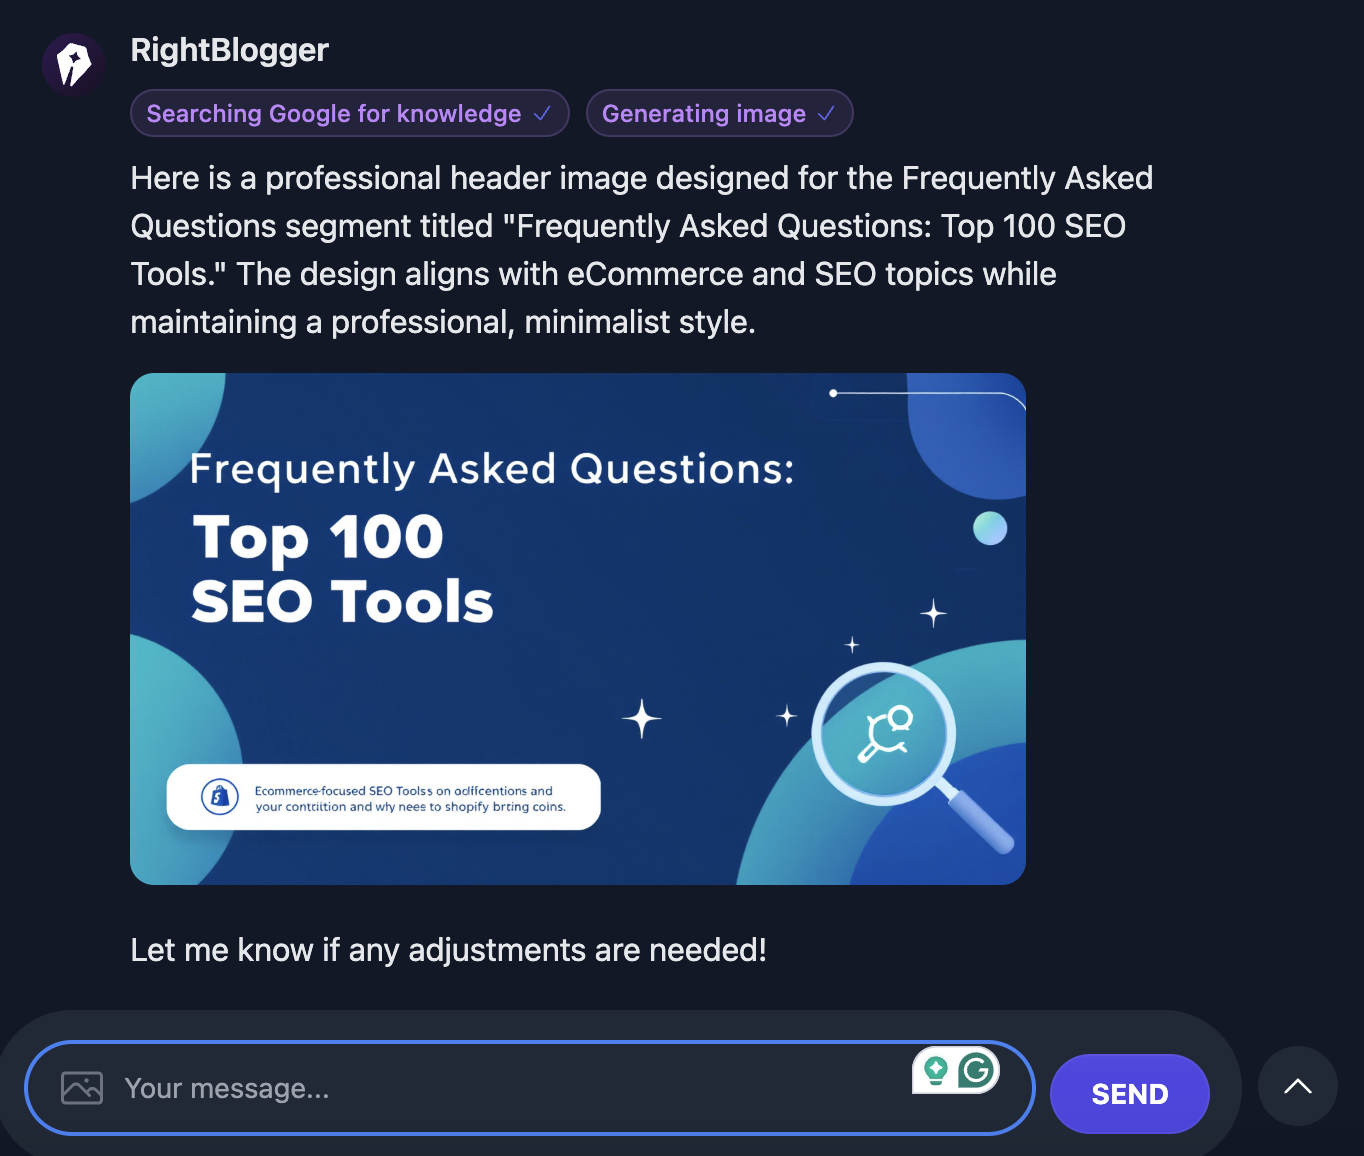
Free photos from sites like Pixabay and Unsplash work well for many blog posts. (Just make sure you’re only sourcing images from sites that allow these images to be freely used on blogs.) You can also use RightBlogger Chat or Canva AI Image generator to create nice images to improve the visual aspect of your blog. Here is an example of an AI-generated image with RightBlogger Chat:
For tutorials or software reviews, you could add screenshots. If you’re writing a tutorial for a recipe or DIY project, you may want to include your own step-by-step photos.
To add an image to your post, type /image and select from the options that appear. In most cases, the “Image” block will work best, but if you want to display text alongside the image, choose “Media and Text.” You might also want to create a gallery of images.

Tip: If you’ve installed and activated the TinyPNG plugin that I recommended above, the plugin will automatically optimize your images as you upload them.
Customizing Your WordPress Theme
Whatever WordPress theme you’ve chosen for your site, you’ll likely want to customize it at least a little bit.
The great thing about WordPress is that you don’t need any special technical knowledge or web design skills to customize your theme. You can simply use the built-in Customizer to make changes.
Tip: A few themes don’t use the Customizer. For instance, the default WordPress Twenty Twenty-Three theme doesn’t have this option.
To enter the customizer, go to Appearance→Customize in your WordPress dashboard.
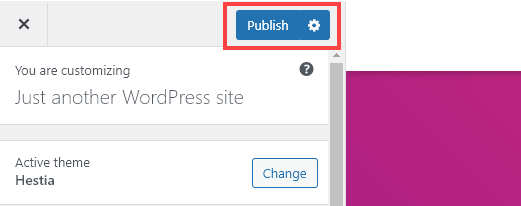
Feel free to experiment as much as you like here! As you customize your site, you’ll see a preview of your changes—once you’re happy, you can click “Publish” to make them live on your website.
The options you see in the Customizer will depend on your theme, but in most cases, you can expect to be able to change things like:
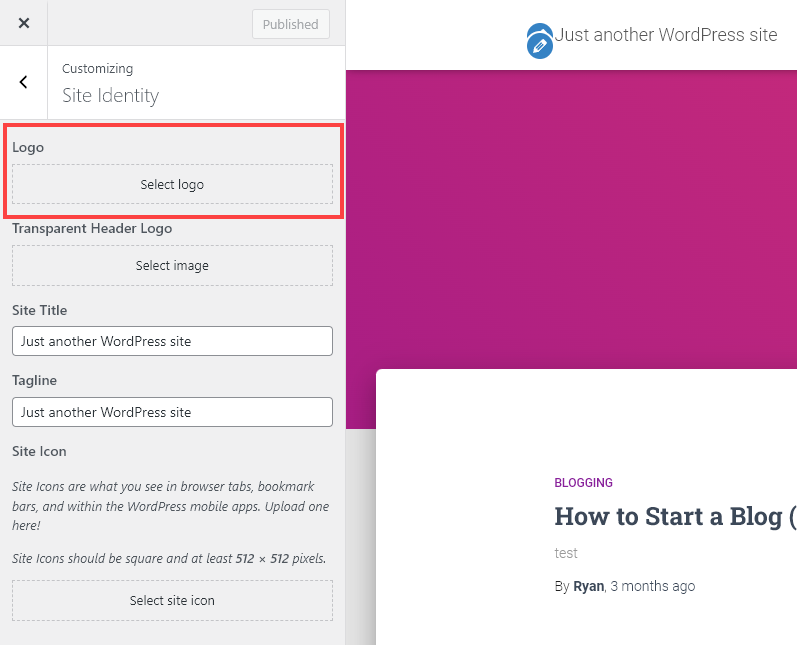
- Your site’s logo, header image, and site icon
- The font on your site
- The colors on your site (background and fonts)
There are also a number of settings you can change through the customizer (like editing your site’s title and tagline) that you can also change through the Settings menu option in your WordPress admin area.
Adding a Logo
You’ll likely want to brand your website with a custom logo design—and it’s really easy to add one through the Customizer.
First, you’ll need your logo file. If you haven’t yet got a logo, you can use AI-powered blogging tools like Brandmark to create one, or you can hire a designer.
Ideally, you’ll want to resize your logo to the recommended dimensions for your theme. You can find this by going to Appearance→Customize→Site Identity and clicking “Select logo.”
Tip: What you see on this screen may look a bit different depending on which theme you’re using.
The theme should tell you the suggested image dimensions for your logo:
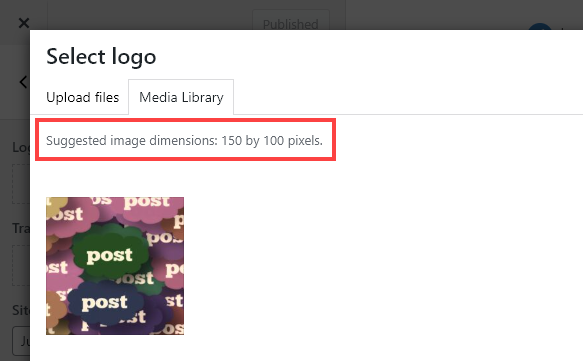
Once you have this, simply resize your logo and upload it. Don’t worry if it’s not quite the right dimensions: WordPress will give you the option to crop it.
After uploading your image, you’ll see it on the preview of your site in the customizer:
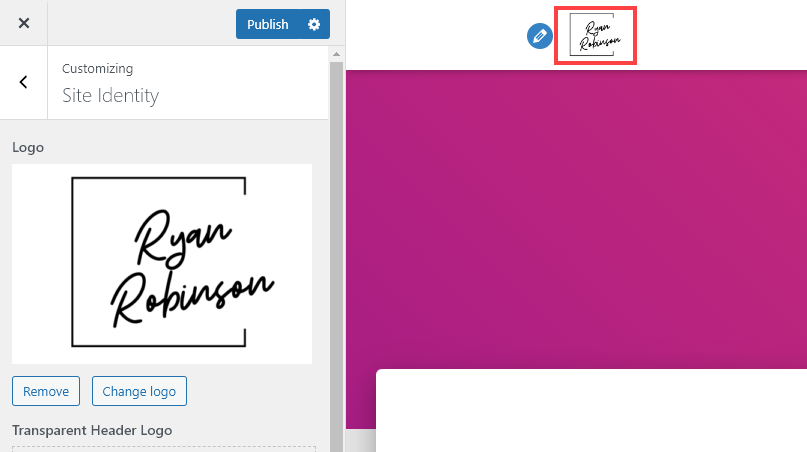
If you’re happy with how it looks, go ahead and click the Publish button.
Setting Up Your WordPress Site’s Home Page
Your site’s homepage, sometimes also called the front page, needs to make a great first impression on your website’s visitors.
Some themes will simply list your most recent blog posts on your homepage by default, but others will have a range of options. You may be able to alter the homepage through the Customizer and/or through the Appearance→Widgets option (if the homepage is set up to use widgets).
With all themes, you can create a page in WordPress to be your homepage. You might add blocks to this page like images, text, or even embedded videos.
Some great things to include on your homepage are:
- A brief description of who you are (including your name) and a link to your About page.
- Your most recent and/or most popular blog posts.
- A sign up form for your email newsletter, once you’ve set one up.
- Links to different categories on your blog or pages on your site.
Static Home Page vs Blog Home Page
Because WordPress was originally designed for blogs, it defaults to showing your latest posts on your home page.
If you want to use a static homepage (a page you’ve created) instead, that’s an easy switch.
Simply go to Settings→Reading in your WordPress admin area, then for “Your homepage displays” select “A static page.”
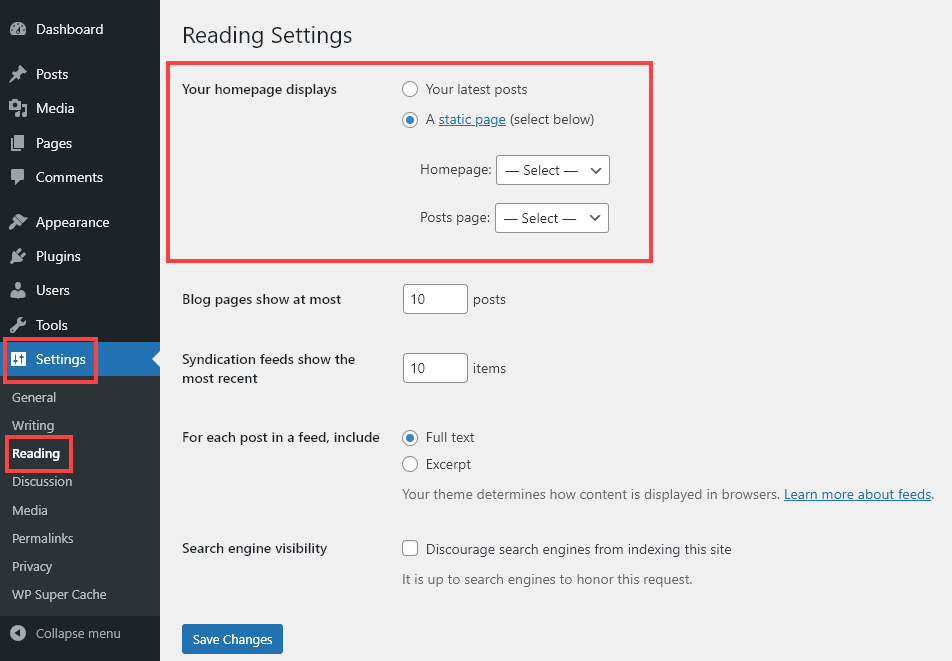
You can then choose your homepage from the dropdown list (which will list all the pages on your site).
If you’re going to use a static homepage, you may also want to create a special blog page for your latest blog posts. This page doesn’t need any content: just publish a page titled “Blog” and then select it here. WordPress will automatically populate it with your posts.
16 Common WordPress Terms Explained (WordPress Glossary)
When you’re just getting started with WordPress, it can seem like there’s a lot of technical jargon to get to grips with.
This mini-glossary covers all the most common WordPress terms that you’re likely to come across.
1. Admin Area (aka Admin or Dashboard)
The admin area is the “backend” of your WordPress site. It’s only accessible to you (and other authorized users, if applicable).
To get to your admin area, go to yoursitename.com/wp-admin. You’ll see your Dashboard—the homepage of your admin area.
2. Backups
It’s a good idea to back up your WordPress site regularly. Although it’s rare for anything to go wrong, a backup means you can quickly get your site back up and running if something breaks—without losing any of your hard work.
There are plugins you can use to make automatic backups of your site regularly, such as UpdraftPlus.
3. Category
All blog posts have a category. This helps organize your blog so that readers can find the posts they’re most interested in. If you don’t select a category, your post will have the default category (this is called “Uncategorized” but you can change it).
To add, remove, or edit categories, go to Posts→Categories in your WordPress admin area.
4. Editor (aka Block Editor or Gutenberg Editor)
The editor is the tool you use to write posts and pages. You build these using different blocks, such as paragraph blocks, list blocks, header blocks, and image blocks.
To access the editor, add or edit a page or post. (E.g. to add a post, go to Posts→Add New.)
5. Excerpt
An excerpt is a short piece of text from your blog post that displays in certain places on your theme. For instance, many blog themes show the post title, image, and excerpt on the front page.
WordPress will automatically create an excerpt for you, using the first few lines of your post. If you want, you can write an excerpt of your own. When you’re in the post editor, you’ll find the Excerpt option under the Post settings, on the right-hand side.
6. Menu (aka Navigation Menu)
The menu is the navigation links for your website, normally along the top of each page. Depending on your theme, you may be able to have multiple different menus, e.g. a footer menu or a primary and secondary menu.
You can create and edit menus by going to Appearance→Menus in your WordPress admin area.
7. Page
A Page is one of the two types of webpage you can create using WordPress. (The other type of webpage is the Post.) Pages are designed for static, undated content, like your About page, Contact page, Services page, and so on.
“Static” doesn’t mean the content can never change. You can easily update a page at any time.
You can create a page by going to Pages→Add New in your WordPress admin area. To see a list of pages, and edit them, simply click on Pages.
8. Plugin
A plugin is an extra piece of software that you can add to your website. It gives your WordPress site additional functionality. That could be anything from catching spam comments to creating a whole online store or web forum.
You can add a plugin by going to Plugins→Add New. You’ll need to activate the plugin after installing it, in order for it to work on your site.
9. Post
A Post is one of the two types of webpage you can create using WordPress. (The other type of webpage is the Page.) Posts are for dated content and you’ll normally publish new posts on a regular basis, perhaps every week or two.
You can update and even republish posts after you’ve published them.
To create a post, go to Posts→Add New in your WordPress admin area. To see a list of posts, just click on Posts.
10. Shortcode
Some plugins use shortcodes. A shortcode is a very simple piece of code that you can add into your WordPress post or page using a “Shortcode” block.
The shortcode lets the plugin’s feature appear in that place on your post or page. For instance, you could use a shortcode to add a contact form partway through your Contact page.
11. Tag
Optionally, your blog posts can have one or more tags. These are used by some plugins (e.g. to show related posts). You might want to use tags for key concepts or ideas within your posts.
Tags are normally more granular than categories and may also apply across multiple categories. For instance, you might have a recipe blog with the categories Breakfasts, Lunches, Dinners, Snacks but you might include tags like gluten-free, paleo, keto, and low-calorie.
To add, remove, or edit tags, go to Posts→Tags in your WordPress admin area.
12. Theme
Your WordPress theme is all about how your site looks. Some themes also include different features and functions. There are lots of different free themes to choose from, as well as many advanced premium themes that offer extra features for a price.
You can change your theme (or preview alternative themes) under Appearance→Themes in your WordPress dashboard.
Tip: Changing your theme won’t change your content itself (like the text and images on your site) but it will change how that content displays.
13. URL (aka Permalink)
The URL of a page or post is its unique link on the web. The URL will always go straight to that page or post (even if the page is removed from the navigation menu or the post is bumped off the front page by other posts).
By default, WordPress uses the full title of your page or post for the URL. This can look a bit clumsy, especially for posts, so you may want to edit the URL to something shorter. You can change a post’s URL under the Post settings in the post editor.
Important: Don’t change a URL after you’ve published the post. This can break other links to your post from around the web.
14. User
In the digital marketing world, “user” can mean a website visitor or a customer of a service. But in WordPress terms, a User is someone with access to the admin area of your website.
How much access they have depends on their user role. For instance, they might have the Contributor role, which gives them access to write posts but not to publish them. Or they might have the Author role, which lets them not only write posts but also publish them.
15. Updates
WordPress updates come in 3 varieties: plugin updates, theme updates, and “core updates” that update the WordPress software itself.
It’s important to keep your WordPress site up to date, as an outdated plugin or theme could be a security risk (even if it’s not active on your site). Keeping core WordPress up to date is vital too, as WordPress updates will address any security issues or bugs.
You can always see any updates that your site requires by going to Dashboard→Updates in your WordPress admin area.
16. Widget
A widget is a block that goes in your sidebar, footer, or another widget area of your site. (Some themes use widgets on the homepage.) WordPress has built-in widgets for things like your latest posts, latest comments, categories list, and many more. Some themes also add other widget options.
As well as the widgets themselves, you can add blocks like paragraphs, lists, images, and headings in widget areas (just like you can add those blocks in pages and posts).
First Steps for Getting Started With WordPress
There’s a lot to learn about WordPress, and I still remember how daunting it was when I first created my site on WordPress.
Don’t worry about trying to master everything at once. It’s better to take it a step at a time, getting to grips with different aspects of WordPress by trying them out.
Your first step is to sign up for web hosting and install WordPress, then you can work through the other steps above.
If you’re starting a WordPress site, there’s a good chance that you’re hoping to make money from it. If that’s the case, check out my guide to starting a blog and making money and my list of ways to make money blogging.
Good luck on your WordPress journey—and if you have any questions that weren’t covered in this tutorial, feel free to ask them in the comments below.
Want My Free Blog Business Plan Template?
Grab my free blog business plan template in both Google Doc and PDF format (that’s helped me build a six-figure blog) and reach 500,000+ monthly readers today.
"*" indicates required fields
I’ve had a wordpress site for a while, and I’m still learning new tips. Thanks for the screenshots, very helpful!
Very very Thankful to Ryan Robinson, I made my website own Word-press. But as a beginner I didn’t know about anything but this blog was very helpful in the making of my website its theme customization.
Hi Ryan, I can’t thank you enough for the tools you offer. I checked out the article suggestion tool and it was great – perfect when you run out of ideas for a day or two. Using WordPress can be a challenge so showing us tips with screenshots was very helpful too.
I’m always learning something new everyday on my blogs between plugins and other tools for WordPress.
🙏❤️☺️
Hey Ryan!
When I set up my blog, I went for this cheap looking theme that did not function well. I did not understand as to why my blog wouldn’t perform well in terms of speed.
Neither did I know about free themes like Astra and Kadence at the time.
After about 4 months, when I made the switch to Kadence, I noticed drastic changes in my site speed and my site looked much better than before.
Well, thanks for this beginner’s guide to WordPress. Worth a share!
Catch you later,
Ali
you’re so welcome, Ali! 🙏
Thanks, Ryan. I’ve glossed over plug ins before, but your blog made me realize I need to add some things. The Really Simple SSL is likely one of the most helpful.
Great breakdown of WordPress basics for beginners! This guide simplifies what can initially seem overwhelming, making it a perfect ‘Use WordPress 101’ starting point. The tips on customizing themes and plugins are especially helpful for building a unique site. Thanks for sharing such practical advice!
Thanks for sharing a very informative blog
You’re welcome!
Such a great resource for beginners! WordPress really is the go-to platform for anyone looking to build a website, no matter the scale. From personal blogs to full-fledged eCommerce sites, it’s amazing how flexible and user-friendly it is. This guide is the perfect starting point for anyone ready to dive in.
loved your WordPress guide! It made setting up a site feel so much easier, especially your tips on themes and plugins. The dashboard breakdown was super helpful—thanks for such a clear and practical resource!
Perfect beginner’s guide! WordPress really is beginner-friendly once you get past the initial setup overwhelm. Love the clear steps on choosing hosting, installing themes, and adding plugins—starting with just the essentials is key.