

When you’re new to blogging or creating a website, it often seems like there are many different technical pieces to get up to speed with. Aside from learning how to use WordPress in the first place, the next big worry you may have is how to install WordPress on your self-hosted website.
Getting WordPress installed (and fully optimized) may seem like an insurmountable challenge right now, especially if you have an old book on WordPress or have talked to friends who set up their sites years ago.
You might feel bewildered by discussions about setting up databases or configuring wp-config.
The good news is that installing WordPress is easy these days. It’s just a matter of clicking a few buttons.
All the most popular web hosting companies make installing WordPress on your website super quick and simple. We will take you through everything step by step so you know exactly what to do and what to expect.
First, let’s clarify the basics and troubleshoot some issues that can trip you up when you’re starting.
How to Install WordPress on a Self-Hosted Website in 2026: Everything You Need to Know
There are three main ways to install WordPress, and we’ll cover all of them in this guide:
- One-click install through your web host (easiest — recommended for 95% of people). We’ll walk through this on Bluehost, Dreamhost, HostGator, SiteGround, and Hostinger.
- Manual install via FTP (for hosts without a one-click installer, or if you want full control). We’ll cover the famous “5-minute install.”
- Local install on your own computer (for testing, development, or learning before going live) using free tools like LocalWP, MAMP, or XAMPP.
- Understanding Self-Hosted WordPress
- Bluehost: Setting Up Your Account and Installing WordPress
- Dreamhost: Setting Up Your Account and Installing WordPress
- HostGator: Setting Up Your Account and Installing WordPress
- SiteGround: Setting Up Your Account and Installing WordPress
- WordPress Set Up: Getting the Most Out of Your WordPress Blog
Disclosure: Please note that some of the links below are affiliate links and at no additional cost to you, I’ll earn a commission. Know that I only recommend products and services I’ve personally used and stand behind. When you use one of my affiliate links, the company compensates me, which helps me run this blog and keep my in-depth content free of charge for readers (like you).
Ready to Start Your Blog?
Check out my ultimate guide: How to Start a Blog (on the Side) Today.
1. Understanding Self-Hosted WordPress
WordPress is software that lets you easily create a website. You can use it to write blog posts, create and publish pages for your site … and much more.
There are two different types of WordPress:
- Self-hosted WordPress (also called WordPress.org): The type of WordPress that big, professional sites use and the type we discuss in this article. Because you own the website, you get complete control over how you use WordPress. You can add third-party plugins (extra features) or even pay a developer to create something just for your site if you want to. This type of WordPress is free, but you’ll need to pay for your website’s domain name (web address) and hosting (storage space).
- Hosted WordPress (also called WordPress.com): This type of WordPress comes with hosting built-in. You don’t need to install anything; you sign up for an account and enter various details about your site. This type of WordPress is often used by people running a website as a hobby, such as a personal blog or a fan site for their favorite TV show. The main drawback is that you’re much more limited in what you can do than with self-hosted WordPress.
This Guide is for People Using Self-Hosted WordPress
That means you need your own web hosting and domain name. If you haven’t got those in place already, I’d recommend using Bluehost or Dreamhost.
They’re both easy to get started with; they have helpful and friendly support teams; they’ll handle the process of adding WordPress to a website for you … and, best of all, their web hosting is excellent value for money.
Bluehost and Dreamhost will give you a completely free domain name (such as yourwebsitename.com) when you sign up, too.
5 Web Hosting Platforms With Super-Fast and Easy WordPress Installation (One-Click Install)
While there are many different web hosts that can run WordPress, some make it especially easy to get up and running.
I’m going to take you through my favorite web hosts and provide a complete guide to installing WordPress on each.
2. Bluehost: Setting Up Your Account and Installing WordPress
Bluehost is a top-rated web host for WordPress sites — and as you might expect, it’s effortless to install WordPress on your Bluehost website.
Creating a Bluehost Account
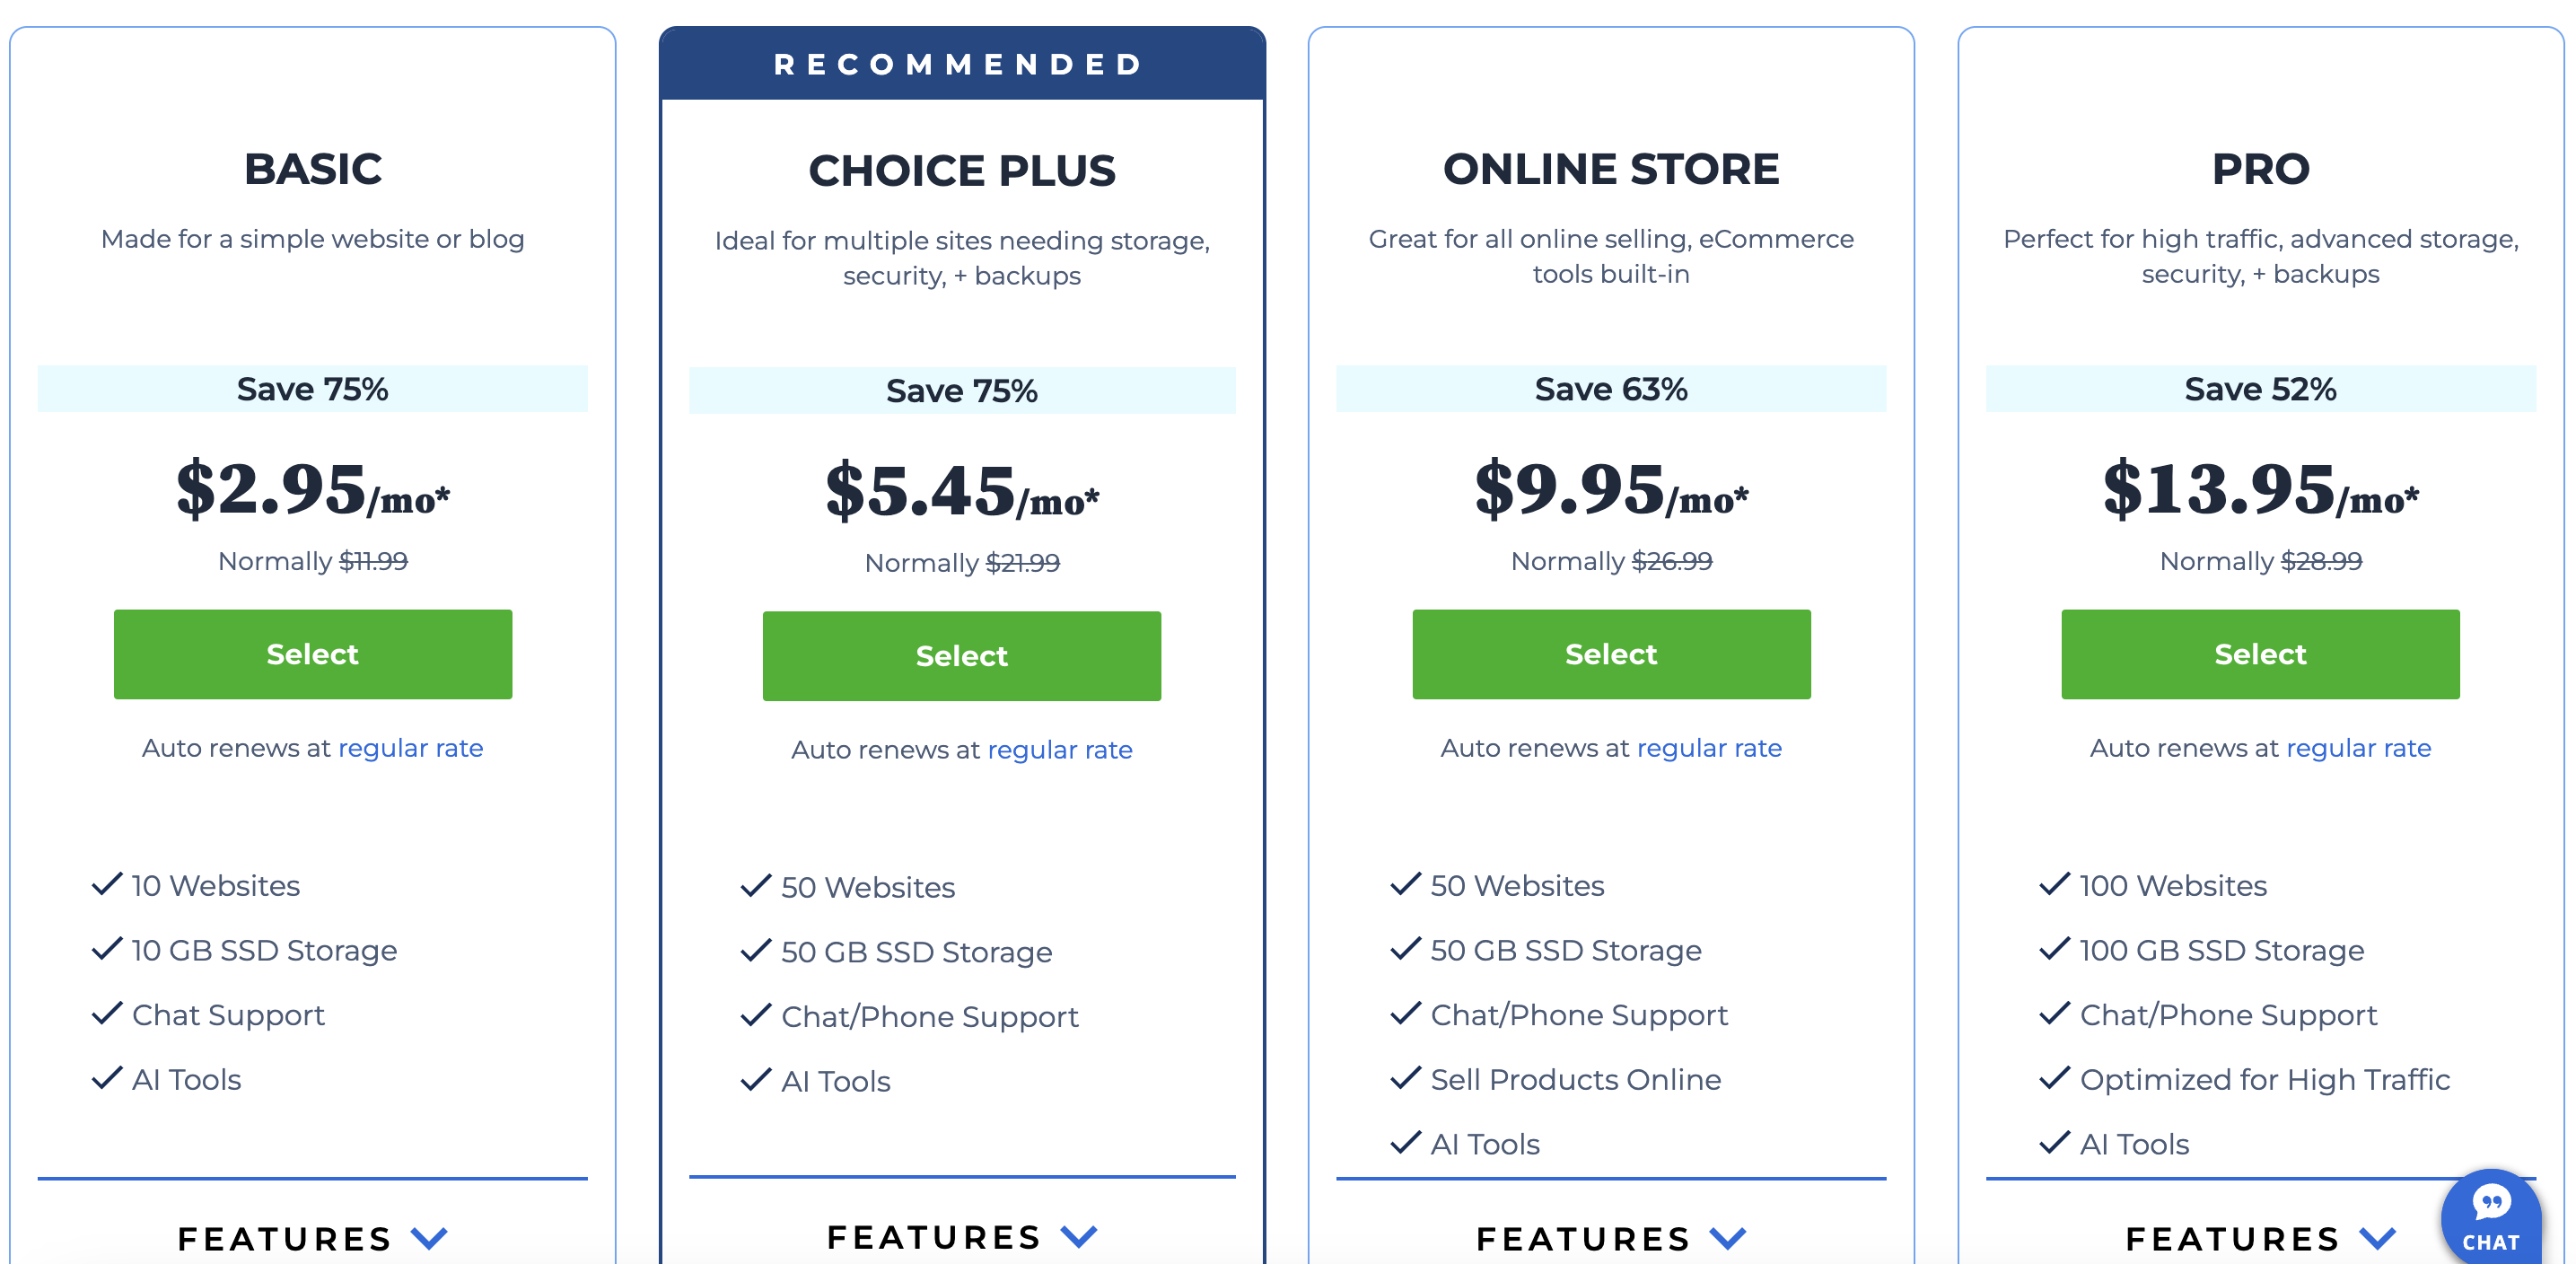
If you haven’t already set up your hosting account, head over to the Bluehost website and click to get started. You can choose from different plans, starting from just $2.95/month.
After selecting your plan, you’ll be prompted to set up your domain, though you can skip this if you haven’t quite decided on your website name yet. You’ll still be able to get your free domain after creating your Bluehost account.
Next, you’ll need to fill in your details, select whether you want a 12-month or 36-month package, and choose what package extras you want:

Tip: Bluehost will automatically add Codeguard Basic (for website backups) and SiteLock Security Essentials (for protection against spammers and hackers). You can uncheck these if you want to keep your website costs down, though if you do so, I’d strongly recommend using a website backup plugin such as UpdraftPlus and a security plugin such as Sucuri. You can find out about those plugins, plus many more, on my round-up of the best WordPress plugins.
Once you’ve paid, you’ll be prompted to pick a password for your account. You can then log in to your Bluehost account and install WordPress.
Installing WordPress on Bluehost
Bluehost makes things super simple for you. As soon as you log in, you’ll see a screen like this:

Just click the “Create your website” button to get started. Bluehost will ask if you need help. You can choose which option you choose here. I chose “A Little Help.”
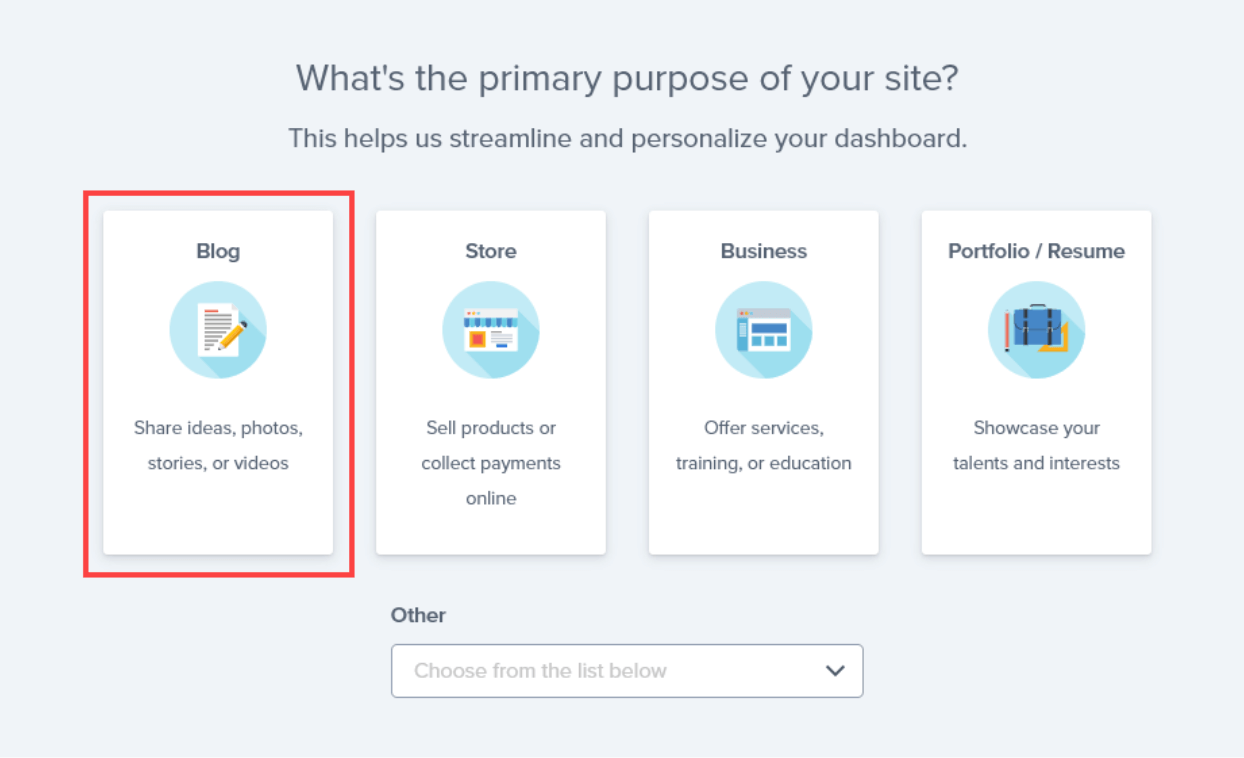
Next, Bluehost will ask you to choose the type of website you’re creating. I went with “Blog,” — but you can pick a different option if that suits your site better.
(Don’t worry; you can change this at a later stage. For instance, you might eventually want to add an online store to your WordPress blog.)
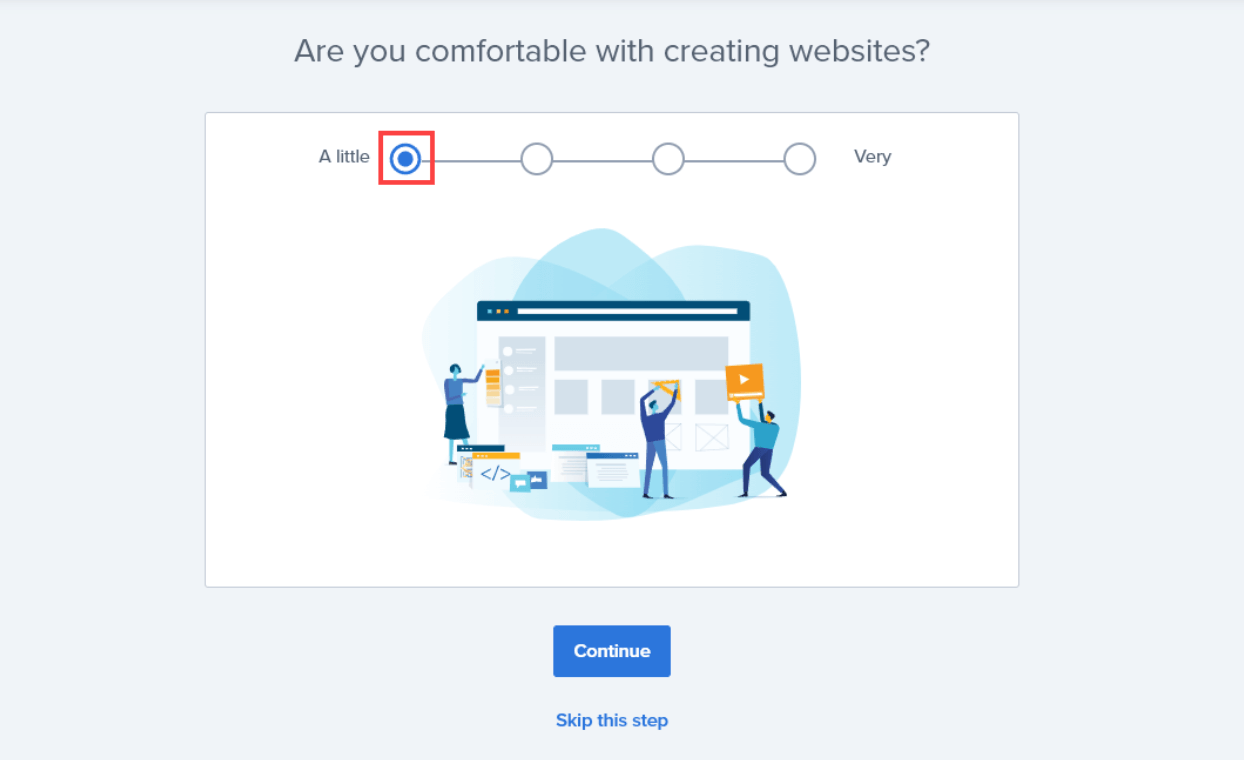
After this, Bluehost will ask if you’re comfortable creating websites. We’ll set this to “A little” to get the maximum help and support.
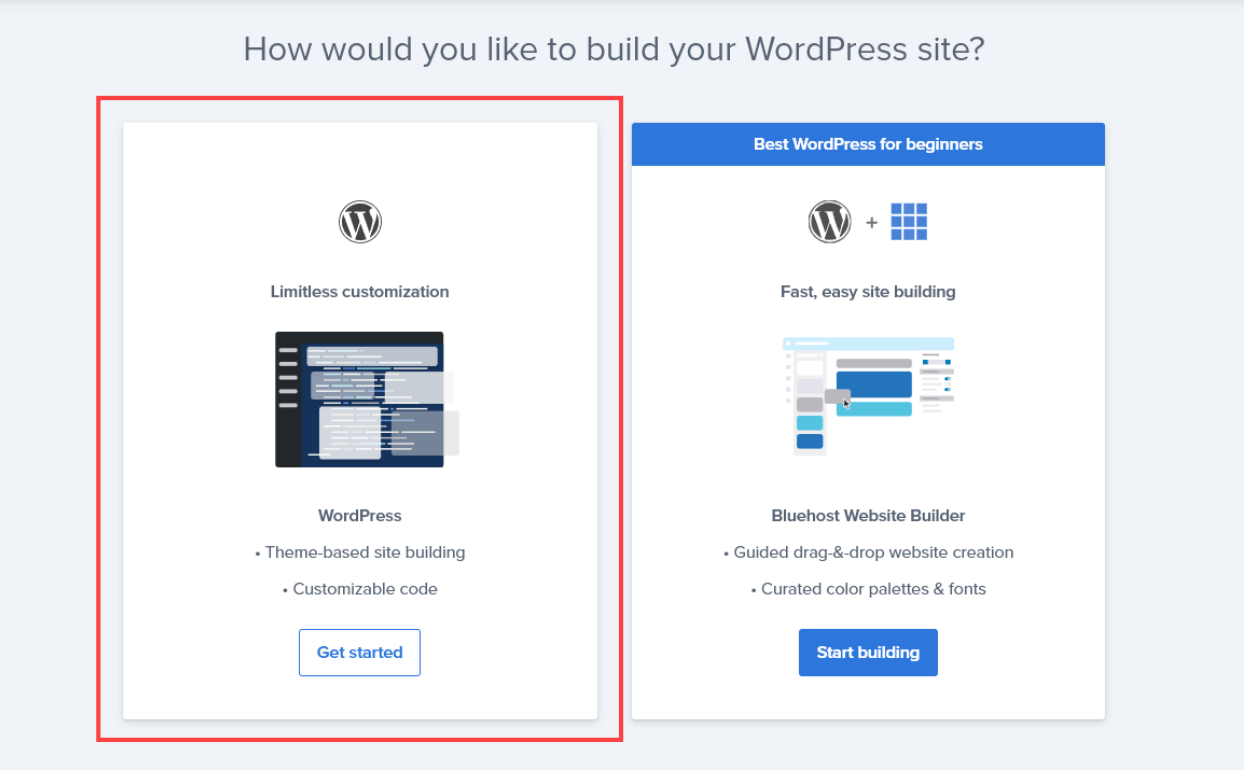
Next, Bluehost will ask how you’d like to build your WordPress site. I recommend departing from the default and using the “Limitless customization” option, which will give you full flexibility.
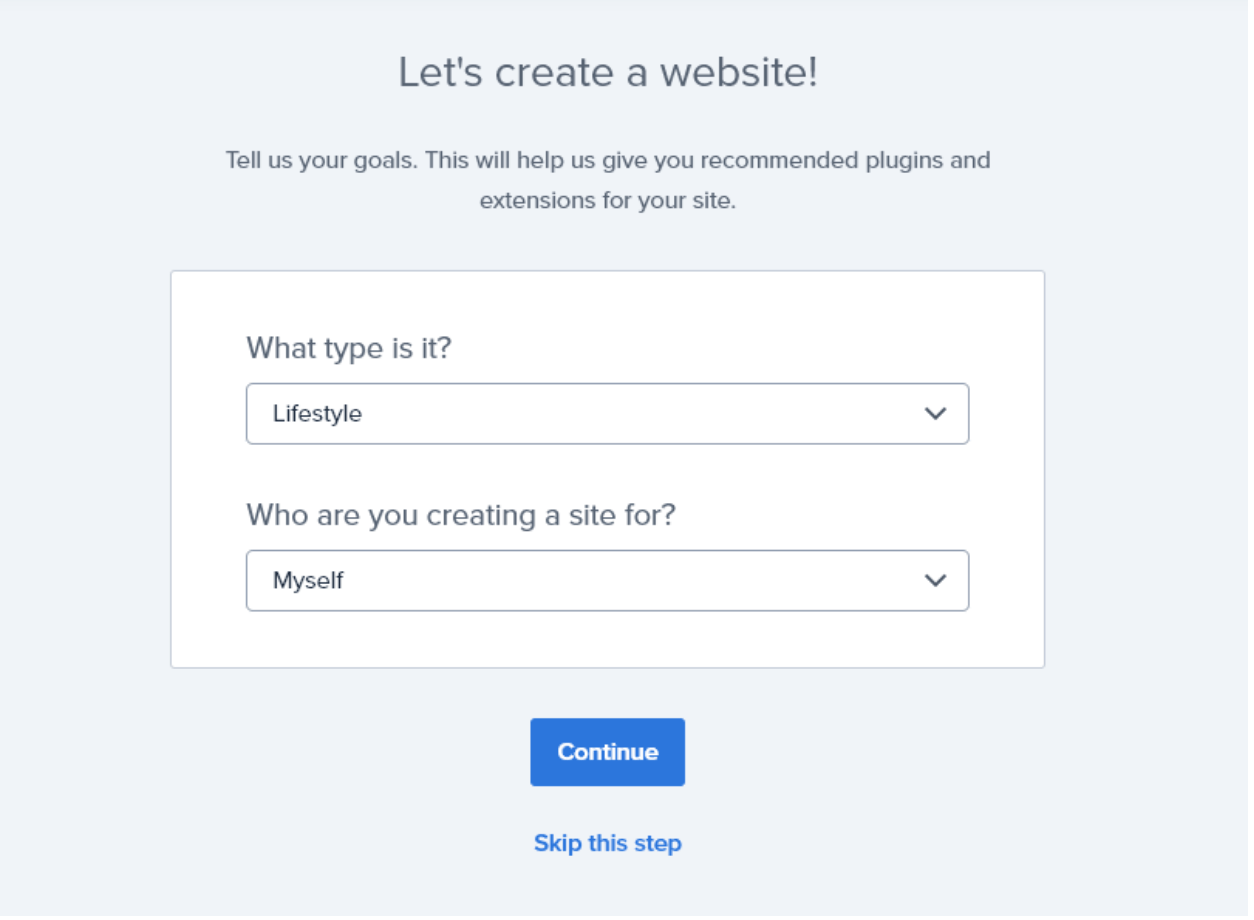
You’ll then be asked to give some details about your site and select the blog topic (if it’s a blog, choose your main blogging niche).
You can also tell Bluehost whether you’re creating the site for yourself, a client, your employer, or someone else. Just select “myself” here.
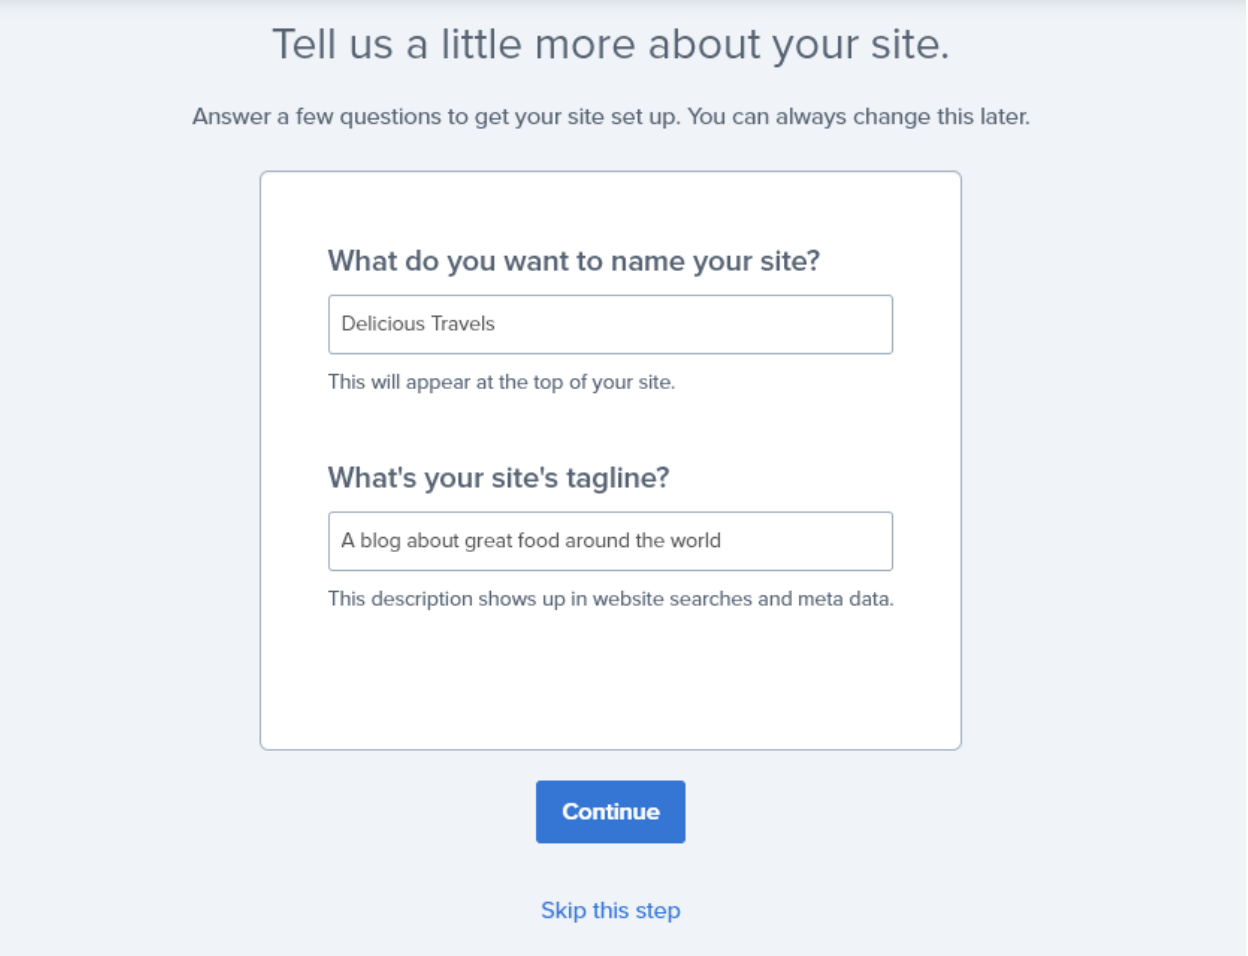
Now, it’s time to enter your website’s name and tagline (short description). Don’t worry if you’re not sure what to put here — it’s straightforward to change these details after setting up WordPress.
Now, Bluehost will suggest some WordPress themes that you might like. A theme is like a template or design for your website.
Again, it’s super easy to change these later, so pick any free theme you like for now. We’re going with the Hello Elementor theme, my top pick of WordPress themes.

Next, you’ll briefly see a message that Bluehost is installing WordPress. Yep, the WordPress installation itself takes just seconds!
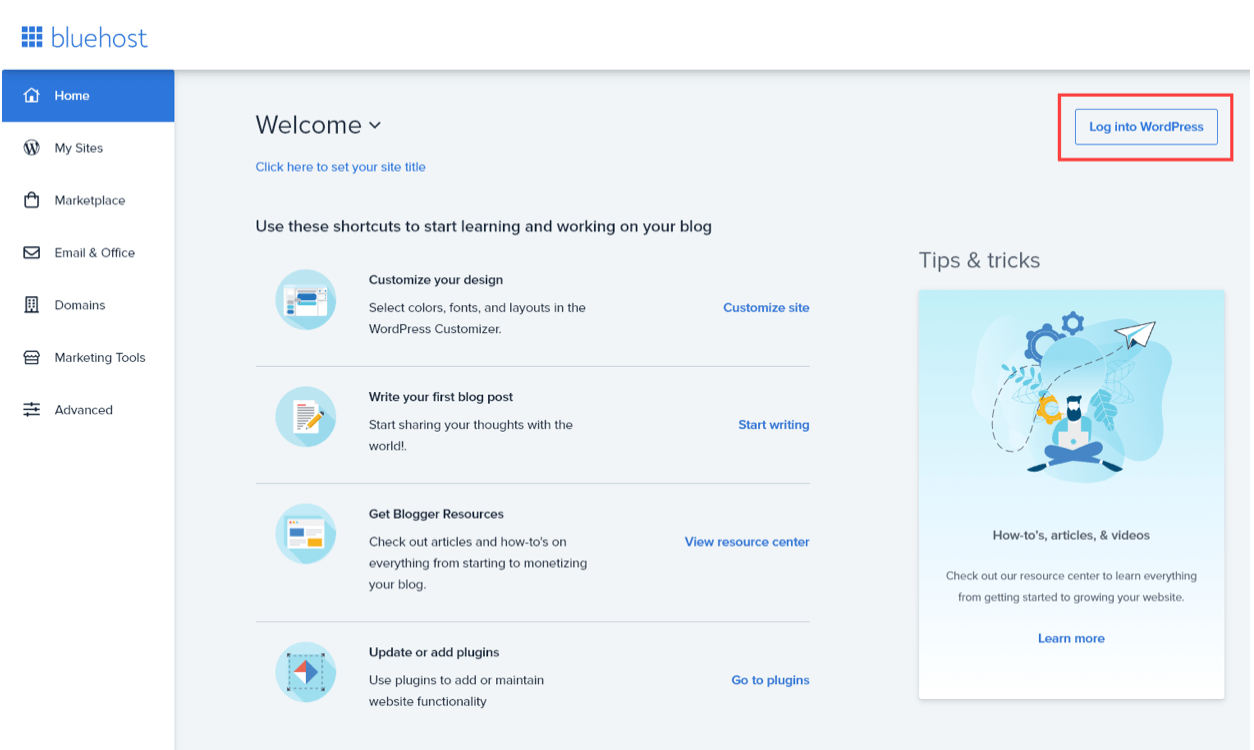
You’ll then be taken to your main Bluehost dashboard, which has plenty of shortcuts to get started on your website.
Or, if you prefer, to log to your WordPress admin area (where you can create posts and pages, change themes, add plugins, and more), you just need to click the button on the top right:
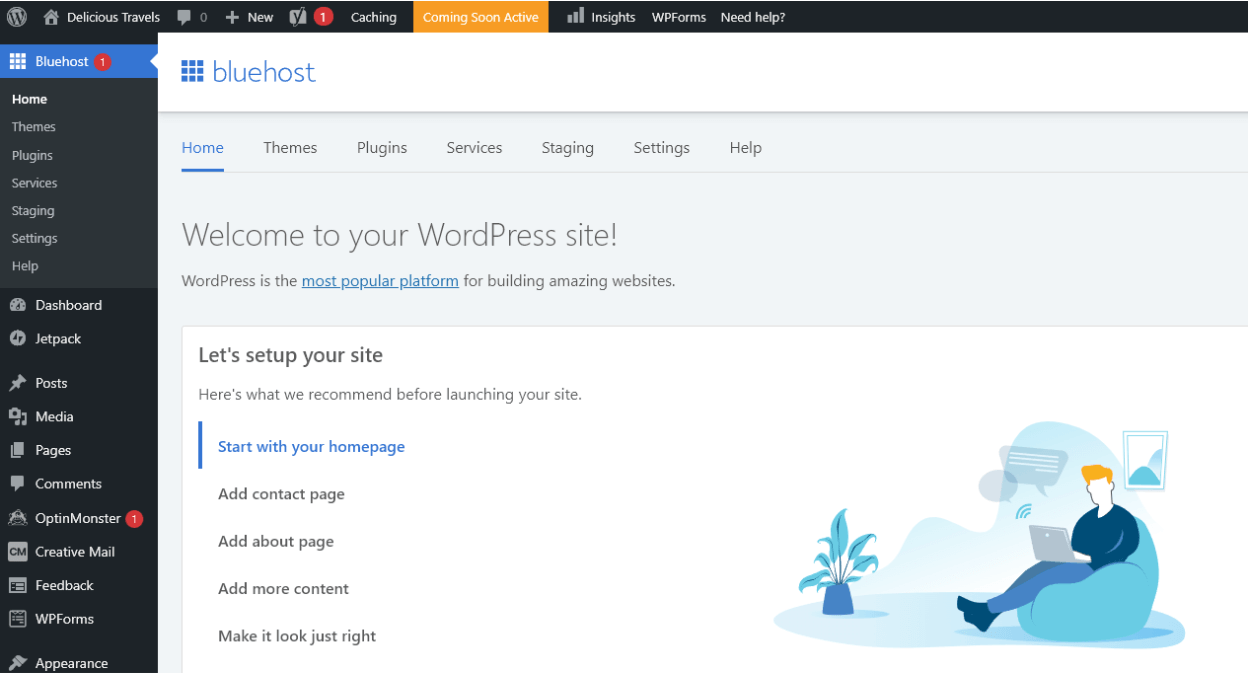
You’ll see your WordPress admin area, which looks like this. Bluehost has automatically installed valuable plugins, such as Jetpack (which helps keep your site running fast) and WPForms (a contact forms plugin).
Have fun exploring and experimenting with your new WordPress site—you officially own a self-hosted blog now.
The Bluehost support team is always happy to help with WordPress questions if you encounter any problems.
3. Dreamhost: Setting Up Your Account and Installing WordPress
Dreamhost is a great-value web host that offers an accurate month-by-month plan, making it one of the most affordable options for beginners.
Creating a Dreamhost Account
If you don’t already have your Dreamhost web hosting account set up, it’s elementary to get started. Go to the Dreamhost website and scroll down to the hosting plans. You can go with the Shared Starter or Shared Unlimited.

Once you’ve decided on a plan, scroll down and click the “Sign Up Now” button.
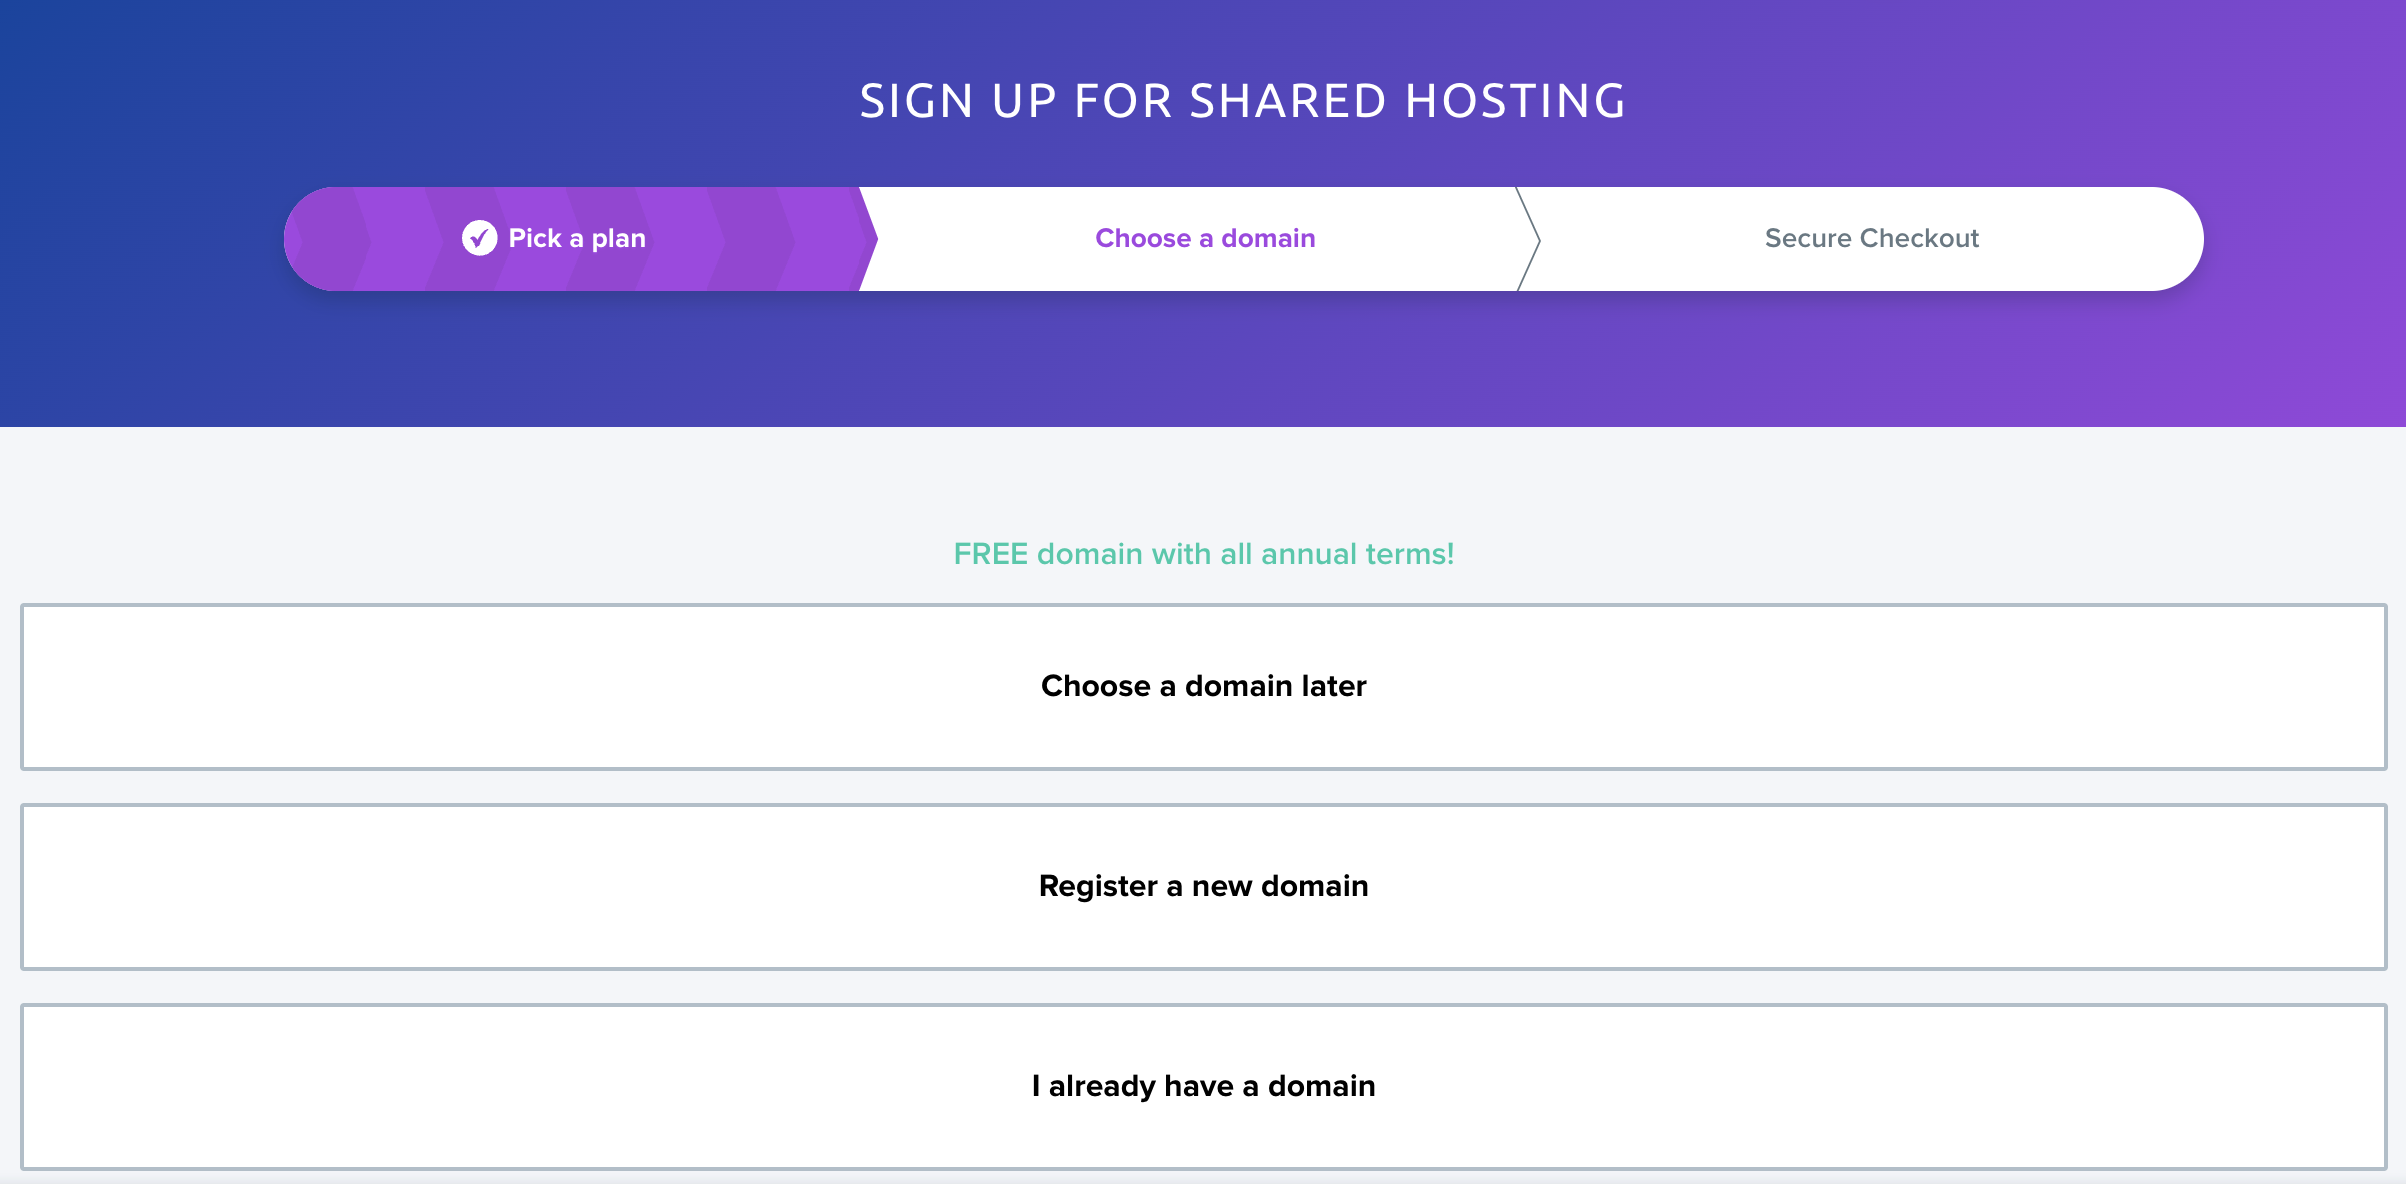
You’ll then be prompted to choose a domain. You can register one now by clicking “Register a new domain.”
(Dreamhost will give you the domain for free if you’re paying for a year or more of web hosting.) If you want to pick your domain later, that’s fine — select the “Choose a domain later” option.
Then, you’ll see a checkout page where you need to enter your card details (or pay via PayPal). Dreamhost automatically adds some options, including DreamShield Protection and DreamHost email.
You can uncheck these if you want. If you turn off DreamShield Protection, I strongly recommend using a plugin like Sucuri to keep your website safe.
Dreamhost also adds the WP Website Builder plugin. You can choose to use this or a different page builder plugin—personally, I prefer Elementor’s page builder.
You’ll also want to check and potentially change the length of your initial hosting term. This will default to 3 years, which works out cheapest over time — but costs a lot upfront.
Once you’ve added your credit card details, you’ll see the “Submit Order” button. Click that to pay and create your account.
After your account has been created, you’ll be prompted to enter a password:
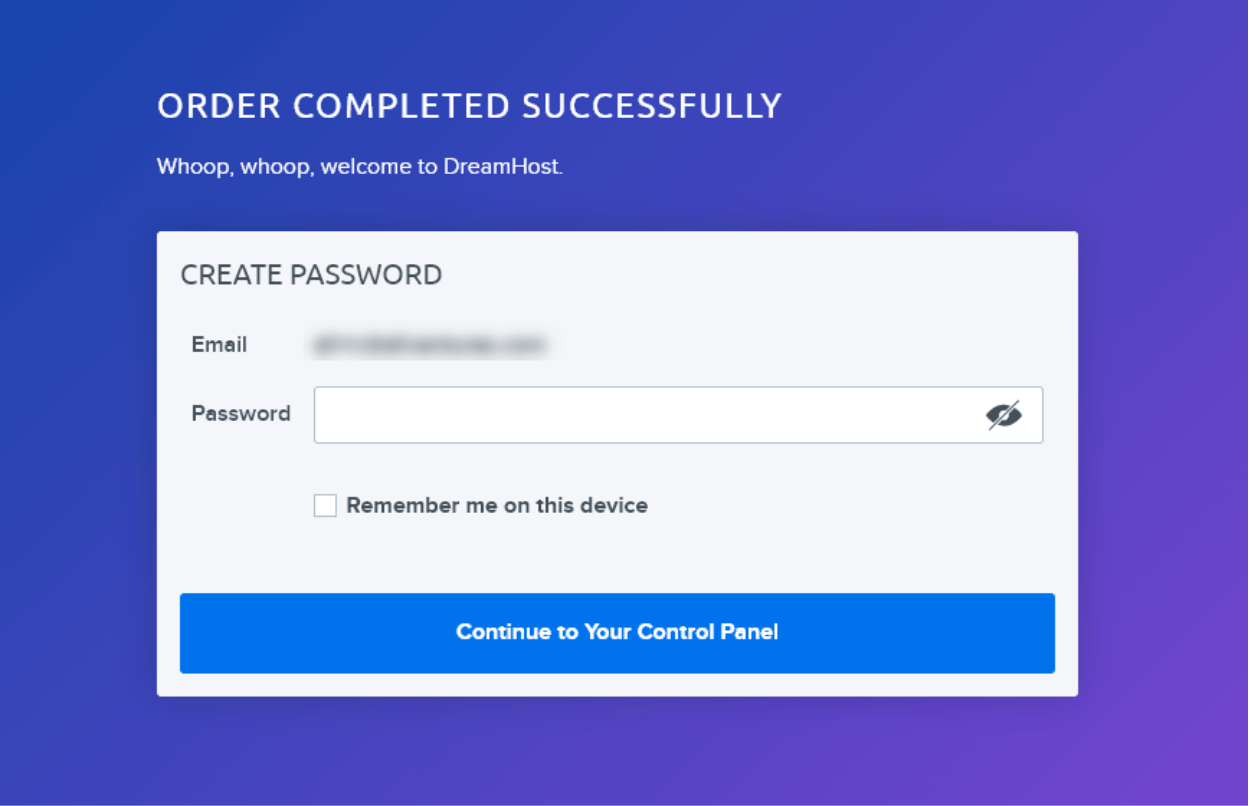
Then, simply click the button to continue to your control panel. You’ll see a progress bar indicating that Dreamhost is finishing setting up your hosting, which should take a few minutes.

Your website will be ready to use once that progress bar reaches 100%.
Dreamhost’s Automatic WordPress Installation
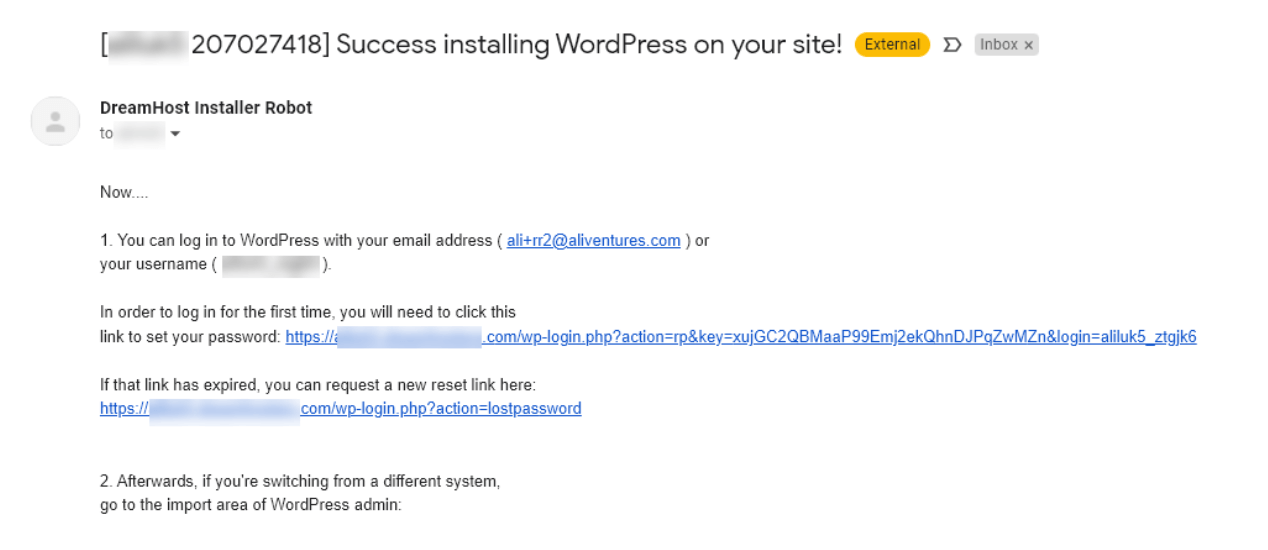
If you left the box checked to install WordPress automatically, you should receive an email from Dreamhost Installer Robot after a few more minutes with the subject line “Success installing WordPress on your site!”
That’s it — you didn’t have to do anything except leave that box checked. WordPress has been installed for you.
To log in to your WordPress admin area, click the particular link in the email and choose a password.
After that, you’ll see your WordPress dashboard. Dreamhost has automatically installed valuable plugins for you, including WPForms (a contact forms plugin) and All in One SEO (a search engine optimization plugin).
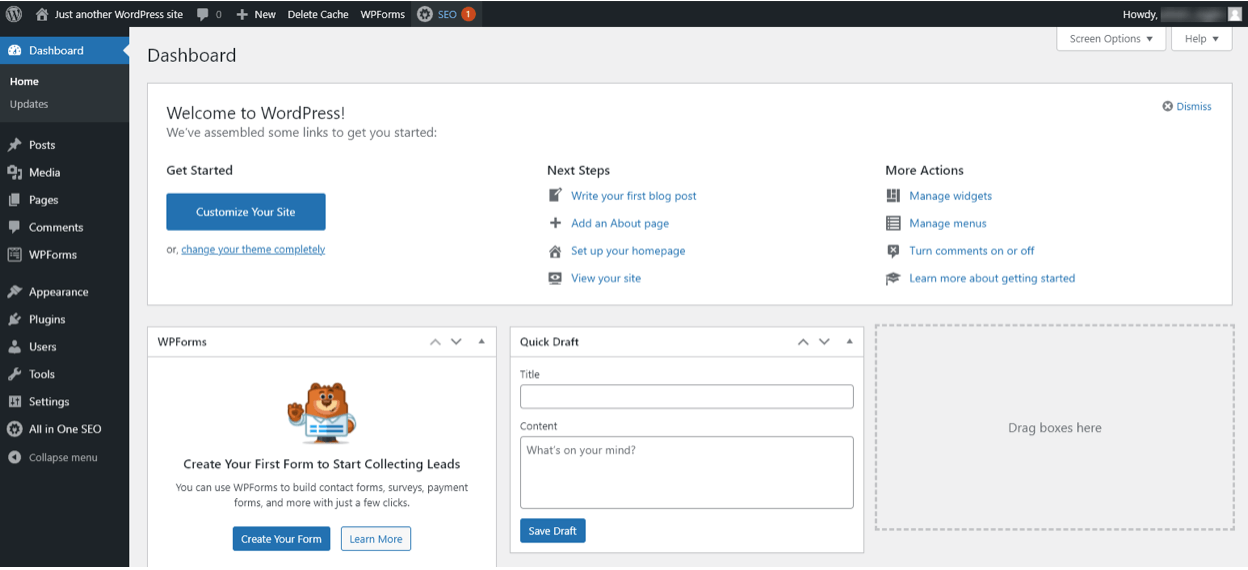
The “Welcome to WordPress” section has many useful links to get you started.
Installing WordPress After Setting up Your Dreamhost Account
What if you unchecked the “pre-install WordPress” box, so WordPress hasn’t been added to your website? Or what if you’ve registered a new domain name to run a second WordPress site from your account?
That’s no problem — you can easily install WordPress after creating your Dreamhost web hosting account.
First, you’ll need to log in to your Dreamhost admin area. Then, go to WordPress → One-Click Installs on the left-hand side.
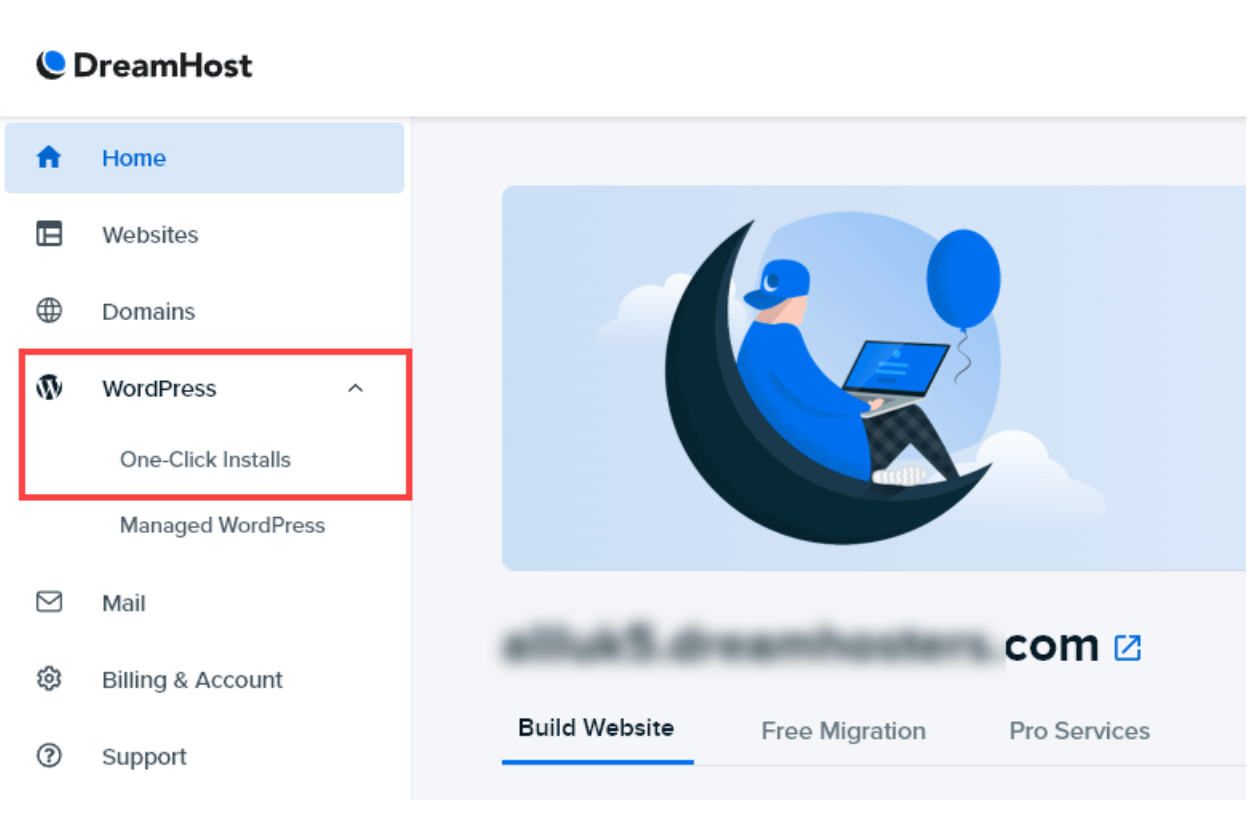
On the next screen, you’ll see some information about WordPress. Go ahead and click the “Learn More & Install” button.
You’ll then see a popup window with the one-click installer. Here’s what you need to do here:
- Next to “Install to,” choose your domain name from the dropdown list.
- Leave “Select Database” as “Automatically Create Database”.
- The “Deluxe Install” option is automatically checked. This adds themes and plugins to your website. If you want to start with bare-bones WordPress, uncheck this box.
- The “Install WP Website Builder” option adds a drag-and-drop page builder. I prefer the Elementor page builder, so I’d suggest unchecking this box.
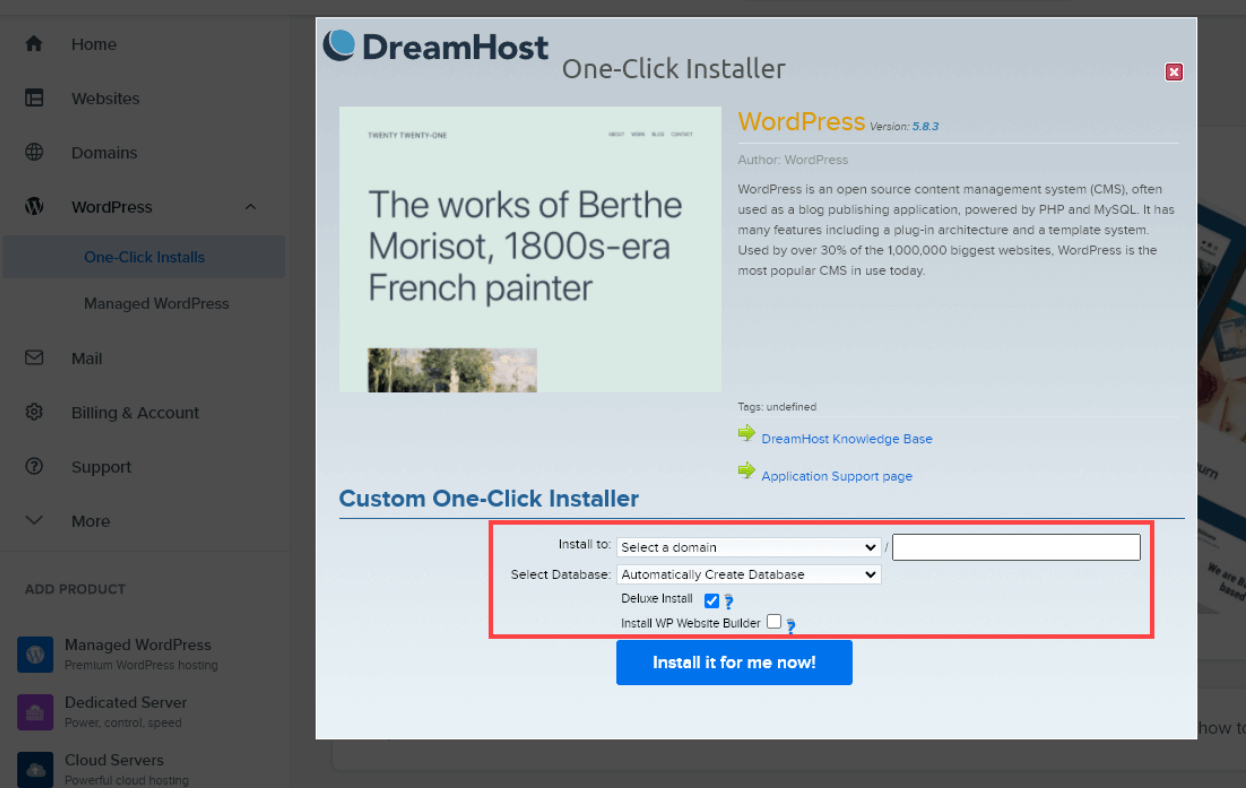
Once you’re ready, go ahead and click the “Install it for me now!” button.
You’ll get an email from WordPress with a special login link that you can then use to access your admin area, as shown above when we looked at the automatic installation process.
4. HostGator: Setting Up Your Account and Installing WordPress
HostGator is another great option for your web host, though their interface can seem a little bit less beginner-friendly than both Bluehost and Dreamhost.
Creating a Hostgator Account
If you don’t already have a HostGator account, go to their website and click the “Get Started Now!” button.
Everything you need to fill out is then shown on one page. First, you need to pick a domain name and choose your hosting plan (Hatchling is the cheapest, most basic plan).
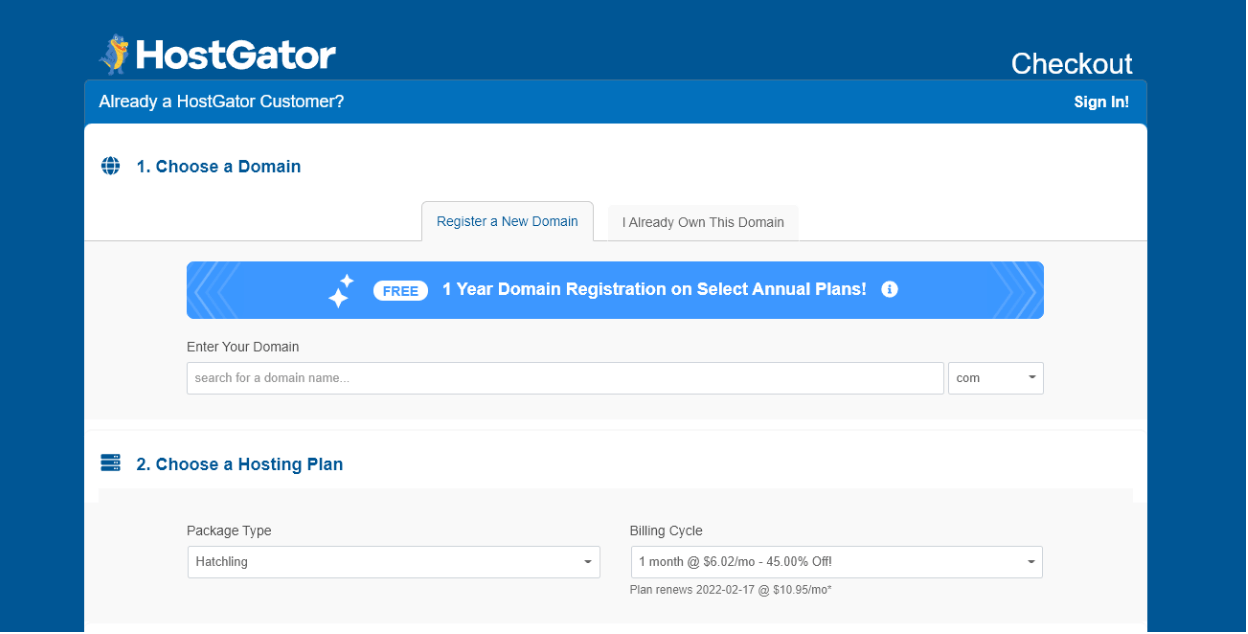
Important: With HostGator, you don’t have the option to create an account without a domain name (like you do with Bluehost and Dreamhost). You need to either register a new domain with HostGator or enter a domain that you already own through a different domain registrar.
You’ll need to create both a password and a PIN, then enter your billing details.
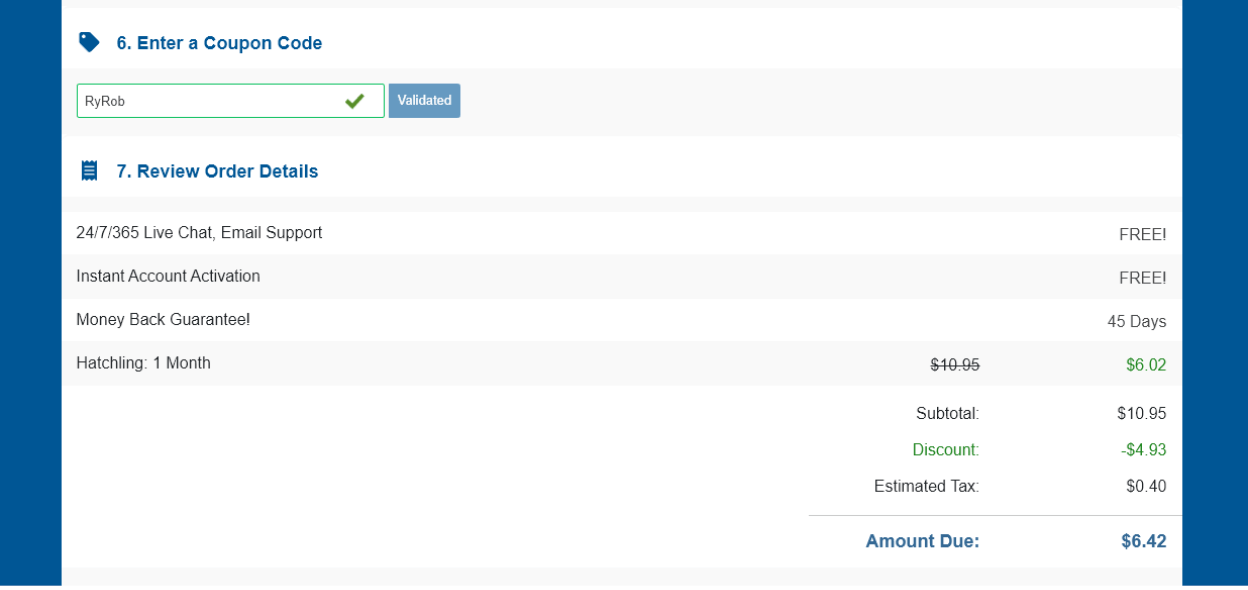
HostGator doesn’t automatically add any extras for you, but you might want to add SiteLock essentials to keep your website secure. If you don’t add this, I recommend using Sucuri or another WordPress security plugin on your site.
Once you’ve filled out all the details, you’ll see a review of your order at the bottom of the page. The “RyRob” coupon code should have been automatically entered for you:
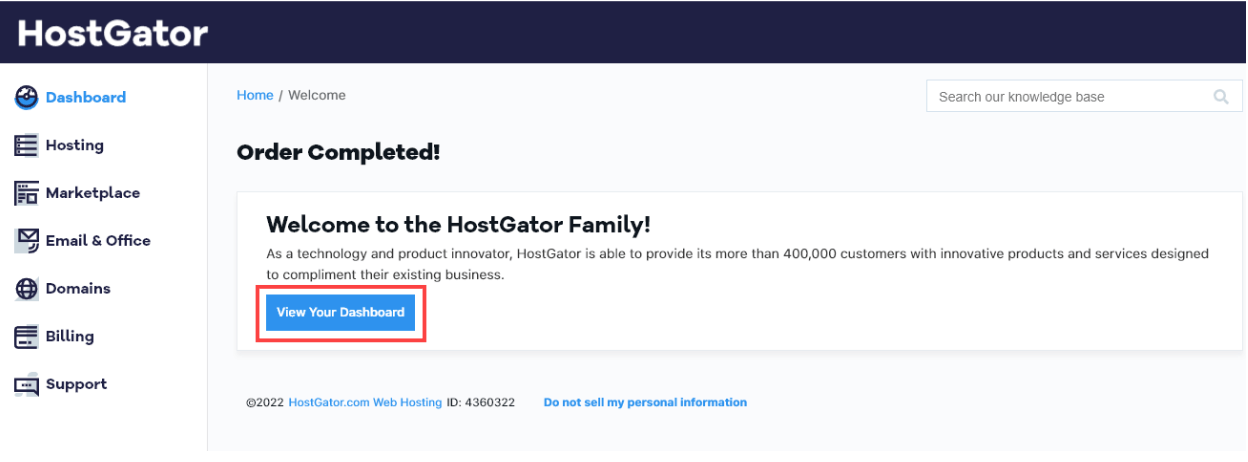
After you submit your details, HostGator will set up your web hosting account and you’ll be automatically logged in.
Installing WordPress on HostGator
Once you’re logged into your HostGator account, click the “View Your Dashboard” button.
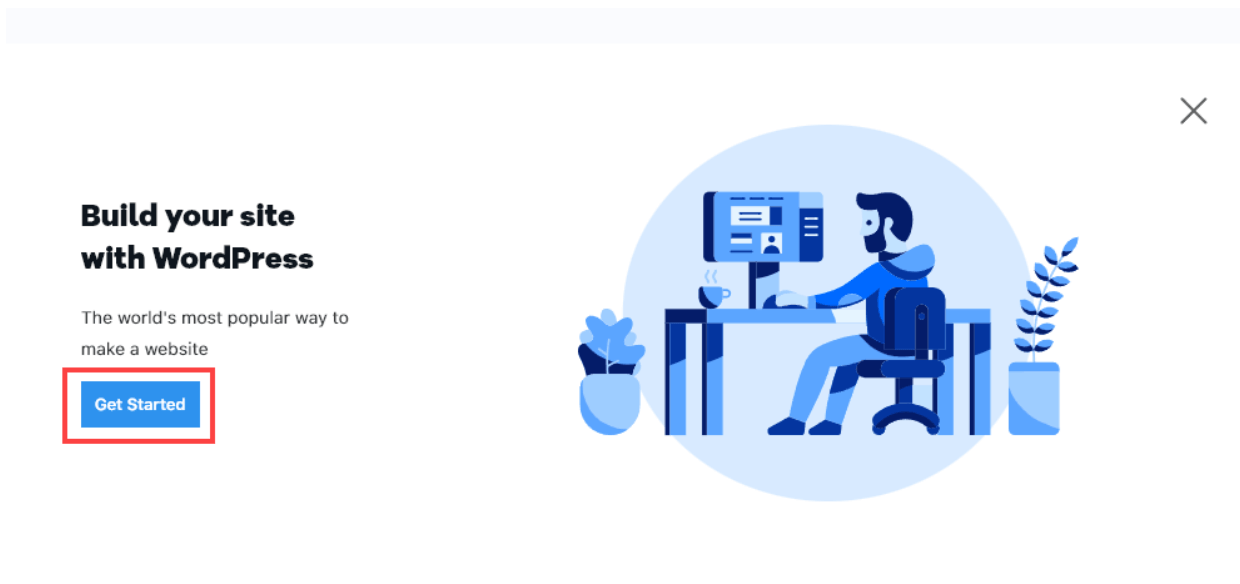
Click on the “View Your Dashboard” button, and you’ll be shown lots of useful links. Don’t worry about what everything means — just click the “Create Website” button here:

You’ll be given the option to build your site with WordPress. Simply click “Get Started” to begin.
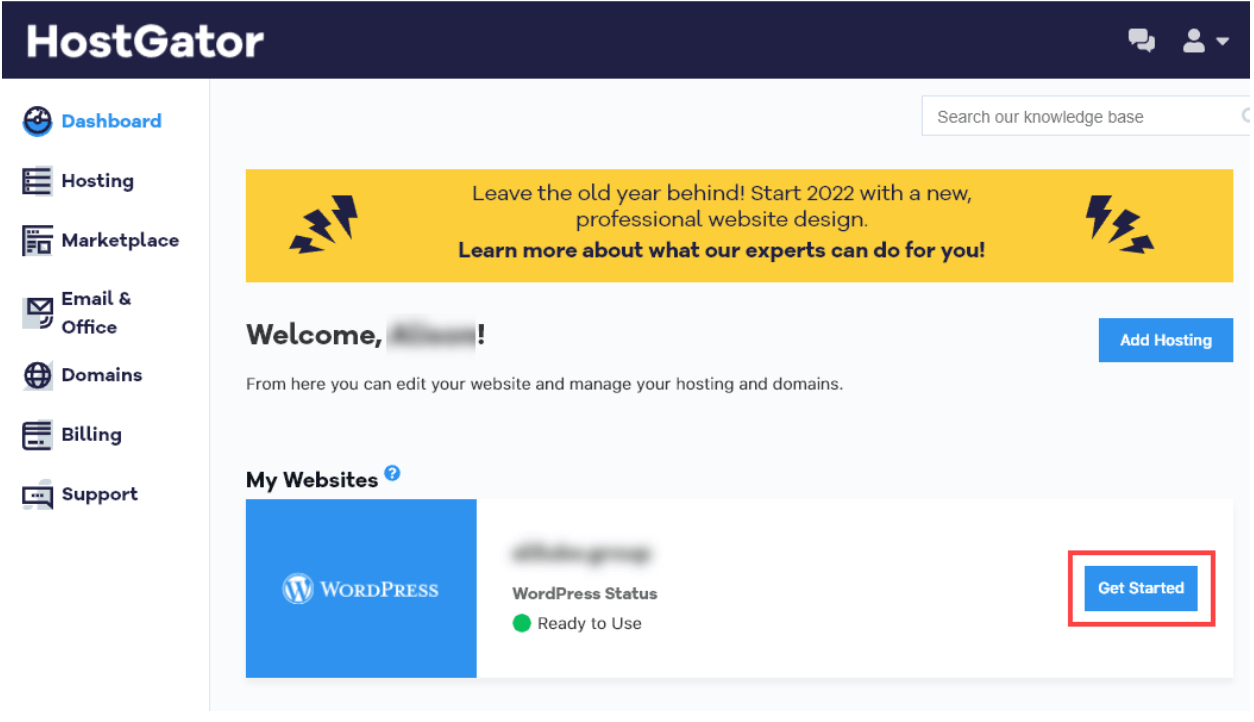
Next, you’ll see the message “Creating your WordPress account…” for a minute or two. If it takes longer than this, Hostgator will send you back to your Dashboard.
You’ll see the “Ready to Use” status once your site is set up — just click the “Get Started” button alongside.
Next, you’ll be shown your WordPress login information. Make sure you copy this in a safe place before clicking the “Go to WordPress” button.
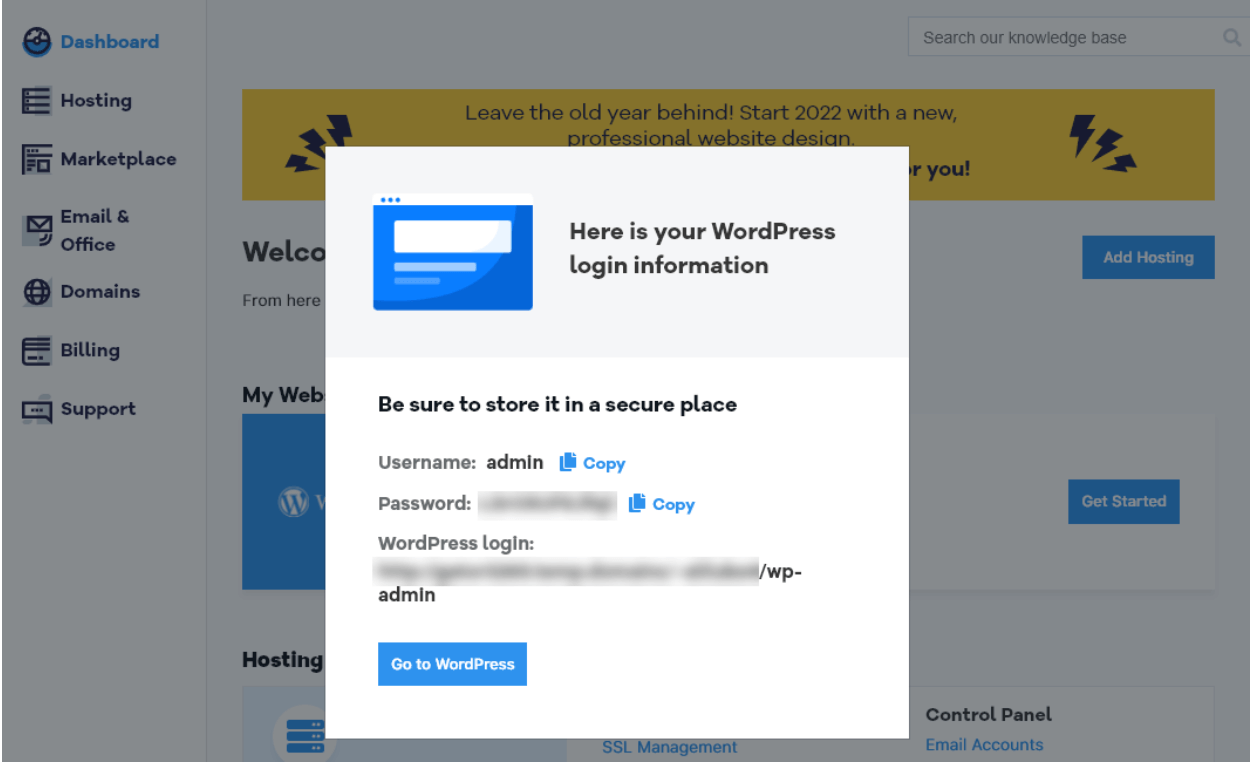
Tip: Clicking “Go to WordPress” opens a pop-up window. If this gets blocked by your browser, you’ll see the Hostgator dashboard again. Just click the “Edit Site” link to get to your WordPress admin area and it should open up in a new tab.
Hostgator will automatically install some popular and high-quality plugins for you, including Jetpack, OptinMonster (email list opt-in forms), WPForms (contact forms), Yoast SEO (search engine optimization), and more.
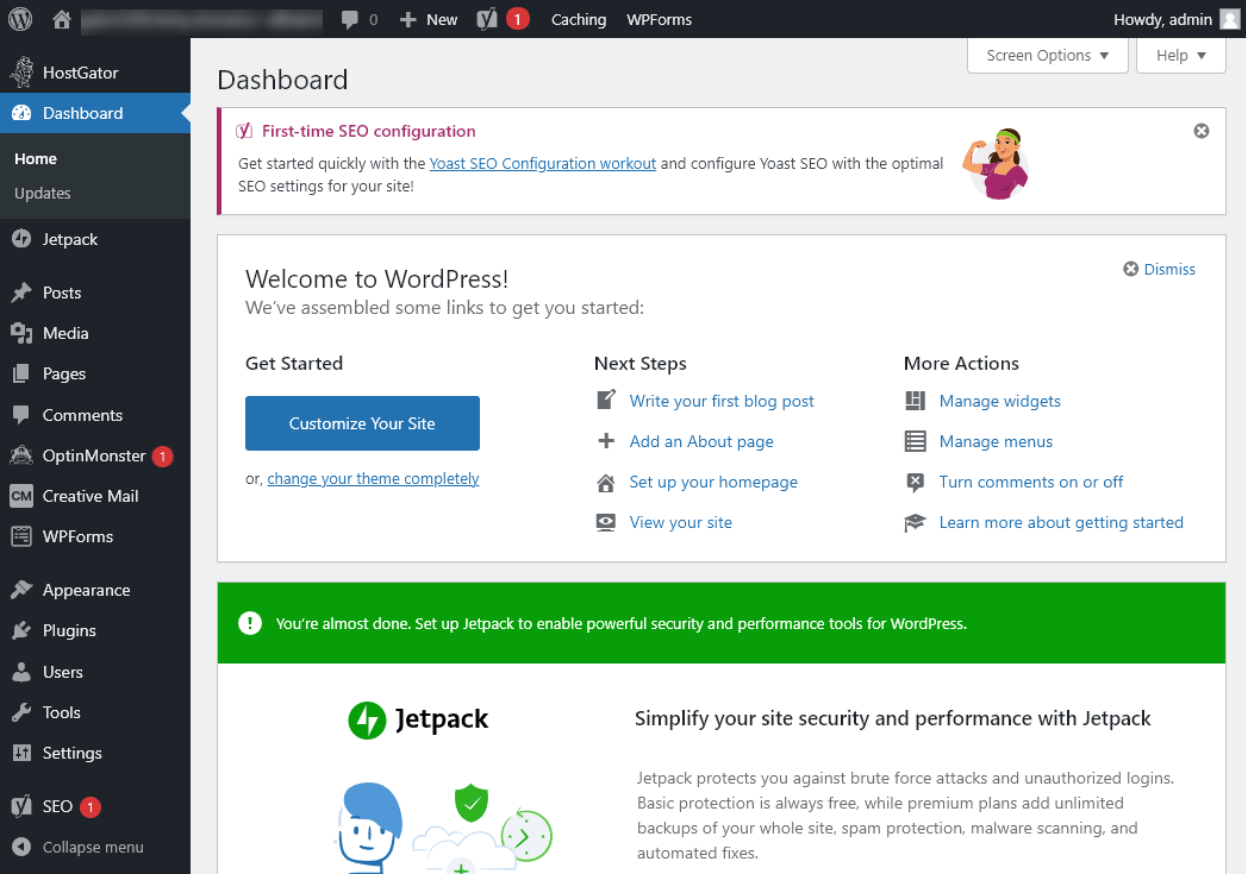
You can use the “Welcome to WordPress” links to get started with your website.
5. SiteGround: Setting Up Your Account and Installing WordPress
SiteGround is a very well-established web host — and like both Bluehost and Dreamhost, it’s an officially recommended WordPress web host.
It has a great reputation for reliability and performance, but it is a bit more expensive than Bluehost and Dreamhost.
Creating a SiteGround account
If you don’t already have a SiteGround account, head over to the SiteGround website. First, you need to choose a plan — just click the “Get Plan” button for whichever one you want.
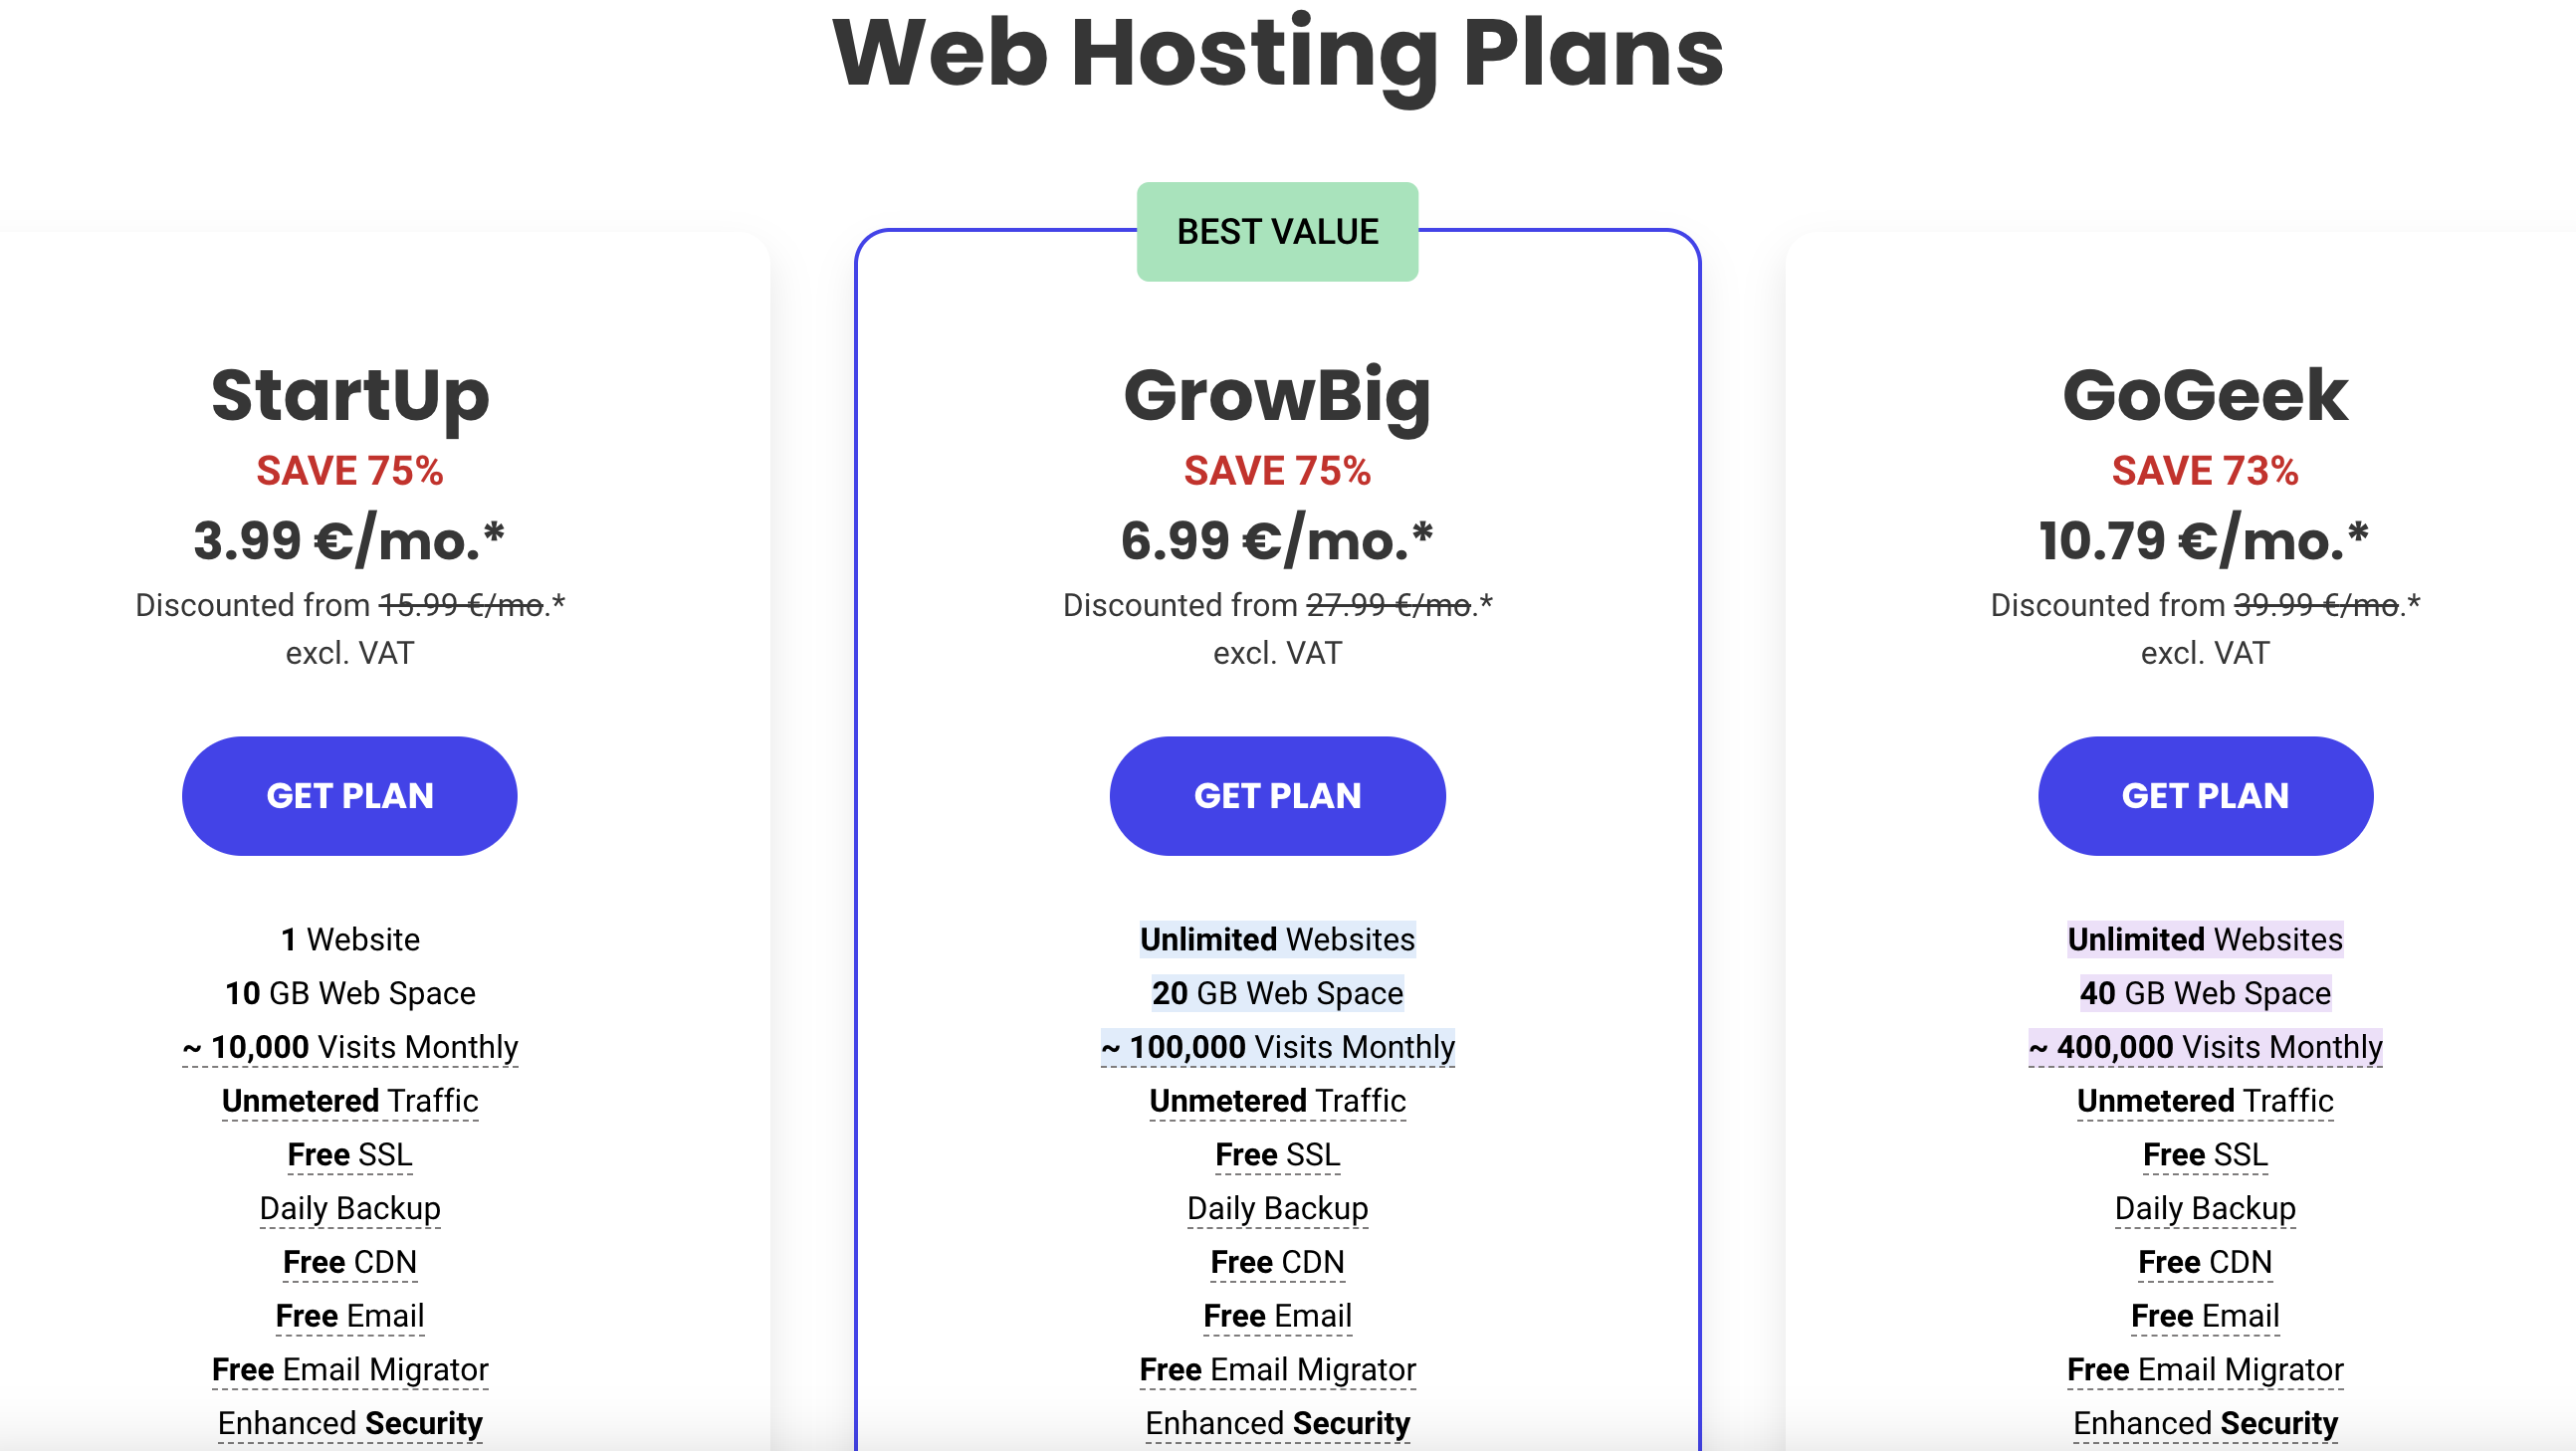
Next, SiteGround will prompt you to register a new domain, or enter one that you already own.
Unlike with Bluehost and Dreamhost, you can’t opt to create a web hosting account before setting up a domain name. Also, you’ll have to pay for your domain name.
For this reason, if you’re on a tight budget, I’d recommend opting for Bluehost or Dreamhost over SiteGround.
Their plans are cheaper and both those hosts include a free .com (or other) domain name with each annual plan.
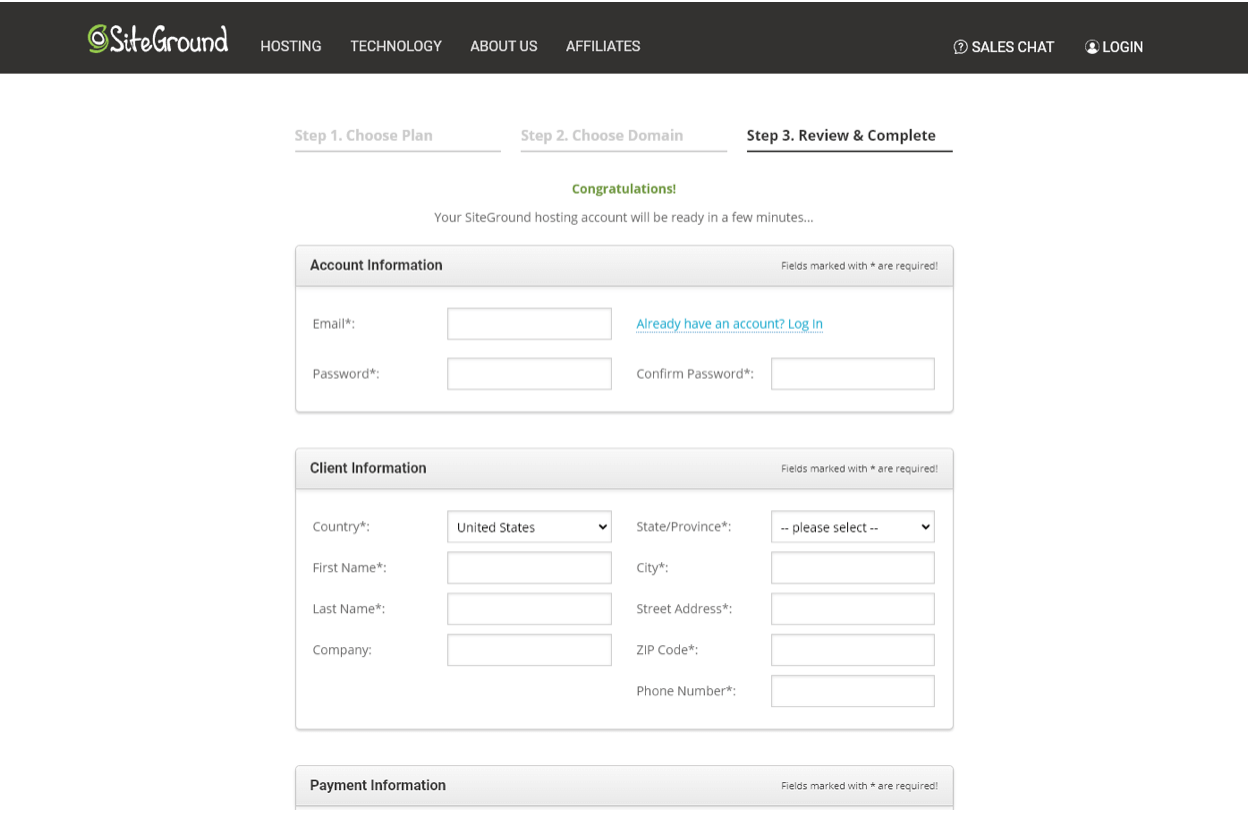
After choosing your domain, you’ll need to enter your personal details and your billing information.
Make sure you select the right length of plan. You can check the boxes for Domain Privacy and SG Site Scanner if you want to.
If you decide not to use the SG Site Scanner, I strongly recommend installing Sucuri or another security plugin on your WordPress site.

Once you’re ready, click the Pay Now button at the bottom of the screen.
Before your SiteGround account is created, you’ll first get a text message to confirm your phone number.
You may also have to go through an extra verification step. SiteGround will send a small payment to your credit card account — you’ll need to check your account to see what the amount is so you can confirm it.
After completing these steps, your SiteGround account will be created and you’ll be able to log in.
Installing WordPress on SiteGround
When you log in to SiteGround for the first time, you’ll see a welcome screen. Simply click the orange “Set up site” button to start installing WordPress.
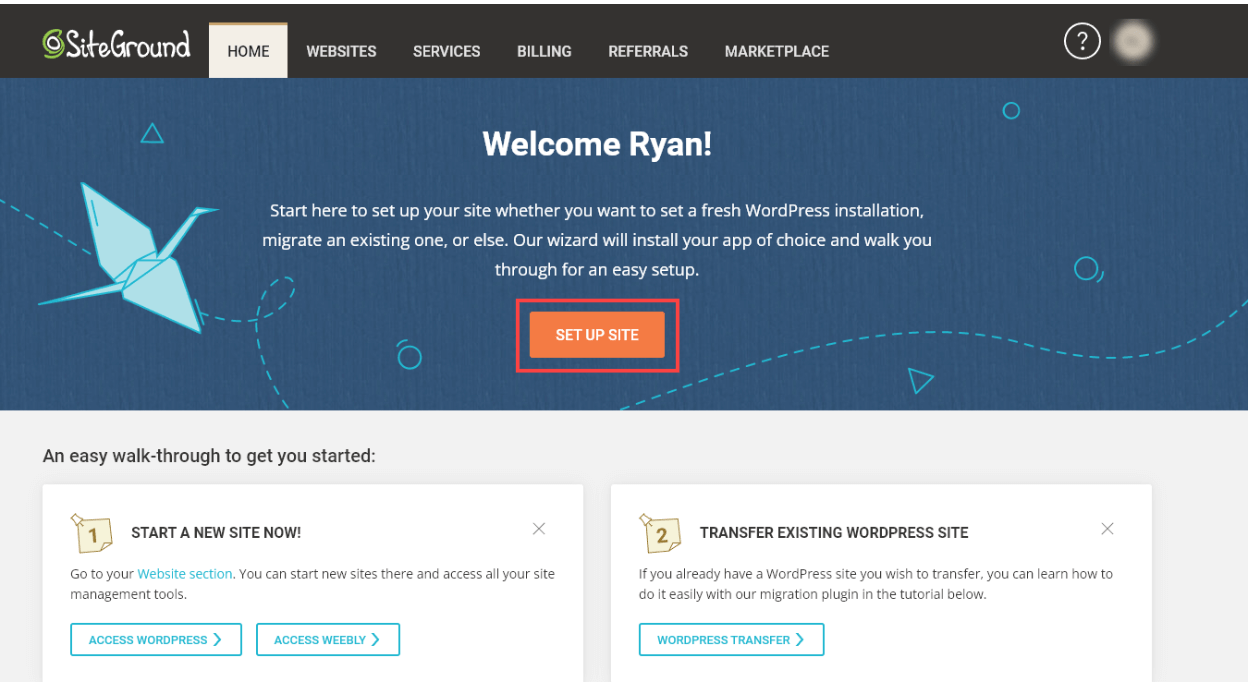
Next, SiteGround will check whether you want to register a new domain, use your existing domain, or use a temporary domain. Just make your selection and then click the “Continue” button at the bottom of the screen.
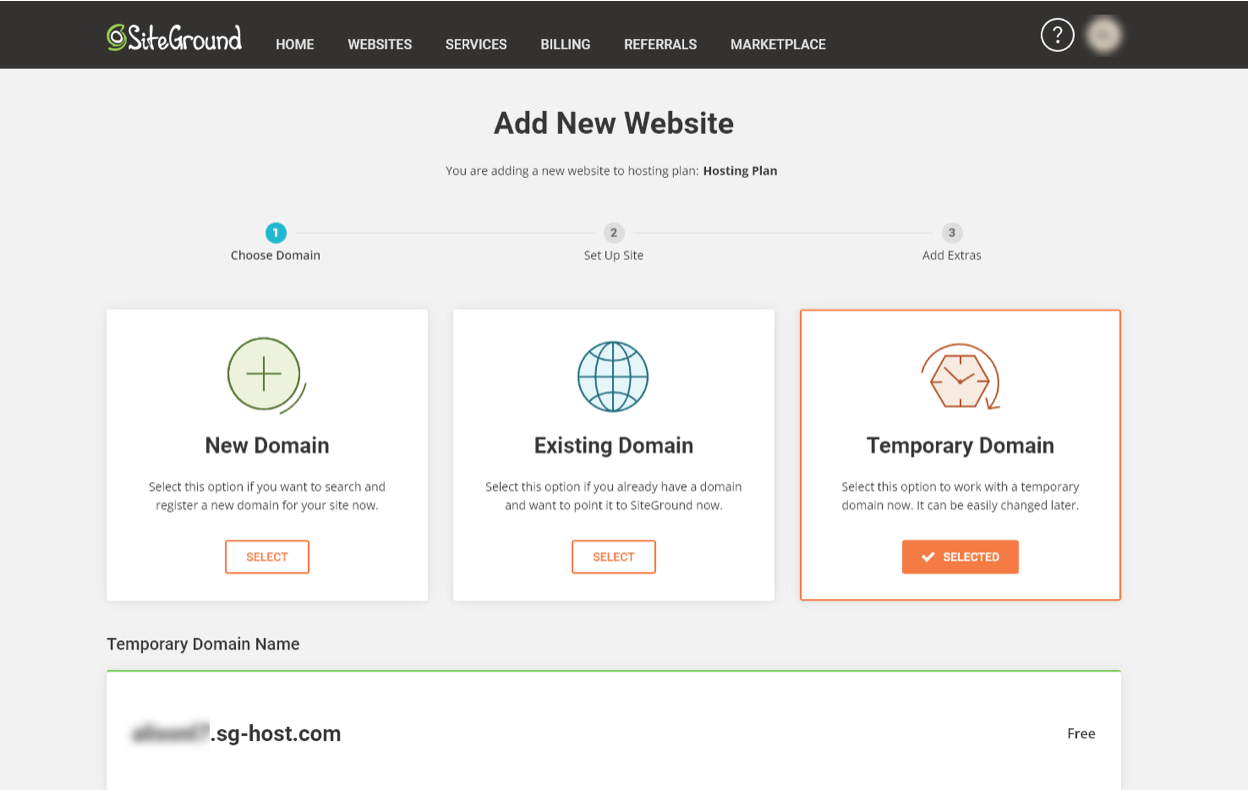
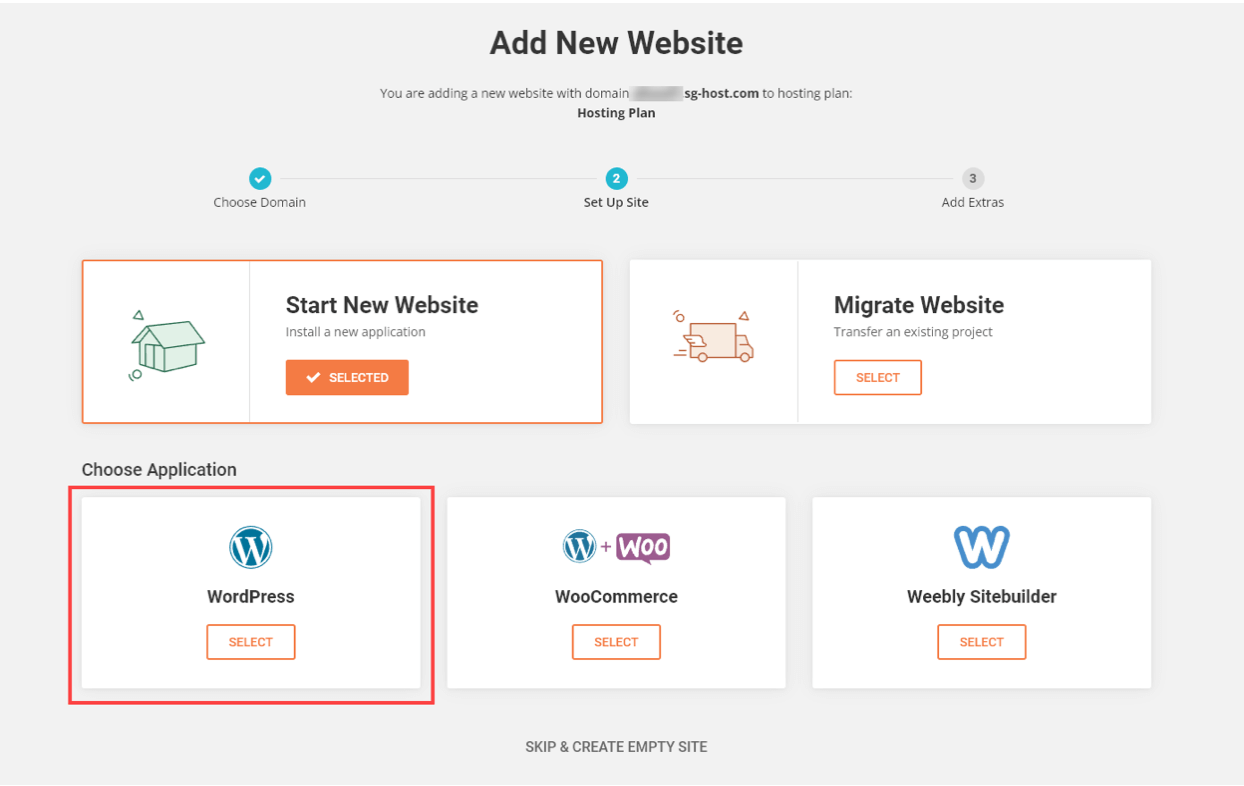
The next step may look a little technical, but don’t worry. First, you need to select the “Start New Website” option, which will bring up three more options below. From these, just select the “WordPress” option.
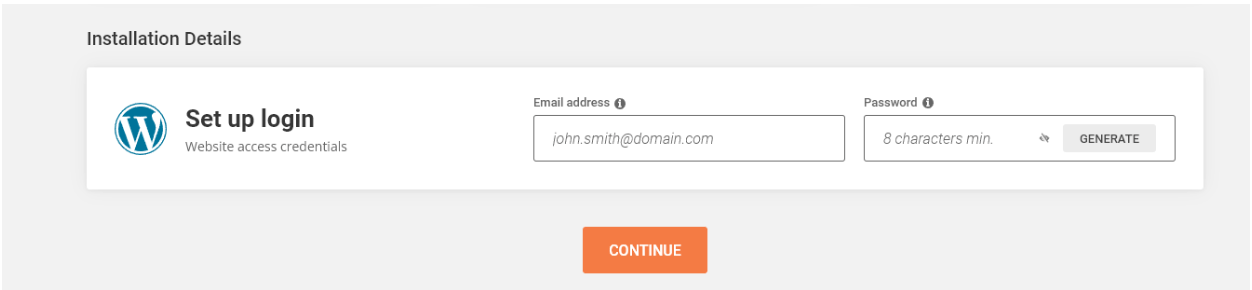
After that, just enter your email address, plus the password that you want to use for your WordPress account. When you’re done, go ahead and click the “Continue” button at the bottom of the screen.
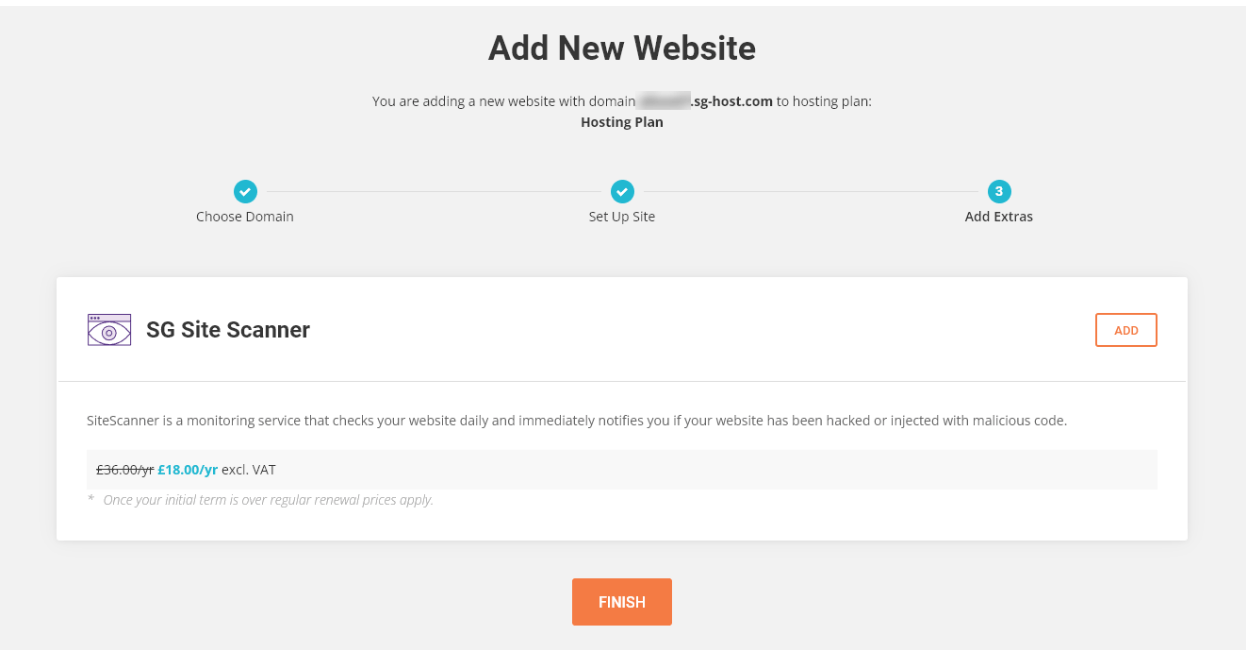
On the next screen, SiteGround will offer you the chance to purchase SG Site Scanner (if you didn’t do so when you initially signed up).
You can add this if you want or leave it off. Just click “Finish” once you’ve decided.
Tip: If you aren’t using SG Site Scanner, I strongly recommend using a WordPress security plugin such as Sucuri on your website.
SiteGround will now create your WordPress site, which could take up to 2 minutes.
Once this process is complete, WordPress is now fully installed on your website. You’ll see a message saying “You Are All Set!” and some new options. Just click the “Log In Admin” button to go straight to your WordPress admin area.
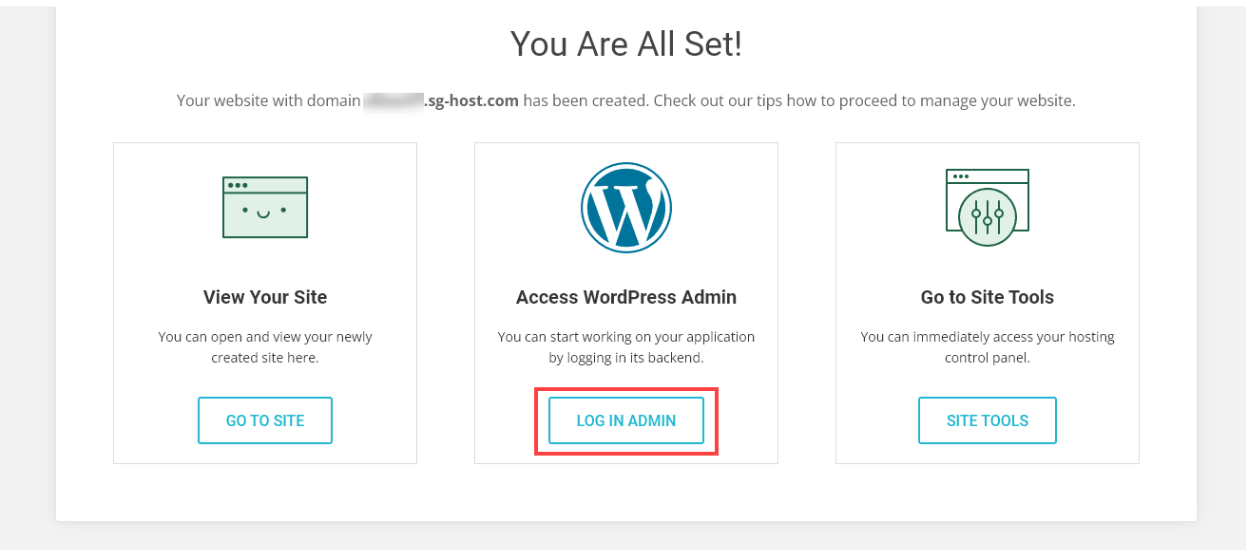
Tip: If you have any difficulties using the automatic login link, you can go to www.yoursitename.com/wp-admin to log in with the email address and password that you set up as your WordPress login.
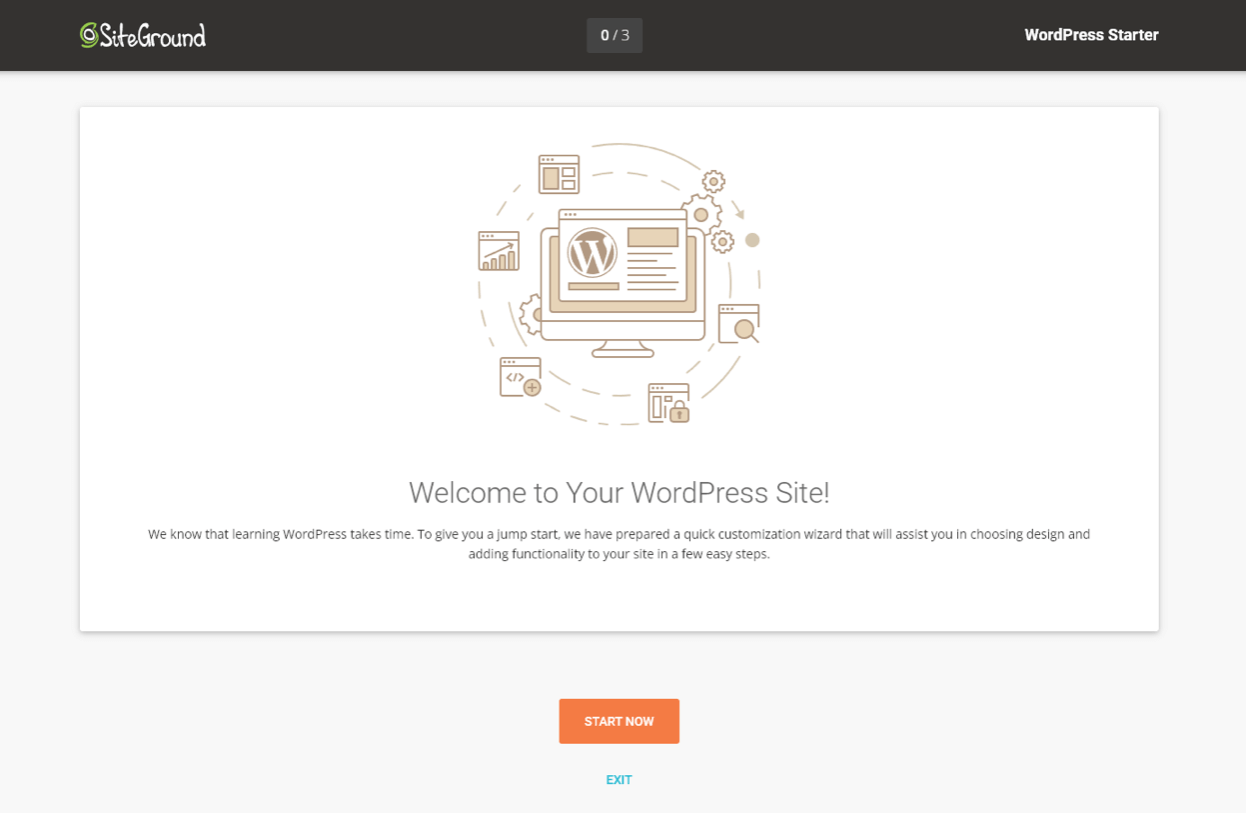
After logging in to your WordPress site, you should see a welcome message. SiteGround will take you through some different steps to get you started quickly.
It only takes a couple of minutes. Just click the “Start Now” button to begin.
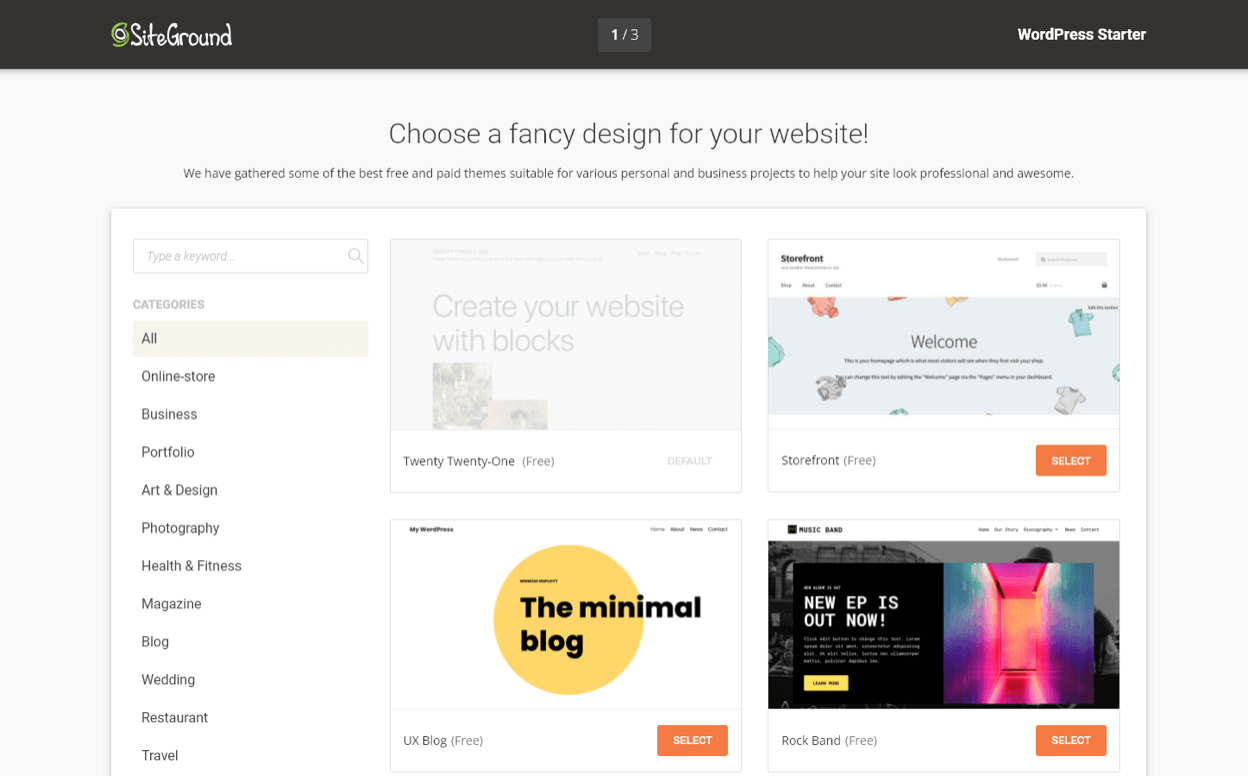
Next, SiteGround will prompt you to choose a WordPress theme for your site.
Don’t worry if you don’t like any of them or if you aren’t sure — you can easily change this later. Just click “Select” below any theme to choose it and move on.
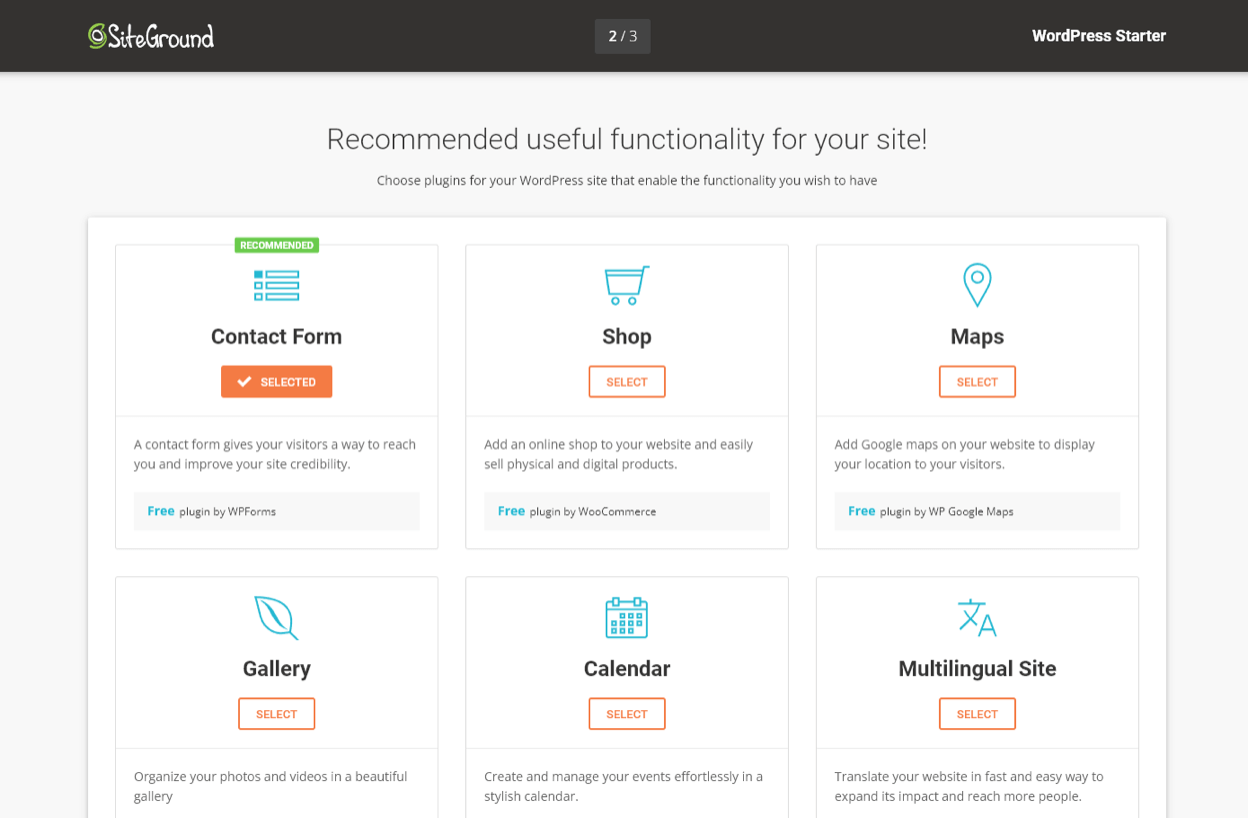
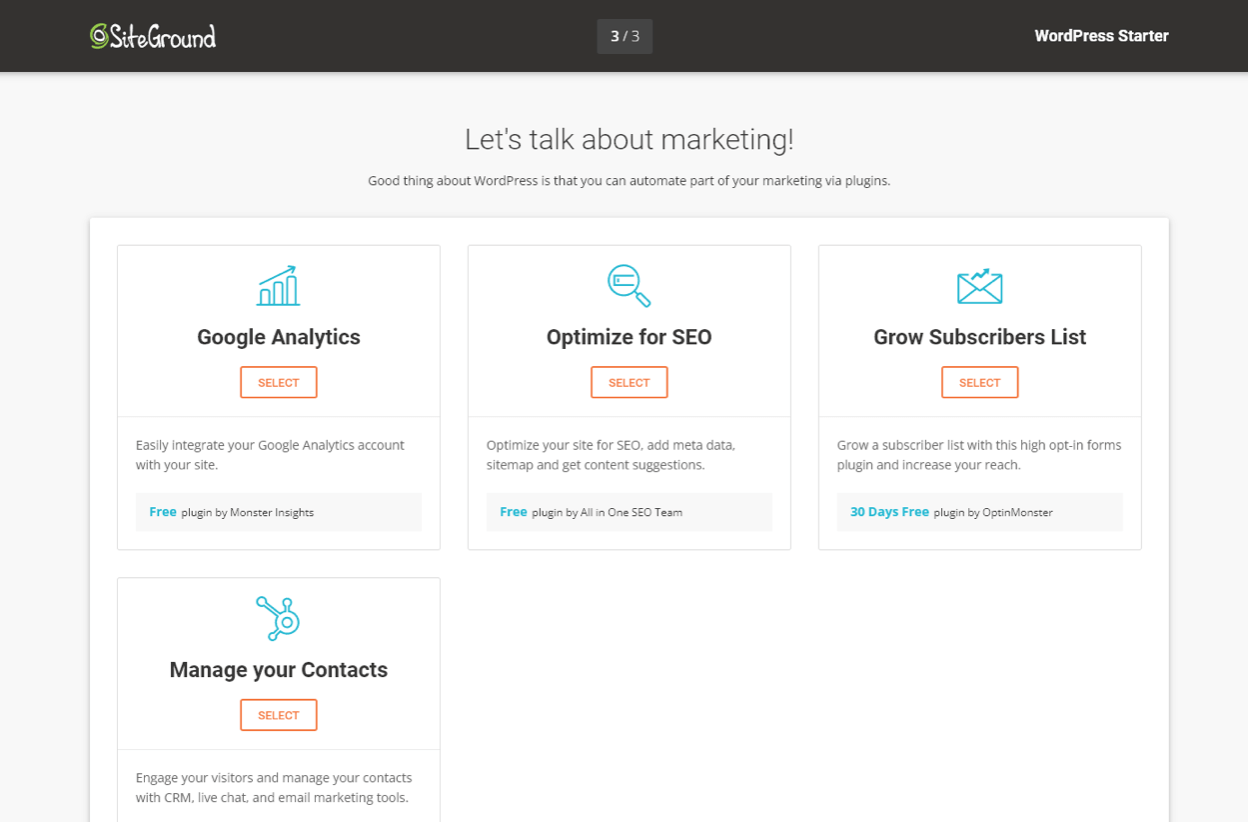
Then, SiteGround will recommend some features you might want to add to your site. These are WordPress plugins that add extra functionality.
The contact form is selected by default. You can add as many or as few as you want.
Don’t worry if you’re not sure — you can easily add (and remove) plugins at any time from your WordPress admin area.
Just click “Continue” at the bottom of the page when you’re done.
In the final step, SiteGround will offer you some plugins that help with getting more visitors, leads, and customers on your website.
You can select as many or as few as you like. Just click the “Complete” button at the bottom of the page once you’re done.
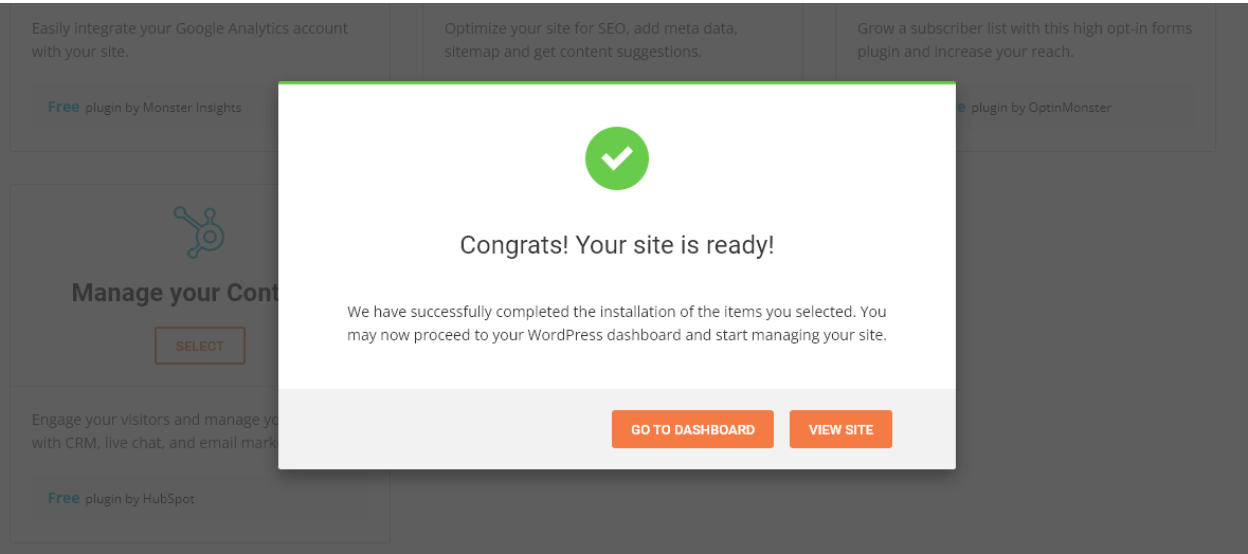
Now, you’ll see a message letting you know that your chosen plugins and theme are being installed. After a minute or two, SiteGround will tell you that your site is ready.
You can click the “Go to Dashboard” button to go straight to your WordPress dashboard.
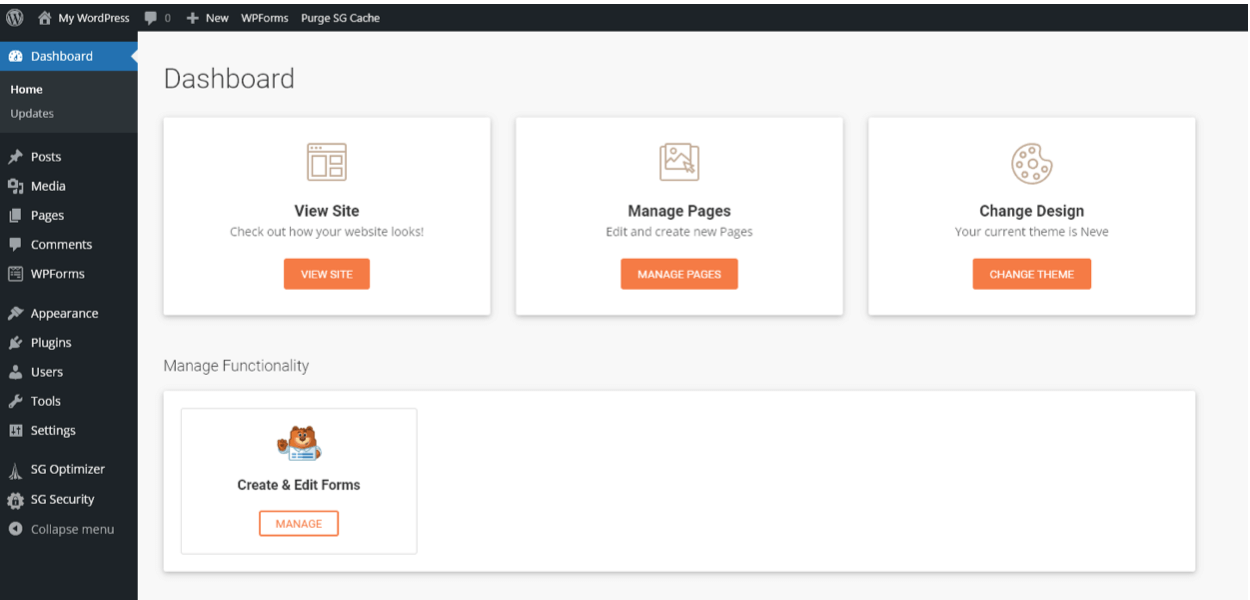
Your Dashboard is like the homepage of your WordPress admin area. This is where you can add pages, change your site’s theme, add plugins, and lots more. SiteGround has included some handy links for you.
Have fun exploring these — and use the links down the left-hand side to see what you can do with WordPress, like creating blog posts.
How to Install WordPress Manually (via FTP — the “5-Minute Install”)
If your web host doesn’t offer a one-click installer (or you simply want full control over the process), you can install WordPress manually. WordPress famously calls this the “5-minute install” — and once you’ve done it once, it really is quick. Here’s the process:
- Download WordPress. Go to WordPress.org/download and download the latest version (a .zip file). Unzip it on your computer.
- Create a database. In your web host’s control panel (usually cPanel), find “MySQL Databases.” Create a new database and a database user, then add that user to the database with all privileges. Write down the database name, username, and password — you’ll need them in a moment.
- Upload WordPress via FTP. Using a free FTP client like FileZilla (or your host’s built-in File Manager), upload all the unzipped WordPress files to your site’s root directory (usually
public_htmlorwww). - Run the install script. Visit your domain in a browser (e.g.,
yourdomain.com). WordPress will detect that it’s not yet configured and walk you through a setup wizard. Enter your database name, username, and password when prompted. - Set up your admin account. WordPress will ask for a site title, admin username, password, and email. Choose a strong, unique admin username (NOT “admin”) and a long password. Click “Install WordPress.”
- Log in. Head to
yourdomain.com/wp-adminand log in with the credentials you just created. You’re live.
For developers: If you’re comfortable with the command line, you can install WordPress even faster using WP-CLI (the WordPress command-line interface). A few commands — wp core download, wp config create, wp core install — will set up a complete WordPress site in under a minute. WP-CLI is the go-to method for managing multiple sites, scripting installs, and working on servers without a graphical control panel.
How to Install WordPress Locally (on Your Own Computer)
Sometimes you want to install WordPress on your own computer rather than on a live web host — for example, to learn WordPress without paying for hosting, to build and test a site privately before launching it, or to develop themes and plugins. This is called a “local” install, and it’s completely free.
The easiest tool for a local WordPress install in 2026 is LocalWP (formerly “Local by Flywheel”). It’s free, available for Mac, Windows, and Linux, and sets up a complete local WordPress environment with one click — no manual database or server configuration required. Here’s the gist:
- Download and install LocalWP (free).
- Click “Create a new site,” give it a name, and accept the default settings (LocalWP handles PHP, MySQL, and the web server for you).
- Set an admin username and password, then click through to finish. LocalWP spins up a fully working WordPress site on your computer in about 30 seconds.
- Click “WP Admin” to log in and start building. When you’re ready to go live, LocalWP can push your site to a host (or you can migrate it manually).
Other popular local-install tools include MAMP (Mac/Windows), XAMPP (cross-platform), and DevKinsta (free, from the host Kinsta). These give you more manual control but require a few extra setup steps (creating a database, downloading WordPress, and configuring the server) compared to LocalWP’s one-click approach. For most people who just want to learn or test WordPress locally, LocalWP is the simplest starting point.
Important: A local WordPress install is only visible on your own computer — the public can’t see it. It’s perfect for learning and development, but when you’re ready to launch a real site, you’ll still need web hosting (covered above) to make it accessible to the world.
WordPress Set Up: Getting the Most Out of Your WordPress Blog
As I mentioned above, I recommend Bluehost or Dreamhost as great web hosts when you’re creating your first blog or website.
SiteGround, HostGator, and Hostinger are all strong contenders too. Hostinger in particular has become one of the most popular budget hosts in 2026 — its hPanel control panel includes a one-click WordPress installer (plus an AI website builder) and plans start around $2.99/month. Basically, you can’t go wrong with any of these!
For super-easy WordPress installation, Dreamhost is my top pick. Being able to check the box to install WordPress at the point at which you create your account makes it really fast and hassle-free.
In general, when setting up WordPress, I recommend:
- Set aside 20 minutes when you won’t be interrupted. While you will often only need 5 or 10 minutes to install WordPress, you want to allow some extra time if this is your first website. Getting distracted partway is very unlikely to lead to any disasters, but it could mean that you’ll miss an option that could have been helpful to you.
- Take things one step at a time. If you get stuck or confused, check the instructions again in this article. If you’re not sure whether or not you want a particular option, it’s usually best to leave it unchecked — you can always add extra plugins, themes, and more to WordPress later, and you can always pay for extra features from your web host at a later stage.
- Keep in mind that installing WordPress is just one step in creating your WordPress site. You’ll also want to choose a theme for your website, create key pages like your About Me page, and so on. I’ve covered these next steps briefly below, with plenty of links to more information.
What to Do After Installing WordPress on a Self-Hosted Website
Tip: Not sure how to login to your WordPress admin area or lost the link? In almost all cases, you can add /wp-admin to your website domain name to find it. That will look something like www.yourwebsitename.com/wp-admin
You might want to bookmark that link in your web browser so you can easily find it again.
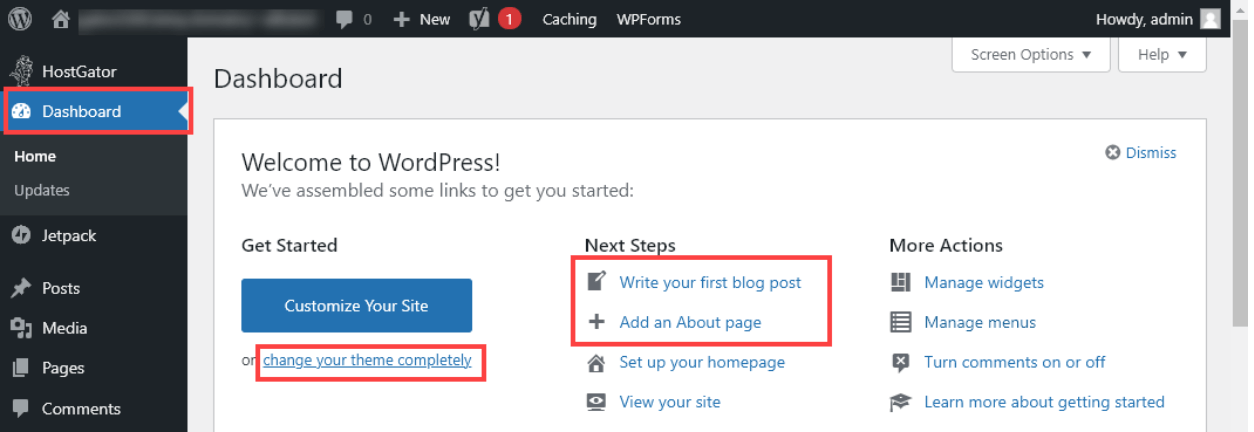
After you’ve installed WordPress, you can customize your site as much as you like. When you’re new to WordPress, just figuring out where to start can feel a little overwhelming.
To get started, you could:
1. Choose a theme for your website.
To do so, click the “change your theme completely” link in the Welcome to WordPress section of your
WordPress dashboard. WordPress themes are like templates or layouts for your site: they control things like the colors, fonts, and placement of elements like the menu bar.
Switching to a different theme doesn’t change your actual content (you won’t lose any of your posts and pages) — it just changes how things look. You can find my list of the best WordPress themes here.
2. Create an “About Me” page for your website.
To create your “About Me” page, just click the “Add an About page” link in the Welcome to WordPress section.
Your About Me page lets people know what your blog or website is all about — and what you can do for them.
Don’t worry if you’re not 100% sure what you want to write yet — you can update your About Me page whenever you want.
3. Write your first blog post.
To create it, simply click the “Write your first blog post” link in the Welcome to WordPress section. Not sure what to write about? Check out my list of over 200+ blog post ideas to get started with some inspiration today.
Here’s where to find all those links:
If you’ve closed the WordPress welcome message or you can’t find it, you can also access everything in the links down the left-hand side. Go to:
- Appearance → Themes to change your theme
- Posts → Add New to write a blog post
- Pages → Add New to create an About page
Most of All, Have Fun with WordPress
If you make a mistake, like switching to a theme you don’t like, you can simply switch things back. If you get really stuck, contact your web host support team and they should be able to give you a hand.
One of the best things about self-hosted WordPress is that you can add lots of extra features and functionality. You’re not limited to just the built-in tools that come with WordPress itself.
These extra features are added through “plugins” — many of which are free, or at least have a limited free version.
Plugins can do a huge range of things, from simple tasks (like adding a contact form to your site) to much more complex ones (like turning your website into a fully functioning online store).
You might want to take a look at my list of the best WordPress plugins for your blog to get a sense of all the possibilities out there.
Installing WordPress: Frequently Asked Questions
What is the easiest way to install WordPress?
What is the easiest way to install WordPress?
The easiest way is the one-click installer built into most web hosts — including Bluehost, Dreamhost, HostGator, SiteGround, and Hostinger. After you sign up for hosting and choose a domain, you click one button and the host installs WordPress for you in a couple of minutes. For 95% of people building a real website, this is the recommended approach — no FTP, no databases, no command line required.
How do I install WordPress manually?
How do I install WordPress manually?
The manual install (WordPress’s famous “5-minute install”) involves six steps: (1) download WordPress from WordPress.org, (2) create a MySQL database and user in your host’s control panel, (3) upload the WordPress files via FTP (e.g., FileZilla) to your site’s root directory, (4) visit your domain to run the setup wizard, (5) enter your database details and create an admin account, and (6) log in at yourdomain.com/wp-admin. Developers can do this even faster with WP-CLI. See the full step-by-step in the manual install section above.
How do I install WordPress locally on my computer?
How do I install WordPress locally on my computer?
The easiest way to install WordPress locally in 2026 is LocalWP (free, for Mac/Windows/Linux). Download it, click “Create a new site,” accept the defaults, set an admin username/password, and LocalWP builds a complete WordPress environment on your computer in about 30 seconds. Alternatives include MAMP, XAMPP, and DevKinsta. A local install is only visible on your own machine — great for learning, testing, and development, but you’ll still need web hosting to put a real site online.
Is WordPress free to install?
Is WordPress free to install?
Yes — the WordPress software itself (from WordPress.org) is 100% free and open-source. What you pay for is the web hosting and domain name needed to make your site accessible online — typically $2.99-$15/month for hosting plus around $10-15/year for a domain. A local install on your own computer is completely free (no hosting needed), but it’s only visible to you.
How long does it take to install WordPress?
How long does it take to install WordPress?
A one-click host install takes about 2-5 minutes (most of which is just clicking through the host’s setup screens). A manual FTP install takes about 5-15 minutes the first time, faster once you’ve done it before. A local install with LocalWP takes around 1-2 minutes. WP-CLI can install WordPress in under a minute for developers comfortable with the command line.
What do I need before installing WordPress?
What do I need before installing WordPress?
For a live site: a web hosting account and a domain name (both of which most hosts bundle together when you sign up). For a manual install, you also need an FTP client (like FileZilla) and the ability to create a MySQL database. For a local install, you just need the free LocalWP app and a computer. That’s it — WordPress has very modest requirements, and modern hosts handle the technical server setup (PHP, MySQL) automatically.
What’s the difference between WordPress.org and WordPress.com?
What’s the difference between WordPress.org and WordPress.com?
This guide covers self-hosted WordPress, which uses the free software from WordPress.org installed on your own web hosting — giving you full control, unlimited plugins, and complete freedom to monetize. WordPress.com is a commercial hosted service (run by Automattic) that handles hosting for you but limits flexibility on lower tiers. For a serious blog or business site you want to own and monetize, self-hosted WordPress.org is the recommended choice — and it’s what every install method in this guide sets up.
Installing WordPress Isn’t Hard… So Try it Today
Installing WordPress is a lot easier than you might think. Big web hosting companies like Bluehost, Dreamhost, SiteGround, and HostGator all make it straightforward for you.
The key is to take everything step by step, working through the web hosting account creation and WordPress installation process at your own pace. You should find it really easy if you follow the steps and instructions above.
Once you’ve installed WordPress, you’re well on your way with your blogging (or website-owning) journey.
For more help getting going, including tips on writing your first post, promoting your blog, getting readers, and making money, check out my detailed guide to starting a blog.
Ready to Start Your Blog?
Check out my ultimate guide: How to Start a Blog (on the Side) Today.
Hi Ryan,
It was a great share! Although, not many people are self-hosting their website in my group. I was thinking about it for a while. I gained a lot of valuable insights from this article that will definitely help me during the process. I did know about the process, but I wasn’t aware of a couple of things. Your article helped me learn more, and cleared a few doubts that I had. Thanks a lot for sharing such an insightful resource, I am sure it will help a lot of people like myself.
That’s awesome to hear, thanks John! 🙏
Hello Ryan! I’ve been visiting your site for weeks and finally decided to dive in and set up a blog today following the guide as I did so. However the point where it asks you to have limitless customization or not, I never saw such a screen. It went right into having WordPress listed on my homepage and the options are quite limited. Is there a way. I can add .org at this point? I tried searching for it in the search for sites to add section of my homepage but nothing was coming up for Wordpress.org. Is there a way I can download it still? Thanks!
Excellent article! Thanks for on the steps in how to install wordpress.