
Whether you want to make your content easily navigable for readers, or you’re hoping to boost your SEO rankings, learning how to create a WordPress table of contents menu (also called a clickable menu) near the top of your blog posts, can help both causes in a big way.
For the better part of a decade now, I’ve been making my own custom clickable WordPress table of contents menus near the top of just about every post on my blog. In this guide I’m going to show you exactly how to make them too.
The best part? There’s no need to download any plugins, customize your WordPress theme or learn to write complicated code.
I’ll show you how to make a beautiful WordPress table of contents menu (with both Gutenberg and the Classic editor) by using a very simple HTML anchor link tag. Without further delay, let’s dive in.
How to Create a WordPress Table of Contents Clickable Menu (No Plugin): Gutenberg and Classic Editor Tutorials
- Creating a Table of Contents in the WordPress Classic Editor
- Making a Clickable Table of Contents in Gutenberg
Disclosure: Please note that some of the links below are affiliate links and at no additional cost to you, I’ll earn a commission. Know that I only recommend products and services I’ve personally used and stand behind. When you use one of my affiliate links, the company compensates me, which helps me run this blog and keep my in-depth content free of charge for readers (like you).
Ready to Start Your Blog?
Check out my ultimate guide: How to Start a Blog (on the Side) Today.
Now if you’re anything like me and you’d prefer watching a quick video tutorial on making a WordPress table of contents (without using a plugin), your wish is my command.
Video Tutorial: How to Make a WordPress Table of Contents (Clickable Menu)—No Plugin
You can watch right here:
First, let’s get started with walking through how to make a WordPress table of contents menu in the Classic editor.
1. Creating a Table of Contents in the WordPress Classic Editor (No Plugin)

Call me old school, but I’m still a fan of using the Classic WordPress editor on some of my blogs.
While Gutenberg has definitely gotten much more user-friendly in recent years, I’ve built a lot of customizations into this blog (with the Classic editor) that’ll require some lifting once I eventually make the switch to Gutenberg. And I know I’m not the only one out there, still hanging on!
For now, let’s start with walking through creating a WordPress table of contents menu in the Classic editor.
Step One: Create an Ordered (or Unordered) List
First, you’ll want to start by creating the list (whether ordered or unordered) that you want to make as your table of contents. Like so:
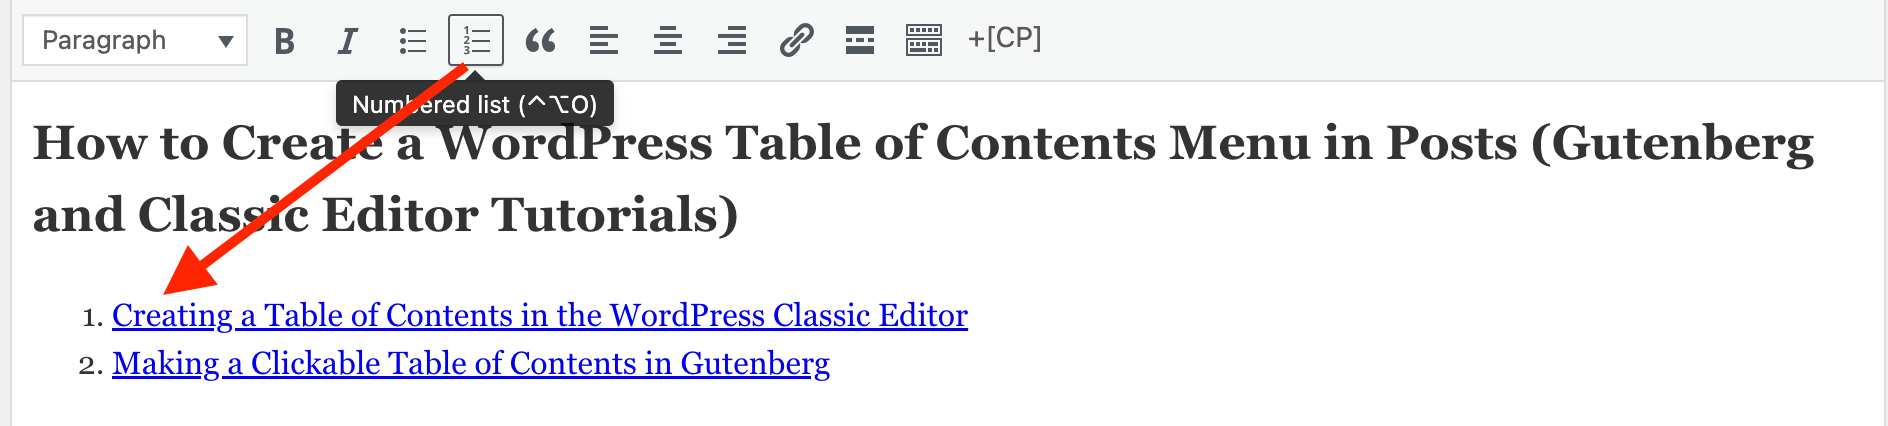
Before we get to hyperlinking your menu items into a functional table of contents, start by typing in the major sections of your article. Ideally, these menu items will correspond to header titles throughout your content (as you can see I’ve done in this guide).
Step Two: Add an HTML Anchor Tag (Hyperlink)
Once you’ve completed the text portion of your table of contents menu, it’s time to hyperlink each item.
We’ll be doing that by adding what’s called an HTML anchor tag—a very simple hyperlink format that’s especially SEO-friendly. Here’s what that tag looks like:

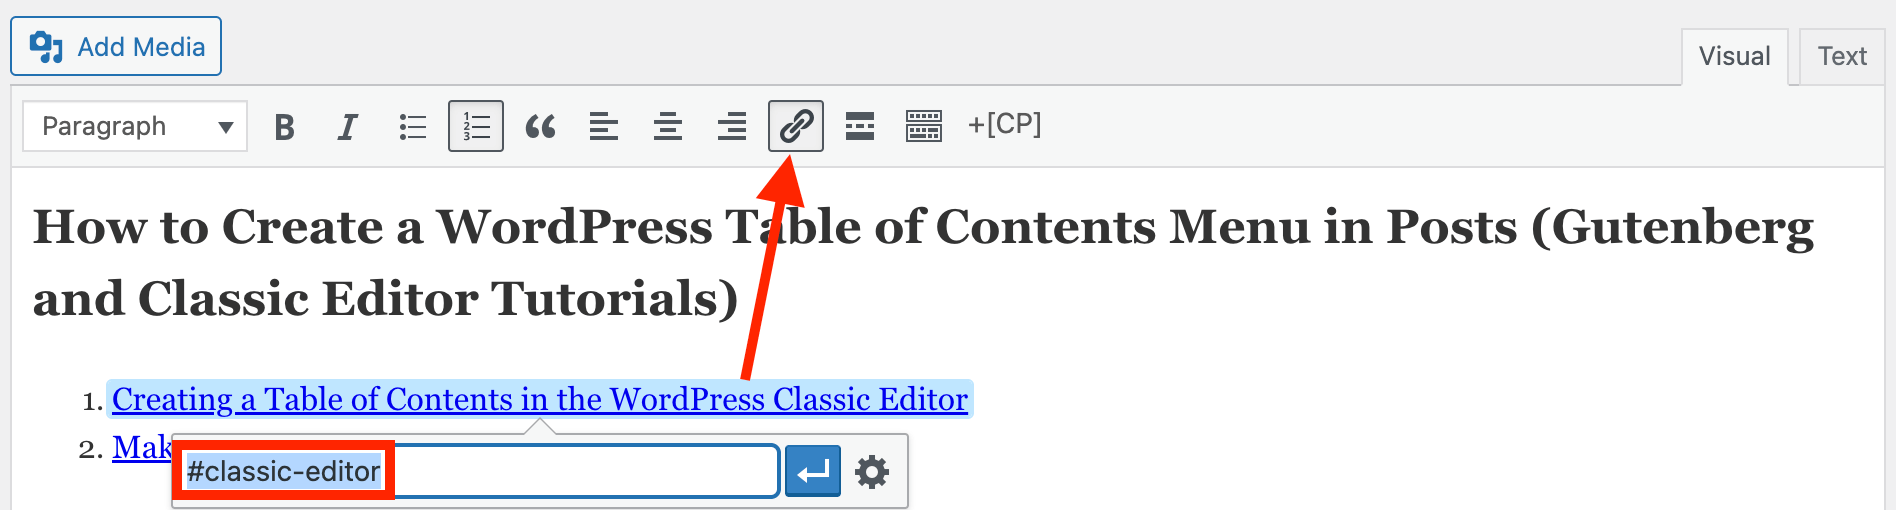
Begin by switching over to Text Mode if you’re comfortable and want to see the full picture of what you’re adding.
Once you’re in Text Mode, find the first list item in your table of contents that you want to hyperlink (make clickable).
As pictured in the screenshot above, add an <a href="#hyperlink-text-goes-here"> right after the opening tag for the first list item (<li>) in your table of contents. I recommend always using descriptive text here, as it can help boost your blog’s SEO ranking capabilities for this post.
Next, you’ll need to close out your hyperlink by adding a closing a tag (</a>) at the end of the text portion of your first menu item.
Here’s a copy/paste example of what the full HTML code should look like:
<a href="#hyperlink-text-goes-here">Descriptive Display Text Goes Here</a>
You’ll need to add an HTML hyperlink tag to each individual menu item in your table of contents.
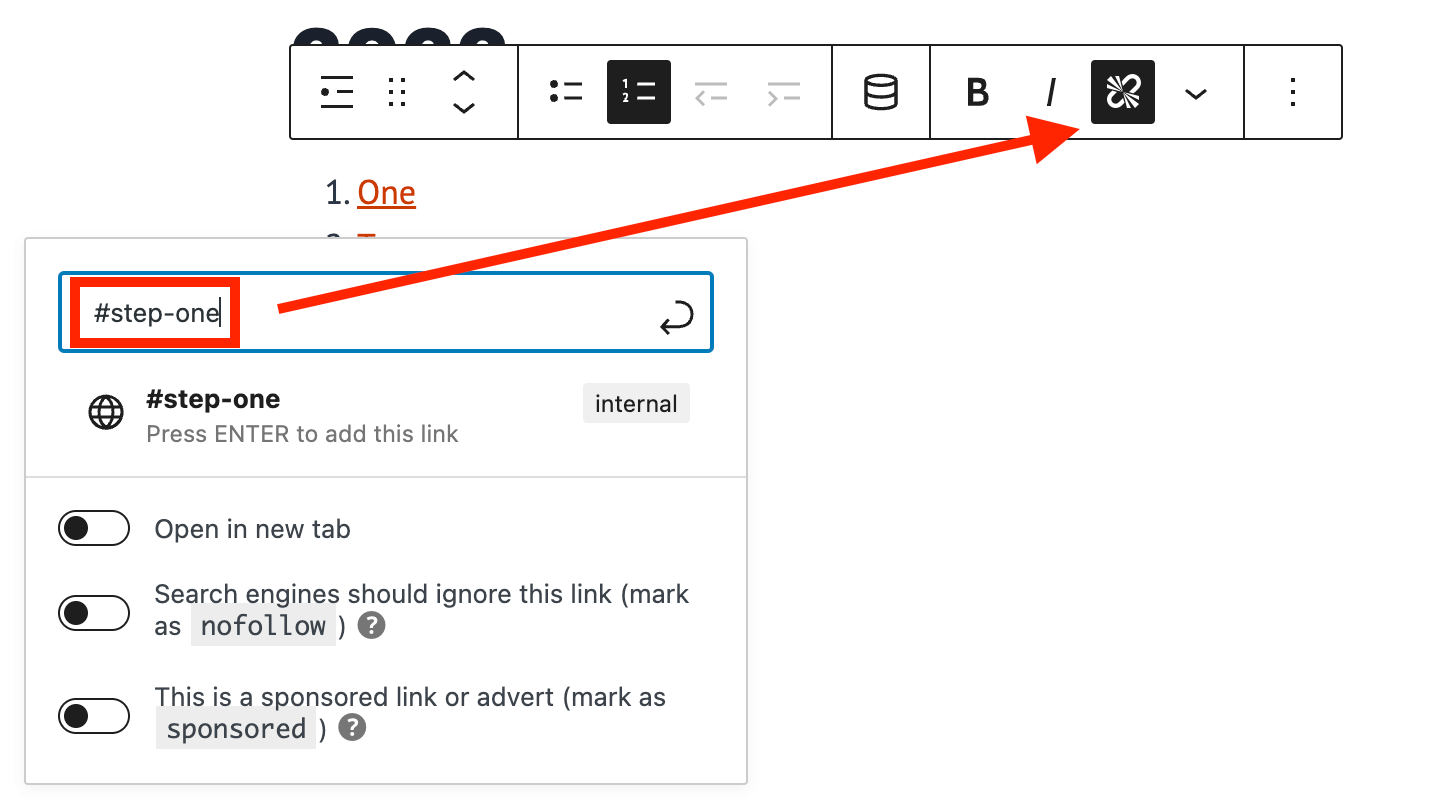
If you want to skip the Text Mode bit and are confident in the functionality of your WordPress theme, you can simply click the Insert/Edit Link button and add the text of your anchor tag in the format of #hyperlink-text like so:
Important: It’s definitely a best practice to use the exact same (descriptive) text in your clickable menu item, as in the corresponding section readers will jump down to when they click.
Whichever method you use to add the HTML anchor tag, you’ve now created the first half of your WordPress table of contents link. In our next step, you’ll add the corresponding tag within your post where you want that clickable link to take a reader.
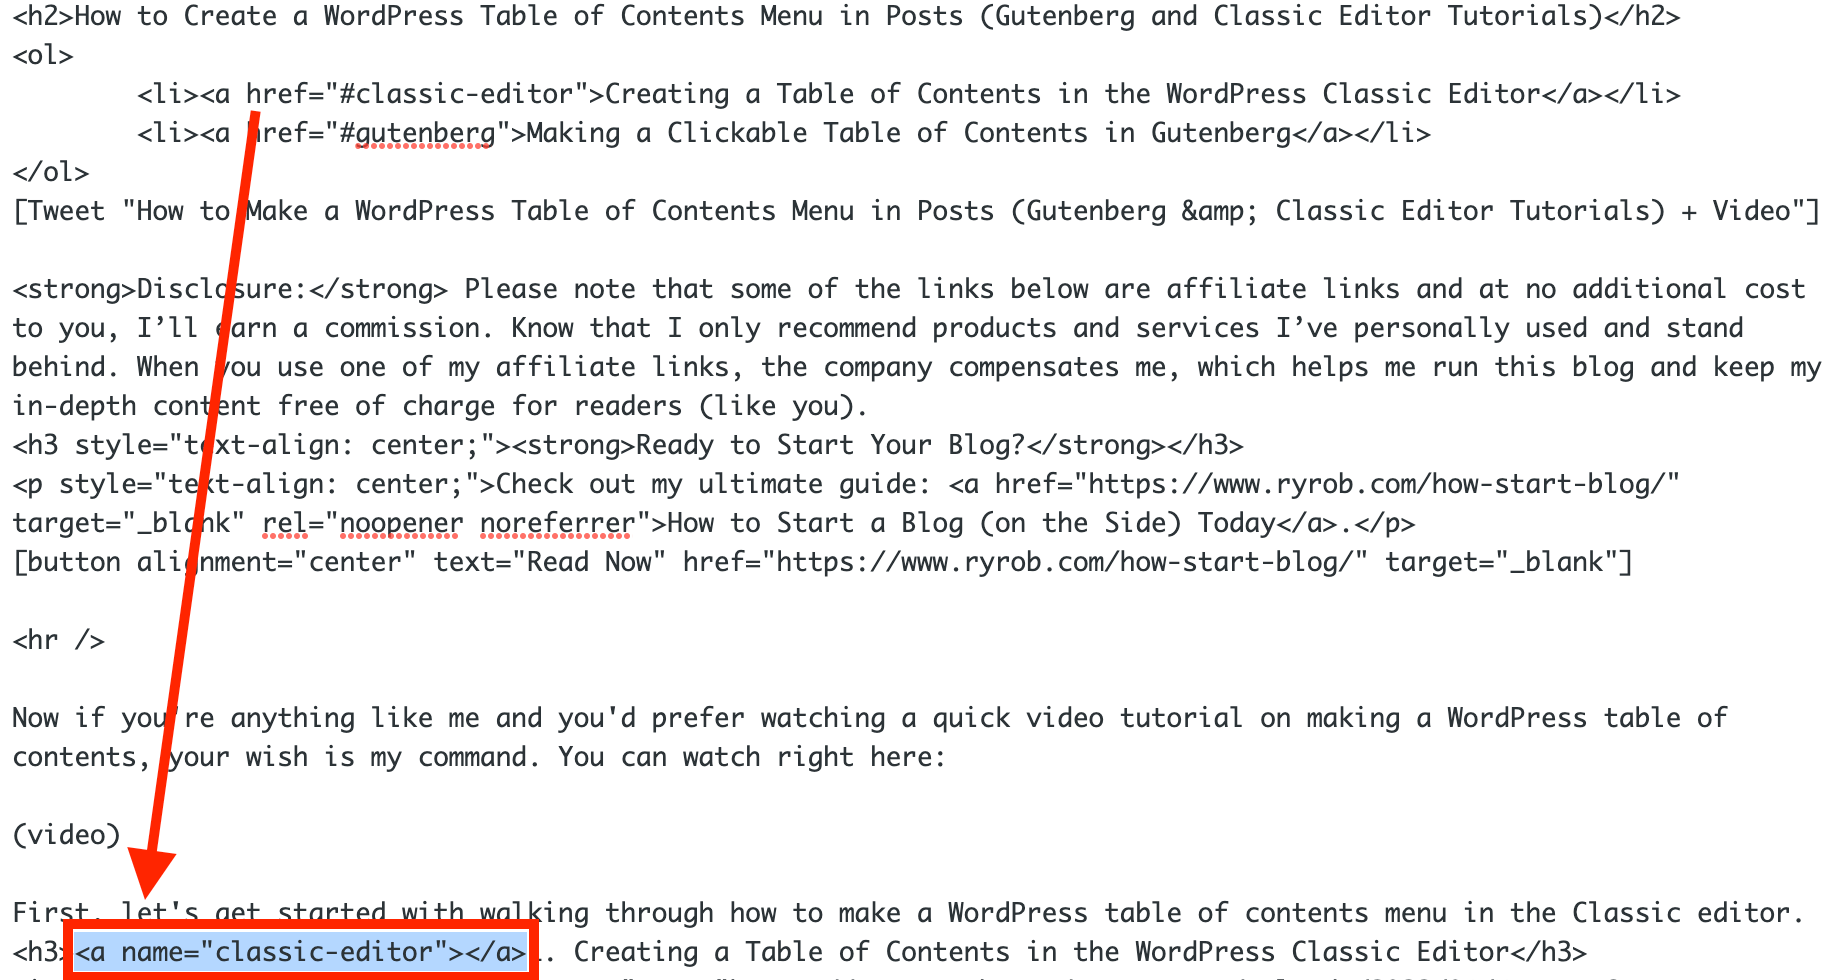
Step Three: Add Your Corresponding Link Tags in the Post
Once you’ve added the anchor tags in your table of contents—making your menu items clickable—it’s time to add a corresponding tag for each of those menu items, so that your readers will land somewhere after clicking on a menu item.
As pictured in the screenshot below, add an <a name="hyperlink-text-goes-here"></a> right after the header tag (and before the text of your header)—where your first list item’s section begins within your post. Since this name tag simply acts as an anchor point for the hyperlinked menu item above, you can close the tag right away as the code snippet above shows.
The text you use inside the (<a name="">) tag must exactly match the contents of the (<a href="#">) tag you’re using in the corresponding item in your table of contents, otherwise the clickable link won’t function.
The portion highlighted in blue in this screenshot is what the full name tag should like:
And with that step, you’ve completed your hyperlinked table of contents menu using simple HTML.
Here’s a copy/paste example of what the full name tag code could look like:
<h3><a name="hyperlink-text-goes-here"></a>Descriptive Display Text Goes Here</h3>
Now for those of you using the Gutenberg editor, let’s walk through the process of making a WordPress table of contents there too.
2. Making a Clickable Table of Contents in Gutenberg (No Plugin)
If you’re using Gutenberg, you’re in luck! The process of making a clickable WordPress table of contents is a bit simpler. And if you’d rather follow along with the video tutorial above, you can watch there.
The first step, regardless of which WordPress editor you’re using is still the same.
Step One: Create an Ordered (or Unordered) List
Start by adding a list block (whether ordered or unordered) that you want to make as your table of contents. Like so:

Be sure to add all of the items you want to include in your table of contents. Next, we’ll add the hyperlinks that turn them into a functional, clickable table of contents.
Step Two: Add Internal Hyperlinks to Each Menu Item
Once you’ve finished the text portion of your table of contents menu, it’s time to add internal hyperlinks to each of them.
We’ll do this in the same way as with the Classic editor, by adding what’s called an HTML anchor tag—a very simple hyperlink format that’s SEO-friendly—the process just looks a little different in Gutenberg. Here’s what adding tag looks like:
To add your hyperlinks within the table of contents, simply click the Insert/Edit Link button and add the text of your anchor tag in the format of #hyperlink-text like so. Don’t forget the # symbol at the beginning, which makes it an internal link.
Next, we’ll add the corresponding name tag to the header element further down in your post, so that readers who click on your table of contents items will have a place to land.
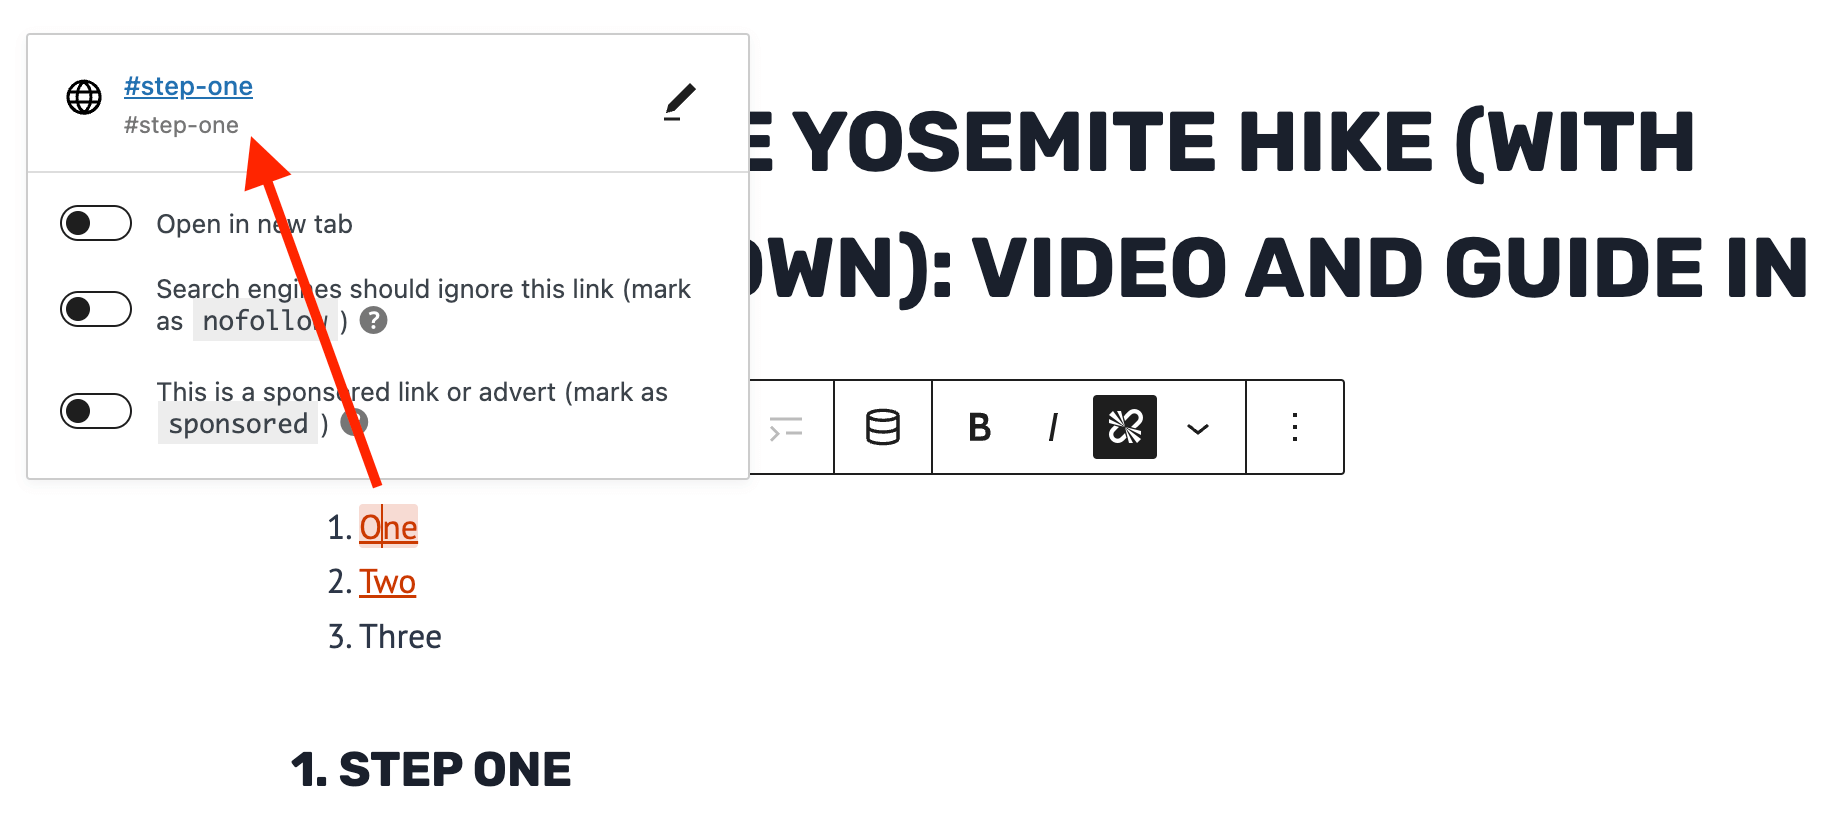
Step Three: Add Your Corresponding Name Tag Link Destinations
Once you’ve added the hyperlinks in your table of contents—making each menu item clickable—it’s time to add a corresponding name tag for each of those menu items, so that your readers will land somewhere after clicking. And thanks to Gutenberg’s block-building focus, this is A LOT easier and faster than with the Classic editor.
To add your corresponding anchor tag, simply…
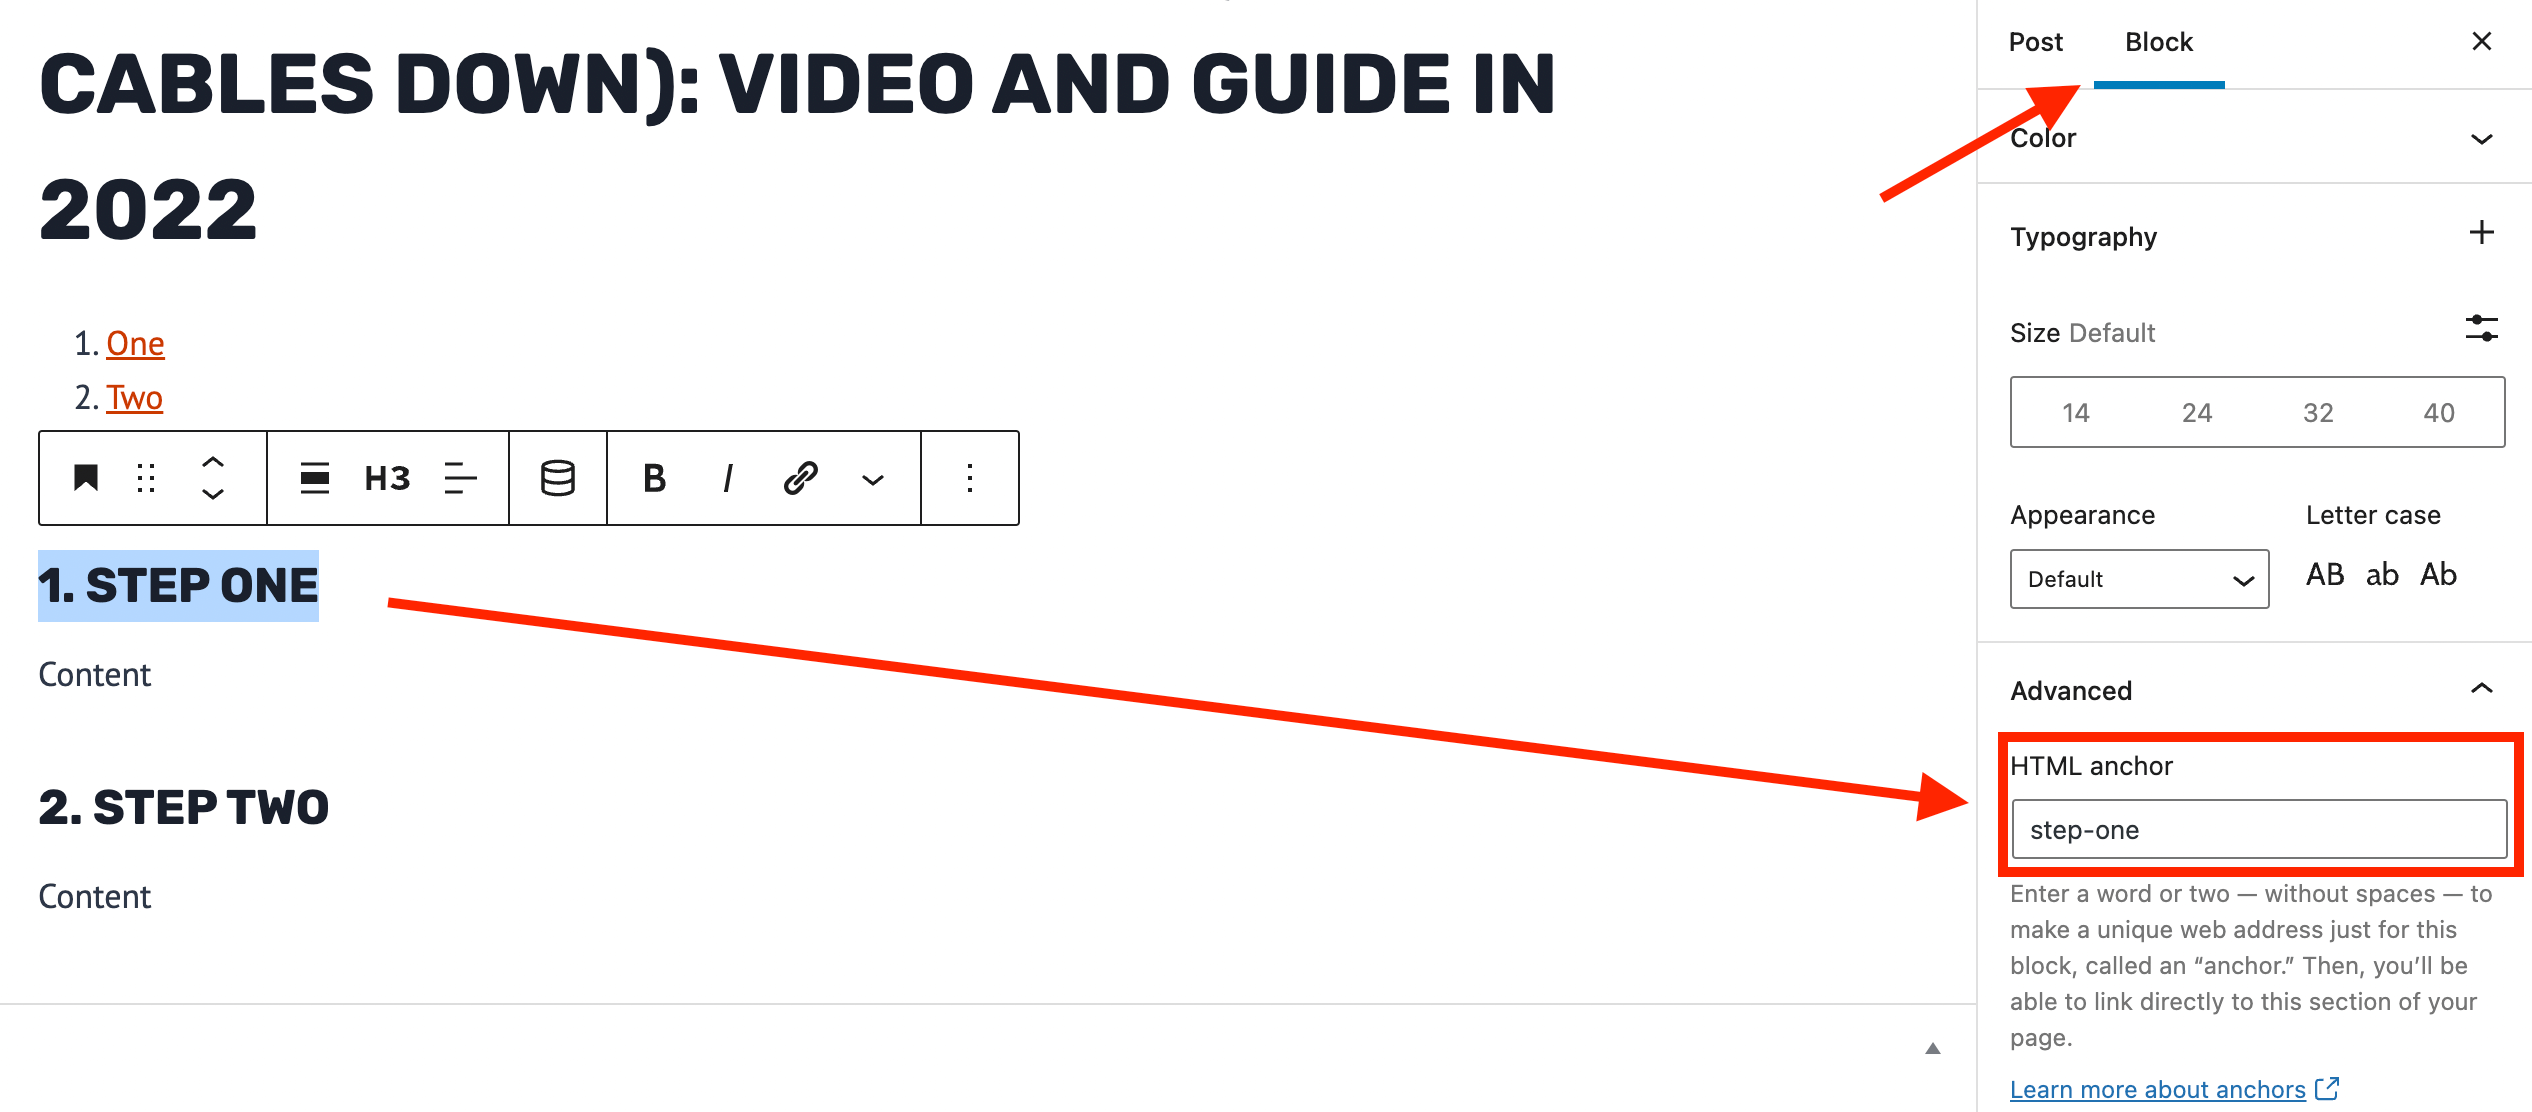
- Select the header block (or whichever text block you’ll be using as the link destination)
- Click on the individual Block settings (over on the righthand sidebar)
- Click on Advanced to open up a dropdown menu with the HTML anchor settings
- Add your matching anchor tag that corresponds to the clickable menu item from your table of contents above
Here’s what that looks like:
As pictured in the screenshot above, this is super straightforward and easy—not actual HTML editing necessary.
While you can of course still take the more manual Edit as HTML approach like we do in the Classic editor, it’s nice not to have to deal with switching back and forth between visual and text mode.
And voilá! You’ve now closed the loop and made a clickable WordPress table of contents menu in Gutenberg. 😊
While there are certainly some WordPress plugins out there (like the premium version of Yoast SEO) that’ll help create a table of contents in your blog posts, I’m always a fan of doing things as simple as possible—and avoiding the use of plugins whenever possible, as they can often slow down your page load speed.
Soon, I’ll create a tutorial on how to make the scrolling table of contents (pictured in my right sidebar on desktop).
Questions About Making a WordPress Table of Contents Menu?
Hit reply in the comments section below and ask away!
I’m happy to help troubleshoot any issues you’re having.
Useful! I love using the Yoast SEO table of contents too with Gutenberg.
Oh good call! I’ll have to add that in 😉
Hi Ryan, I am visually impaired and I am putting a Bass Guitar blog together and now, thanks to you, I have learned about the table of contents and what it is good for. I do the classic editor because it is so much simpler for me and my knowledge of HTML is really good. I honestly thank you for this information and I am checking out your blog to find more and more tips that I need and so far, everything I have found has been terrific!! So please, keep teaching those like myself because it really works! Take care and may God Bless!!
Ah, thank you so much for the kind words Chris! That’s really great to hear and I’m super happy this breakdown was able to make the table of contents setup click for you. Wishing you luck with your blog and please reach out anytime you have a question I can help with! 🙏
I can write about psychology English and Islamic studies
🙌
Ryan, such an easy and super clear tutorial.
Did you ever write the blog post about how to create the scrolling table of contents like you alluded to at the end of this post?
That’s a great question! I haven’t written about that one yet, because it’s a custom-built solution over here. I’ll talk with my friend/developer and see if he can make it a free plugin soon 🙂
Very useful guide and easy to follow, thanks for making this!
I didn’t understand why you were able to see the Visual and Text menus on the top of the page, but I understand why you kept repeating WordPress Classic editor, I got it now.
But I want to know, don’t know if you are explaining later but, how do you put the content information in the middle of the page? All my content its on the left side, but I see that content from different sites is in the middle of the page, and I want to do that too.
Thanks
That depends on your theme’s design and settings. Many are set up in essentially a three-column format, with a sidebar area to the left (whether or not there’s any actual sidebar content there). It sounds like yours either doesn’t have that, or it has multiple layouts and you’re set to the one that doesn’t.
Great post! Thank you for the visuals and simple how-to’s.